
Instructions / Assembly


ASSEMBLY INSTRUCTIONS
10
Inspect the STAMINA® Oval Jogger before each use and replace any worn, defective, or missing parts.
The following conditions could represent potential hazards:
CARE AND MAINTENANCE
1. Missing, improperly positioned, or insecurely attached frame padding.
2. Punctures, frays, tears, or holes in the bed, elastic bands, or frame padding.
3. Inspect the resistance tubes for nicks and cuts. Replace damaged resistance tubes.
4. Deterioration in the stitching or fabric of the bed or frame padding.
5. Ruptured or damaged elastic bands.
6. A bent or broken frame.
7. A sagging bed.
8. Sharp protrusions on the frame or suspension system.
1. Adequate overhead clearance is essential. When using your STAMINA® Oval Jogger, be sure to provide
clearance for ceiling height, ceiling lights, ceiling fans, wires, tree limbs, and other possible hazards.
2. Lateral clearance is essential. Place the trampoline away from walls, structures, fences, play areas,
furniture, and other exercise equipment. Maintain a clear space on all sides of the trampoline.
3. Place the trampoline on a level surface.
4. Use the trampoline in a well lighted area. Articial illumination may be required for indoor or shady areas.
5. Secure the trampoline against unauthorized and unsupervised use.
6. Remove any obstructions from beneath the trampoline.
7. The owner and supervisors of the trampoline are responsible to make all users aware of practices
specied in the use instructions.
INSTALLATION INSTRUCTIONS
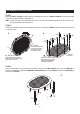
8.
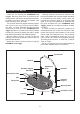
The SAFETY PAD(4) must be securely
attached to the frame before using the
trampoline. It must be properly positioned
as shown in the illustration.
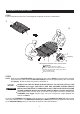
STEP 9: Remove the LEG CAPS(7) from the two LEGS
(5) as shown in illustration 8. Slide the STRAP LOOPS(28)
on the LEGS(5). Press the LEG CAPS(7) back on the
LEGS(5). Hook the RESISTANCE TUBES(26) to the
STRAP LOOPS(28). Hook the HAND GRIPS(27) to the
other ends of the RESISTANCE TUBES(26).
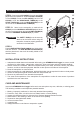
STEP 10: Stand on the trampoline to make all the
LEGS(5) and the HANDRAIL SUPPORTS(16) sit at on
the oor. Install and tighten all four LOCKING KNOBS(19)
to lock the HANDRAIL SUPPORTS(16) in position.
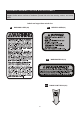
STEP 11
Post the USE INSTRUCTIONS SIGN(32) in a highly visible
and safe location. The USE INSTRUCTIONS SIGN(32)
shall be placed such that it will be readily visible to the
intended viewer.
!
WARNING