
User Manual


Page 13GX1600
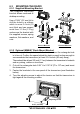
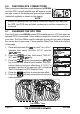
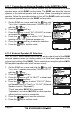
6.3 MOUNTING THE RADIO
6.3.1 Supplied Mounting Bracket
The supplied mounting
bracket allows overhead or
desktop mounting.
Use a 13/64” (5.2 mm) bit to
drill the holes to a surface
which is more 0.4 inch (10
mm) thick and can support
more than 3.3 lbs (1.5 kg)
and secure the bracket with
the supplied screws, spring
washers, flat washers, and
nuts.
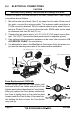
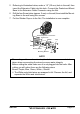
6.3.2 Optional MMB-97 Flush Mount Bracket
1. Use the supplied template to mark the location where the rectangular hole
is to be cut. Confirm the space behind the dash or panel is deep enough to
accommodate the transceiver (at least 3.54 inches (90 mm) deep).
There should be at least 1/2 inch (1.3 cm) between the transceiver’s heatsink
and any wiring, cables or structures.
2. Cut out the rectangular hole 2.82” H x 5.39” W (72 x 137 mm) and insert
the transceiver.
3. Fasten the brackets to the rear panel of the transceiver (see illustration
below).
4. Turn the adjusting screw to adjust the tension so that the transceiver is
tight against the mounting surface.
DESKTOP MOUNTING OVERHEAD MOUNTING
6.42”
(
163 mm
)
Adjusting Screw