
Operation Manual


Page 15HX400IS
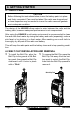
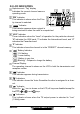
4.3.3 BATTERY CHARGING
1. Turn the transceiver off.
2. Insert the DC plug from the PA-45B into
the DC jack on the CD-50 side panel,
then plug the PA-45B into the AC line
outlet.
3. Insert the HX400IS (with the battery
pack) into the CD-50; the antenna
should be at the left side when viewing
the charger from the front.
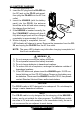
4. If the HX400IS is inserted correctly, the
Red “CHARGING” indicator will glow. A
fully-discharged pack will be charged
completely in approximately 3 hours.
5. When charging is completed, the red
LED indicator will change to green. Remove the transceiver from the CD-
50, and unplug the PA-45B from the AC line outlet.
NOTE: The green LED indicator may blink after charging is complete, but
this is not a malfunction.
WARNING
Do not reverse-connect the battery terminals.
Do not parallel-connect the battery terminals.
Do not change batteries in hazardous locations.
To reduce the risk of explosion, recharge the batteries outside of
hazardous locations.
If the LED blinks red, please insert the HX400IS again. If LED con-
tinues blinking red, the CD-50 Desktop Charger or the battery may
be defective. Disconnect the HX400IS from the CD-50, then please
contact Standard Horizon/Yaesu authorized dealers.
CAUTION
The CD-50 cradle is NOT designed to be waterproof. Do not attempt to
charge in water hazardous locations.
NOTE
The CD-50 cradle is only designed for the charging of the HX400IS’s
battery, and is not suitable for other purposes. The CD-50 may contrib-
ute noise to TV and radio reception in the immediate vicinity, so we do
not recommend its use adjacent to such device.
PA-45B
CD-50