
Operation Manual


HX400ISPage 20
6. BASIC OPERATION
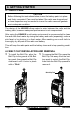
6.1 INITIAL SETUP
1. Install the battery pack on the transceiver (see section “4.3.2 BATTERY
INSTALLATION AND REMOVAL”).
2. Install the antenna onto the transceiver; hold the bottom end of the an-
tenna, then screw it onto the mating connector on the transceiver until it is
snug. Do not over-tighten.
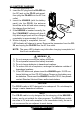
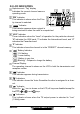
6.2 RECEPTION
1. Turn the VOL knob clockwise to turn the trans-
ceiver on.
The battery voltage will appear briefly at the upper
left corner on the display, then the channel name
will appear.
2. Press the key to activate the squelch adjusting
mode (The “SQL LVL” notation will appear). Press the
key until the “ ” indicator appears on the dis-
play, then press the key again.
3. Turn the VOL knob clockwise until the noise or audio
from the speaker is at a comfortable level.
4. Press the key, then press the key until the ran-
dom noise disappears. This state is known as the
“Squelch Threshold”.
5. Press the or key to select the desired channel.
Refer to the channel chart on page 37 for available chan-
nels.
6. When a signal is received, adjust the VOL knob to the
desired listening level. The “ ” indicator on the
LCD is displayed indicating that the channel is being
used.
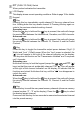
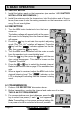
6.3 TRANSMISSION
1. Perform “6.2 RECEPTION” discussion above.
2. Before transmitting, monitor the channel and make sure it is clear.
THIS IS AN FCC REQUIREMENT!
3. For communications over short distances, press the
key to select Low power (1 watt: “ ” icon appears).
Note: Transmitting on Low power prolongs battery life.
Low power should be selected whenever possible.