
User Manual


hilmor.com
10
Moisture Function
OPERATING
INSTRUCTIONS CONT.
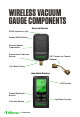
To change out the Replacement Sensor:
1. Remove the batteries from the Remote Sensor.
2. Purchase the hilmor® Wireless Vacuum Gauge
Replacement Sensor (1950219).
3. Unscrew the 2 flathead screws on the back of
the Remote Sensor to remove the door.
Note - these are captive screws, designed so
that they cannot fall out and be lost.
4. Gently remove the replaceable sensor from the
Remote Sensor housing and disconnect the
wires.
5. Plug the new Replacement Sensor in by
carefully connecting the male ends of the white
plugs to the female white plugs on the Remote
Sensor Transmitter. Gently tuck the colored
wires inside of the Remote Sensor body.
6. Re-attach the 2 flathead screws to secure the
Replacement Sensor.
7. The Replacement Sensor has been pre-
calibrated by hilmor, so it does not need any
calibration.
8. Make sure the Handheld Display is powered on
and the new Remote Sensor should auto-sync.
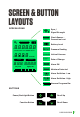
When the vacuum pump is blanked o to observe vacuum level and the pressure is
below 1,000 microns, moisture detection feature will activate automatically. If the
feature detects moisture the handheld unit will display the moisture icon and beep
3 times. If the pressure rises above 2,000 microns the feature is deactivated.
REPLACEMENT SENSOR