
Instructions / Assembly


PORTES | DOORS
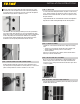
STEP 6: INSTALL DEAD BOLT AND STRIKE PLATES
INSTALLATION INSTRUCTIONS
When the shims are properly installed, the frame should not move or twist
at all when the screws are tightened and counter-sunk thereby maintaining
the 1/8”gap. If there is any movement, loosen the screws and shim tighter to
maintain the 1/8”gap, and then re-tighten the screws.
Shim behind the latch-side jamb approximately 8” from the top and bottom
of the frame. Install shims until there is an even 1/8”gap between the jamb
and the edge of the door slab along the whole length of the door. Shim behind
the latch-side jamb just above and below the dead bolt hole, maintaining
the 1/8”gap. Pull the weather-stripping away from the jamb and screw 3”
installation screws through the jamb and shims and into the stud.
Install the dead bolt strike plate in the proper location, depending on door
style. If the plates are being installed on an exterior jamb, use 3” screws. If the
plates are being installed on a mullion or sidelite use 1 3/8” screws.
C
Score the shims with a utility knife and then snap where scored. Trim any
excess. Insulate around the top and the side of the door unit in the cavity
between the frame and the wall studs. Use either a low-expansion foam or
fiberglass insulation.
+ Important Point: The use of foam that does not have a low expansion
may cause door frame to warp; this may leave the door inoperable.
Caulk all four corners and all around the brick or siding in the following
order:
• Caulk the top corner where the header and sill meet, starting at the
weather-stripping and working to the face of the molding.
• Caulk the perimeter.
If the door is center-hinged or has a sidelite; caulk around the mullions
where they contact the sill and header.
Most of our door units are supplied with a U-channel adjustable sweep,
and these may be raised or lowered to form a tight seal with the fixed
sill. Lower or rise according to desired fit and if needed fix in place with a
screw (not supplied).
Following the manufactures installation guide for the handle you purchased
install the latch and dead bolt.
STEP 7: INSULATE
STEP 8: CAULK DOORWAY
STEP 9: ADJUST THE SILL OR SWEEP
STEP 10: INSTALL THE LATCH AND DEADBOLT