24X AUTOMATIC LEVEL KIT 24X AUTOMATIC LEVEL KIT EN INSTRUCTION MANUAL BEDIENUNGSANLEITUNG MANUEL D’INSTRUCTIONS MANUALE DI ISTRUZIONI MANUAL DE INSTRUCCIONES INSTRUÇÕES DE UTILIZAÇÃO GEBRUIKSAANWIJZING 77-159 • 77-160 D EN F D I EN F E D I EN PF E D I EN P F E D I EN PF EN E D I DP F E F I
6 5 7 Fig. 1 5 3 8 2 9 1 12 13 11 4 10 A B A B Fig.
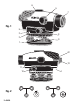
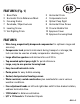
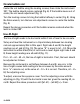
FEATURES (Fig. 1) 1 3 5 7 9 11 Base Plate Horizontal Circle Reference Mark Focusing Knobs Sunshade / Objective Lens Leveling Screw Vial Sighting Prism 2 4 6 8 10 12 13 Horizontal Circle Compensator Lock Optical Peep Sight Horizontal Drive Screw Circular Bubble Vial Eyepiece Cover Eyepiece Focusing Knob FEATURES • Wire-hung, magnetically dampened compensator for optimum range and accuracy.
INTRODUCTION Thank You for purchasing one of our Automatic Levels. This instrument was carefully inspected and calibrated within tight tolerances before shipment. We properly package the instruments for shipment, but we cannot control how the package is handled during shipment. We advise that you check the instrument using the test shown in the “Line-of-Sight” Section before using. “Measure Twice, Cut Once”... After doing any job using any instrument, it is advised that you check your work.
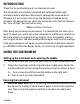
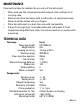
2. Focus the telescope by locating a target, such as a leveling rod, using the optical peep sight. Looking through the eyepiece, use the focusing knob to bring the target into sharp focus. Center the vertical hair within the target using the horizontal drive knobs on either side of the instrument. Reading measurements using a leveling rod Height reading Read the rod where it is intersected by the horizontal hair. For example, the height reading in Fig. 4 is 1,195 m.
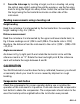
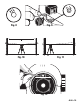
Circular bubble vial Center the vial bubble using the leveling screws, then rotate the instrument 180°. The bubble should remain centered (Fig. 6). If the bubble moves out of center, the vial needs adjustment (Fig. 7). Turn the leveling screws to bring the bubble halfway to center (Fig. 8). Using the Allen wrench, turn the two vial adjustment screws to center the bubble (Fig. 9). Repeat the above preocedure until the bubble remains centered when the level is rotated 180°.
MAINTENANCE Care must be taken to maintain the accuracy of the instrument. • • • • After each use, the instrument should be wiped clean and kept in its carrying case. Remove dust from the lenses with a soft brush or a nonabrasive wipe. Never touch the lenses with your fingers. Store the instrument in a dust-free area with low humidity. A bag of silica gel dryer is included with each instrument; if it has stopped working effectively, bake it to remove moisture or replace with a new bag.
WARRANTY Five Year Warranty ( GW ) Stanley Tools warrants its electronic measuring tools against deficiencies in materials or workmanship for five year from date of purchase.
8 2 C C A 1 9 B 1 11 4 10 A B O Fig. 3 11 10 A B A 4 B O Fig.C 4 C A B A C A B C A B Fig. 5 O Fig. 6 9 • AL24 Fig.
O Fig. 8 Fig. 9 A B O Fig. 10 Fig. 11 Fig.
©2004 THE STANLEY WORKS: www.stanleyworks.