
Operation Manual


INTRODUCTION
Thank You for purchasing one of our Automatic Levels.
This instrument was carefully inspected and calibrated within tight
tolerances before shipment. We properly package the instruments for
shipment, but we cannot control how the package is handled during
shipment. We advise that you check the instrument using the test shown in
the “Line-of-Sight” Section before using.
“Measure Twice, Cut Once”...
After doing any job using any instrument, it is advised that you check your
work. To check your work, set up the instrument in a different location from
the place where you originally set up (approx. 16 m) and reshoot a few of
your original targets. The new readings should agree with the first readings.
If the new readings do not agree, you should have the instrument checked
by a STANLEY Authorized Repair Center, or try the Line-of-sight adjustment.
USING THE INSTRUMENT
Setting up the instrument and centering the bubble
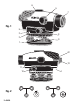
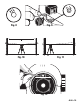
1. Set up the tripod and attach the level using the tripod mounting screw.
2. Adjust the tripod legs until the tripod head is roughly level. Center the
bubble within the vial by turning the leveling screws as shown in Fig. 2.
A – Turn screws A and B to move the bubble to the right side.
B – Turn screw C to center the bubble.
Focusing the instrument
1. Focus the cross hairs (Fig. 3) by pointing the telescope towards a bright
background or holding a white sheet of paper in front of the objective
lens, then turning the eyepiece until the cross hairs are sharp and
black.
4 • AL24