
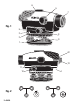
Operation Manual


Circular bubble vial
Center the vial bubble using the leveling screws, then rotate the instrument
180°. The bubble should remain centered (Fig. 6). If the bubble moves out of
center, the vial needs adjustment (Fig. 7).
Turn the leveling screws to bring the bubble halfway to center (Fig. 8). Using
the Allen wrench, turn the two vial adjustment screws to center the bubble
(Fig. 9).
Repeat the above preocedure until the bubble remains centered when the
level is rotated 180°.
Line-Of-Sight
The line-of-sight needs to be horizontal within 3 mm of level to be accurate.
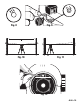
Set up and level the instrument on a tripod midway between two leveling
rods set approximately 30m to 50m apart. Sight rods A and B; the height
readings are a1 and b1 (Fig. 10). The value “H” is equal to (a1 – b1). Move the
instrument to within 6 feet (2m) of rod A and re-level. Again sight rods A and
B; these height readings are a2 and b2 (Fig. 11).
If a1 – b1 = a2 – b2 = H, the line-of-sight is horizontal. If not, the level should
be adjusted as follows.
Because the instrument is set halfway between A and B, any error in the
line-of-sight causes both readings to be erroneous by the same amount.
Error “e” cancels out, so the value a1 – b1 = H is correct. Therefore, a2 – H =
b3, the adjusting value.
To adjust, unscrew the eyepiece cover. Turn the adjusting screw with the
adjusting pin (Fig. 12) until the horizontal cross hair gives the reading b3, on
rod B. Repeat the above procedure until {(a1-b1) – (a2-b2)} </= 3 mm.
6 • AL24