
Assembly Instruction
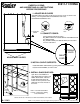

Shelves should rest on Flat Surfaces of SHELF SUPPORTS, when installed.
NOTE: Your furniture may have different design features than those shown in the drawing.
81611-11 CHINA
A-1140
CAREFULLY READ
AND UNDERSTAND ALL INSTRUCTIONS
BEFORE PROCEEDING!
Counterclockwise to
Raise...
Turn Clockwise to
Lower...
Adjustable Glides are located under the front corners of case as shown in the
drawing. Turn Adjustable Glide CLOCKWISE to lower case;
COUNTERCLOCKWISE to raise.
1. ADJUSTABLE GLIDES
ADJUSTABLE GLIDES
ONLY!
110 Volt AC
2. CONNECT POWER:
Connect Electric LIGHTS as shown...
Plug MALE LEAD from TOUCH SWITCH into FEMALE LEAD
from SWITCH BOX.
Plug POWER CORD (from SWITCH BOX) into a standard
110V AC outlet ONLY.
MALE
LEAD
FEMALE
LEAD
GROMMET
1
1
/
2
"
-
B
l
a
c
k
L
.
H
.
S
I
D
E
O
N
L
Y
Note: If a Power Screwdriver
is used, a "low torque" setting
is recommended!
SHELF
PLATE
GROOVE
CENTER SHELF
SUPPORT
END
FRAME
SHELF
SHELF
END SHELF
SUPPORT
STEM
HOLE
UPRIGHTS
SHELF
3. INSTALL SHELF SUPPORTS:
Install END SHELF SUPPORTS by pushing Stems into predrilled Holes
located in END FRAMES, as shown at left.
4. INSTALL GLASS SHELVES:
Open Doors and CAREFULLY
angle SHELVES into position onto
SHELF SUPPORTS. Note that
PLATE GROOVES should be
located on the top surface of the
SHELVES, and near the back of
the China.