
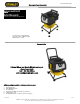
Use and Care Manual


STANLEY is a registered trademark of The Stanley Works or its affiliates and are used under license by GXi Outdoor Power LLC.
No part of this publication can be printed or copied without written permission.
12 of 16 Rev. 1/2011
Models: G2250S & G3250S
Maintenance
MAINTENANCE
The Importance of Maintenance
Good maintenance is essential for safe, economical, and trouble-free
operation. It will also help reduce air pollution.
To help you properly care for your generator, the following pages
include a maintenance schedule, routine inspection procedures, and
simple maintenance procedures using basic hand tools. Other ser-
vice tasks that are more difficult, or require special tools, are best
handled by professionals and are normally performed by a STANLEY
technician or other qualified mechanic.
The maintenance schedule applies to normal operating conditions. If
you operate your generator under severe conditions, such as sus-
tained high-load or high-temperature operation, or use it in unusually
wet or dusty conditions, consult your servicing dealer for recommen-
dations applicable to your individual needs and use.
Maintenance, replacement, or repair of the emission control
devices and systems may be performed by any engine repair
establishment or individual, using parts that are ‘‘certified’’ to
EPA standards.
Replacement Parts
The emission control systems on your STANLEY engine were designed,
built, and certified to conform with EPA and California emission regula-
tions. We recommend the use of genuine STANLEY parts whenever
you have maintenance done. These original-design replacement parts
are manufactured to the same standards as the original parts, so you
can be confident of their performance. The use of replacement parts
that are not of the original design and quality may impair the effective-
ness of your emission control system.
A manufacturer of an aftermarket part assumes the responsibility that
the part will not adversely affect emission performance. The manufac-
turer or rebuilder of the part must certify that use of the part will not
result in a failure of the engine to comply with emission regulations.
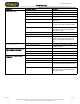
Maintenance Schedule
* Should be performed by an authorized STANLEY service center.
Item Before
each use
20hrs or
every 3
month
50 hrs or
every 3
months
100 hrs or
every 6
months
300 hrs
or every
1 year
Engine oil (Check) X
Engine Oil (Change) X
Air Cleaner (Check) X
Air Cleaner Wash X
Fuel filter Cup (Clean) X
Spark Plug (Clean) X
Spark Plug (Change) X
Optional Spark Arrestor (Clean) X
Valve Clearance (Adjust) X*
Combustion Chamber (Clean) X*
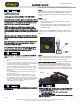
Engine Oil Change
Drain the oil while the engine is warm to assure rapid and complete
draining.
1. Remove the drain plug and sealing washer, remove the oil filler
cap, and drain the oil.
2. Reinstall the drain plug and sealing washer. Tighten the plug se-
curely.
3. Refill with the recommended oil (SAE 10W-30) and check the oil
level.
Dispose of used motor oil in a manner that is compatible with the envi-
ronment. Do not throw it in the trash, pour it on the ground, or down a
drain.
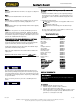
Air Cleaner Service
A dirty air cleaner will restrict air flow to the carburetor. To prevent
carburetor malfunction, service the air cleaner regularly. Service more
frequently when operating the generator in extremely dusty areas.
NOTICE:
Never run the generator without the air filter. Rapid engine wear will
result.
1. Remove the air cleaner cover.
2. Be careful to prevent dirt and debris .
3. from falling into the air cleaner base.
4. Separate the Filter element from the air cleaner housing
5. Inspect the air cleaner elements.
6. Clean or replace dirty elements.
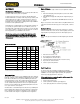
Spark Plug Service
In order to service the spark plug, you will need a spark plug
wrench. Recommended spark plugs: BPR5ES (NGK) and W16EPR-
U (DENSO). To ensure proper engine operation, the spark plug
must be properly gapped and free of deposits.
If the engine has been running, the muffler will be very hot. Be
careful not to touch the muffler.
1. Remove the spark plug cap.
2. Clean any dirt from around the spark plug base.
3. Use a spark plug wrench to remove the spark plug.