
Assembly Instruction

NOTE: Your furniture may have different design features than those shown in the drawing.
A-1219
20
20
6
5/16
5/16
5/16x 1 1/2
FLAT WASHER
LOCK WASHER
SCREW
BOLT
E
D
C
B
A
QTY
PARTS LIST
NO
NUT
5/16
12
8
F
OPEN WRENCH
5/16
1
CAUTION:
(2) OR MORE PERSONS RECOMMENDED FOR
ASSEMBLY!
CAREFULLY READ
AND UNDERSTAND ALL INSTRUCTIONS
BEFORE PROCEEDING!
Two persons should assist each other in turning the
TOP ASSEMBLY "upside down" on to a smooth
surface such as a Carpeted Floor.
1. PREPARE FOR ASSEMBLY:
8 x 2
A
E
D
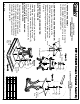
2. CONNECTING THE LEGS AND STRETCHER:
A
E
D
One by one insert dowel pin guide of the
STRETCHER into the pre – drilled hole of the
leg and screw (C) as shown. Make sure that
Stretcher and Legs are fitted tightly. As shown in
Figure (1)
3. MOUNTING THE LOWER MOUNTING
PLATE TO THE LEGS
Attach the Lower Mounting Plate by inserting the
three Bolts pre – attached on the top of Legs
through. Put the Lock washer (D), Flat washer (E),
and Nut (A) and tighten using open wrench . As
shown in Figure (2)
Stretcher
Dowel Pins
4. ATTACHING THE UPPER MOUNTING
BRIDGE WITH THE LEGS.
Reverse the Pedestal as shown and
insert the three bolts of the legs through
the hole of the Upper Mounting Bridge and
attach with Flat Washer (E), Lock Washer
(D) and Bolt (B). Tight with Open Wrench
as shown in Figure (3).
Pre-Drilled
Hole
Screw
Lower
Mounting
Plate
Lower
Mounting
Plate
Upper
Mounting
Plate
E
D
B