
Instructions


6
ENGLISH
(Original instructions)
Leaving the battery in the charger
The charger and battery pack can be left connected with the
LED glowing indenitely. The charger will keep the battery
pack fresh and fully charged.
Hot/Cold Pack Delay
When the charger detects a battery that is too hot or too cold,
it automatically starts a Hot/Cold Pack Delay, as shown in
'Charger LED Modes diagram', suspending charging until the
battery has reached an appropriate temperature. The charger
then automatically switches to the pack charging mode. This
feature ensures maximum battery life.
Maintenance
Your Stanley Fat Max tool has been designed to operate over
a long period of time with a minimum of maintenance.
Continuous satisfactory operation depends upon proper tool
care and regular cleaning.
Your charger does not require any maintenance apart from
regular cleaning.
Warning! Before performing any maintenance on the tool,
remove the battery from the tool. Unplug the charger before
cleaning it.
u Regularly clean the ventilation slots in your tool and
charger using a soft brush or dry cloth.
u Regularly clean the motor housing using a damp cloth.
u Do not use any abrasive or solvent-based cleaner.
Protecting the environment
Z
Separate collection. Products and batteries marked
with this symbol must not be disposed of with
normal household waste.
Products and batteries contain materials that can be
recovered or recycled reducing the demand for raw materials.
Please recycle electrical products and batteries according to
local provisions. Further information is available at
www.2helpU.com
Technical data
Charger SFMCB11 SFMCB12 SFMCB14
Input Voltage V
AC
230 230 230
Output Voltage V
DC
18 18 18
Current A 1.25 2 4
Battery SFMCB201 SFMCB202 SFMCB204 SFMCB206
Voltage V
DC
18 18 18 18
Capacity Ah 1.5 2.0 4.0 6.0
Type Li-Ion Li-Ion Li-Ion Li-Ion
Approx.
Charge time
min.
SFMCB11 = 72
SFMCB12 = 45
SFMCB14 = 22
SFMCB11 = 96
SFMCB12 = 60
SFMCB14 = 30
SFMCB11 = 192
SFMCB12 = 120
SFMCB14 = 60
SFMCB11 = 288
SFMCB12 = 180
SFMCB14 = 90
Warning! Before drilling into walls, oors or ceilings, check for
the location of wiring and pipes.
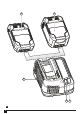
Charging the battery (Fig. A)
The battery needs to be charged before rst use and
whenever it fails to produce sufcient power on jobs that were
easily done before.
The battery may become warm while charging; this is normal
and does not indicate a problem.
Warning! Do not charge the battery at ambient temperatures
below 10 °C or above 40 °C. Recommended charging tem-
perature: approx. 24 °C.
Note: The charger will not charge a battery if the cell
temperature is below approximately 10 °C or above 40 °C.
The battery should be left in the charger and the charger
will begin to charge automatically when the cell
temperature warms up or cools down.
Note: To ensure maximum performance and life of lithium-ion
battery packs, charge the battery pack fully before rst
use.
u Plug the charger (1) into an appropriate outlet before
inserting battery pack (4) (5).
u Connect the charger (1) and battery pack (4) (5), making
sure the battery pack is fully seated.
u The green charging light (2) will blink continuously
indicating that the charging process has started.
u The completion of charge will be indicated by the green
charging light (2) remaining ON continuously. The battery
pack (4) (5) is fully charged and may be removed and
used at this time or left in the charger (1).
u Charge discharged batteries within 1 week. Battery life will
be greatly diminished if stored in a discharged state.
Charger LED Modes
Charging:
Green LED Intermittent
Fully Charged:
Green LED Solid
Hot/Cold Pack Delay:
Green LED Intermittent
Red LED Solid
Note: The compatible charger(s) will not charge a faulty
battery pack. The charger will indicate a faulty battery pack by
refusing to light.
Note: This could also mean a problem with a charger. If the
charger indicates a problem, take the charger and battery
pack to be tested at an authorized service centre.