
Instructions


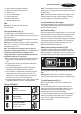


8
ENGLISH
(Original instructions)
Fitting the Accessories
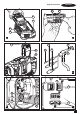
Universal Valve Adapter (Fig. D)
Your inator is supplied with the inator needle valve (15),
a brass coupler (16) , and the standard tapered nozzle (17) ,
located on the side of the unit.
u To use the universal valve adapter (9), make sure the
lever is in the up position.
u Place the valve adapter over the stem of the inator
needle valve, brass coupler adapter or standard
tapered nozzle.
u Press the lever (18) on the universal valve adapter down
to lock it in place.
u Place the inator needle valve, brass coupler adapter or
tapered nozzle into the item to be inated.
Note: Always make sure that the lever is in the up position
when not in use. Operate your inator only with the
universal valve adapter or with the included nozzles.
Note: Make sure the universal valve adapter is rmly
locked in place before turning the inator on.
High-volume hose (Fig. E)
u Remove the high-volume hose (7) from the storage
location.
u Line up the notches (19) of the hose with the nubs (20)
of the high volume pump inator connection (12). Then,
slide the hose on and twist counter-clockwise
to secure.
u To remove, twist the hose clockwise and slide hose off.
Note: Many inatables have an internal ap that prevents
air loss during ination, especially air mattresses. Unless this
ap is displaced by the nozzle the inatable will not inate.
Push the nozzle rmly into the valve to make sure that you
push this ap out of the way.
Warning! Risk of Bursting. Excessive air pressure may cause
a hazardous risk of bursting or personal injury. Check the
manufacturer’s maximum pressure rating for items being
inated.
Note: If the pressure rating for the item being inated is above
100 p.s.i.g., note that the maximum run time is 10 minutes,
leave to rest for 20 minutes before reusing.
Switching on
Warning! Risk of Bursting. Do not leave unit running
unattended. Overination of tires and other items could result
in serious injury and property damage.
Note: When power is supplied to the inator by 12V, 18V
battery, or 230V AC the digital readout display will remain
on for approximately 10 minutes before the display shuts
off/goes into sleep mode. This occurs when the unit is not
operating. To wake up the system, the user will need to
push the pressure mode / reset button (5). At this time the
digital readout will turn on and the inator is ready for use.
Before switching your inator on, decide which power
source you will be using; 12V AC adapter, 230V AC plug or a
18V Max* battery pack.
u To use the 12V AC adapter, or 18V Max* battery pack
press the AC/DC power switch 1 located on the front of
the unit to DC.
u If using the 230V AC vehicle adapter (14), always fully
extend the 230V AC cord before each use.
u Connect the 12V AC vehicle adapter (14) into your
vehicles 12V AC accessory socket.
u To use the 230V AC cord, press the AC/DC switch (1)
located on the front of the unit to AC.
u If using the 230V AC cord (13), always fully extend
the cord before each use.
u Connect the 230V AC cord (13) into either a wall
outlet or an approapriate sized extension cord that
is plugged into a wall outlet.
To turn on high-volume
The high-volume hose is meant to be used for objects that
hold large amounts of air, such as air mattresses, rafts, and
swimming pool oats.
Note: The high-volume mode DOES NOT have an auto
shut-off feature.
u Attach the high-volume hose (7) to the high volume
pump inator connection (12) as described in the High
Volume Hose section.
u Insert the high-volume hose (7), or it’s tapered nozzle (8)
into the object being inated.
u Press the high-volume side of the mode power
switch (2), indicated by the air mattress symbol.
u To turn off, push the power switch to the center position.
To turn on high-pressure
The high-pressure hose is meant to be used for objects that
need more air pressure, such as tires and basketballs.
u Remove the high-pressure hose (10) from the storage.
u Attach a nozzle as described in the Universal valve
adapter section.
u Insert the nozzle into the object being inated.
u Press the high-pressure side of the mode power
switch (2), indicated by the tire symbol.
u To turn off, push the power switch to the center position.
Deate using the high-volume hose (Fig. G)
Warning! Beware of objects being ejected.
When deating, large amounts of air will exit the
high volume pump inator connection (12) . Ensure the
universal valve adapter is not pointed at anyone or anything.
u Remove the high-volume hose (7) from the storage
location.
u Line up the hose end (24) with the high-volume pump
deate connection (11).