900 PSI Electric Pressure Washer ASSEMBLY, CARE AND USE INSTRUCTIONS Model Take-Along READ CAREFULLY IMPORTANT: RETAIN THESE INSTRUCTIONS AND ATTACH RECEIPT TO MANUAL FOR FUTURE REFERENCE. Questions, problems, missing parts? 94630-KN 94630_Take-Along_1900PSI_IM_EN.indd 1 Before returning to your retailer, call (1-866-235-5112) or email (info@arnorthamerica.com) our customer service department. They are available from 8:00 a.m. 5:00 p.m., CST, Monday - Friday. www.arblueclean.
TABLE OF CONTENTS Product Specifications....................................................................................................... 2 Package Contents.............................................................................................................. 3 Hardware Contents............................................................................................................ 3 Safety Information...........................................................................................
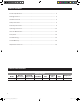
PACKAGE CONTENTS N K M J L AA PW909TAKE-ALONG H A B G Soap – Black 0° – Red I 15° – Yellow 25° – Green F C E D PART A DESCRIPTION Power Washer Unit QUANTITY 1 PART I DESCRIPTION Quick Connect Nozzles QUANTITY 4 J K L M N AA Spray Gun Spray Gun Trigger Lock O-Ring Replacement Kit Foam Cannon Nozzle Cleaning Wire Screws 1 1 1 1 1 4 B Rear Wheels 2 C Front Wheels 2 D High Pressure Hose 1 E F Handle Handle Connect 1 2 G Rotary Nozzle 1 H Extension Lance 1 HARDWARE CONTENT
SAFETY INFORMATION Please read and understand this entire manual before attempting to assemble and operate the product. This manual contains information that relates to PROTECTING PERSONAL SAFETY and PREVENTING EQUIPMENT PROBLEMS. It is very important to read this manual carefully and understand it thoroughly before using the product. The symbols listed below are used to indicate this information. DANGER Potential hazard that will result in serious injury or loss of life.
SAFETY INFORMATION 25. Protect eyes, lungs, and skin from exposure to detergent. 26. Warning-If connection is made to a potable water system, the system should be protected against backflow. CAUTION Store the power washer indoors to prevent the water in the unit from expanding under freezing conditions. When the water freezes and expands, your power washer will be damaged and become inoperable. Or, if storing outdoors, it is recommended you use pump saver (not included) to protect pumps. 27.
PREPARATION Before beginning assembly of product, make sure all parts are present. Compare parts with package contents list and hardware contents list. If any part is missing or damaged, DO NOT attempt to assemble the product. Please call customer service at 1-866-235-5112. Replacement parts will be sent no charge. Tools Required for Assembly (not included): Phillips screwdriver. Estimated Assembly Time: 5 minutes.
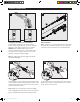
ASSEMBLY INSTRUCTIONS 4 3 A A D B Install real wheels (B) to power washer unit (A). Note: This step does not require any screws. 5 J 2 D 3 1 HIGH PRESSURE HOSE ASSEMBLY Screw high pressure hose (D) clockwise onto bottom front of power washer unit (A). Pull back collar and insert o-ring post into water outlet far enough so collar can thread onto outlet threads until hand tight. If it takes fewer than six turns you have not properly tightened the high pressure hose fitting.
PREPARATION ASSEMBLY INSTRUCTIONS 7 8 J J 1 H 2 1 Unlocked Locked Locking Spray Gun (Before Lance Installation) To lock trigger of spray gun (J), point gun away from you and turn dial to lock (“3” and “9” position). Squeeze or pull trigger to make sure it is locked. ALWAYS leave in locked position when not in use. This ensures the gun is in “safe” mode until it is ready for use. Turn dial to unlock (“12” and “6” position) to release spray gun trigger.
OPERATINGINSTRUCTIONS ASSEMBLY INSTRUCTIONS 11 12 1 2 H 1 750ml 2 600ml H 450ml 300ml M 150ml Foam Cannon Installation The foam cannon (M) comes with a straw which is fitted into high pressure top. If you do not see the straw, look inside the foam cannon and attach it to the high pressure top. When using foam cannon, fill it with a properly formulated detergent or cleaner with a water ratio according to instructions on the container.
OPERATING INSTRUCTIONS • Make sure the “ON/OFF” switch is in the “OFF” position. The power switch has international symbols for ‘on’ and ‘off’: On (|) Off (O). •U nwind the power cord completely and plug the GFCI into a grounded 120 volt outlet. • Turn on water supply at the faucet to completely open. • Release safety by twisting trigger lock.
OPERATING INSTRUCTIONS • T he power washer will pull a ratio of water to detergent of 10:1 or 10 parts water to 1 part detergent. The detergent concentration can be adjusted by turning the detergent knob on the top of the cannon. Turn it left for more concentration or turn it right for less concentration. 1 2 •W hen removing the detergent tank, squeeze the clamp and remove the small hose from detergent tank. Pull the detergent tank straight out.
OPERATING INSTRUCTIONS Detergents •U se detergents designed for power washers. Hardware stores or home centers also have power washer detergents for different cleaning projects. The cleaning solution should be the consistency of water in order to prevent clogging your detergent bottle and nozzle. • T his system applies detergent under low pressure. The cleaning power of the detergents is enhanced when applied with low pressure and enough time is given to break down dirt and grime.
CARE AND MAINTENANCE Storage •W hen your pressure washer session has been completed, turn off the power switch. Unplug the power cord from the outlet. Turn off the water supply. Pull the trigger on the spray gun 2-3 seconds to drain out the excess water and to release any remaining water pressure. Do not allow the power washer to run with no water flowing through it. •R emove high pressure hose from spray gun and unscrew the other end of the high pressure hose from the power washer.
CARE AND MAINTENANCE TROUBLESHOOTING If you have any questions regarding the product, please call customer service at 1-866-235-5112 PROBLEM CORRECTIVE ACTION Unit will not turn on. 1. The GFCI module on the end of the power cord must be plugged directly into an outlet. 2. Do not use an extension cord. 3. With the GFCI Connected make sure the power switch is turned on. Note: When power switch is turned on, the power washer will turn on by itself for 1-2 seconds and shut off. This is normal.
CARE AND LIMITED WARRANTY MAINTENANCE TROUBLESHOOTING This product has a 2 (two) year warranty. Please read the following carefully to understand what each warranty entails: This product is under warranty to the original retail consumer against defects in material and workmanship for a period 1 (one) year and is a complete “bumper to bumper” warranty including the spray gun, the high pressure hose and all accessories from the date of purchase. The warranty is not transferable or assignable.
REPLACEMENT PARTS LIST For replacement parts, call our customer service department at 1-866-235-5112, 8:00 a.m. - 5:00 p.m., CST, Monday - Friday or order online at www.arblueclean.