PETROL HEDGE TRIMMER 4 STROKE 26CC MODEL NO. SXPG42604 AUST. 1300 660 457 N.Z. 0800 474 876 www.stanleyproducts.com.au 03615 03/19 For service, spare parts or product information, please contact Smart Marketing Group Pty. Ltd.
CONTENTS Section Page Contents 2 Description & Components Suggested Applications 2 Unpacking 2 Years Warranty / Serial Number 2 Preparation 10 – 11 Specifications 3 Operation 12 - 17 Introduction 4 Maintenance 18 – 21 Express Warranty Statement 4 Trouble Shooting 22 Complete Warranty Statement 5 Service Log 23 Contact Information 24 Important Safety Instructions Section 6-8 Page 9 10 SUGGESTED APPLICATIONS These are some suggested articles which could be used by this Hedge
OWNER’S OPERATING MANUAL PETROL HEDGE TRIMMER 4 STROKE 26CC MODEL NO. SXPG42604 SPECIFICATIONS Engine type...............................................................................................................................................4-Stroke, air cooled Engine displacement......................................................................................................................................................... 26cc No load speed...................................................
INTRODUCTION CUSTOMER SERVICE Dear Customer, Thank you for purchasing this Hedge Trimmer which has passed through our extensive quality assurance processes. Every care has been taken to ensure that it reaches you in perfect condition. However, in the unlikely event that you should experience a problem, or if you require any assistance please do not hesitate to contact us. Australia: 1300 660 457 New Zealand: 0800 474 876 Operating times: Monday – Friday 8.00am - 5.
COMPLETE WARRANTY STATEMENT - HEDGE TRIMMER As soon as you have purchased the Hedge Trimmer, we recommend that you check to make sure it is intact and that you read the operating instructions carefully before using it. The purchase receipt for this product is to be retained and must be presented if making a claim under the terms of the Smart Marketing Group (SMG) warranty. Bank account statements are not acceptable for proof of purchase.
IMPORTANT SAFETY INSTRUCTIONS SPECIFIC SAFETY INSTRUCTIONS The purpose of safety rules is to attract your attention to possible dangers. The safety symbols and the explanations with them, require your careful attention and understanding. The safety warnings do not by themselves eliminate any danger. The instruction or warnings they give are not substitutes for proper accident prevention measures. Read the instructions with due care.
IMPORTANT SAFETY INSTRUCTIONS Never start or run the product inside a closed room or building. Fumes from the exhaust contain dangerous carbon monoxide. If the unit will not be used for a long time, clean the unit completely, especially the fuel/oil tank, its surroundings, and the air cleaner. Never attempt to make engine adjustments while the unit is running. Always make engine adjustments with the unit resting on a flat, clear surface and with the engine turned off.
IMPORTANT SAFETY INSTRUCTIONS Be careful not to drop the unit or hit it against obstacles. RESIDUAL RISKS Before proceeding to adjust or repair the unit, be sure to stop the engine and detach the spark plug. Even when the unit is used as prescribed it is not possible to eliminate all residual risk factors.
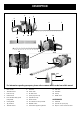
DESCRIPTION 3 1 5 4 2 7 6 8 9 10 13 11 21 20 5 14 15 16 12 19 17 18 24 22 23 For information regarding spare parts, please refer to contact details on the front of this manual 1. Rear handle 9. 2. Throttle lockout 10. Primer bulb Fuel tank 18. Gear box 19. Oil elbow 3. Fuel tank cap 11. Air filter cover 20. Oil cap 4. Choke button 12. Spark plug with cap 21. Blade cover 5. Front handle/safety guard (integrated) 13. Cylinder housing 14. Recoil Starter 6.
UNPACKING CAUTION. Using an incomplete or damaged product represents a hazard to people and property. Unpack all parts and lay them on a flat, stable surface. Ensure that you have all the accessories and tools needed for assembly and operation. This also includes suitable personal protective equipment. Remove all packing materials and shipping devices if applicable. Make sure the delivery contents are complete and free of any damage.
PREPARATION USING THE RIGHT PETROL FUELLING The use of old petrol is the most common cause of performance problems. Use only fresh, clean unleaded petrol. WARNING! Always shut off engine before fuelling. Never add petrol to a machine with a running or hot engine. CAUTION! Only use 91 RON unleaded petrol The lowest octane recommended is 91 RON Unleaded petrol. If you run the engine on a lower octane grade than 91 RON Unleaded fuel so-called knocking can occur.
OPERATION STARTING/STOPPING THE MACHINE CHECK BEFORE STARTING • Inspect the working area. Remove any objects that could be thrown out. • Check the cutting attachment. Remove the blade cover before use and never use blades that are dull, cracked or damaged. • Check that the machine is in perfect working order. Check that all nuts and screws are tight. • Make sure the gear housing is lubricated correctly. See instructions under the heading Gear housing.
OPERATION TO START A COLD ENGINE Turn switch to “I” ON postion. Slowly press the primer bulb 5-10 times. NOTE: After the 7th press, fuel should be visible in the primer bulb. If it is not, continue to press the primer until you see fuel in the bulb. Push the choke button in to set the choke to FULL CHOKE position. NOTE: Do not squeeze the throttle trigger because the choke will pop out automatically. Fig. 4 Pull the starter grip /cord until resistance is detected.
OPERATION WARNING! The machine can cause serious personal injury. Read the safety instructions carefully. Learn how to use the machine. WARNING! Do not touch the product without first switching off the engine. SAFETY INSTRUCTIONS REGARDING THE SURROUNDINGS • Never allow children to use the machine. • Ensure that no-one comes closer than 15 metres while you are working. • Never allow anyone else to use the machine without first ensuring that they have understood the contents of the operator’s manual.
OPERATION TIPS FOR TRIMMING • When the engine is switched off, keep your hands and feet away from the cutting attachment until it has stopped completely. • Watch out for stumps of branches that can be thrown out during cutting. • Do not cut too close to the ground. Stones and other objects can be thrown out. • Check the working area for foreign objects such as electricity cables, insects and animals, etc, or other objects that could damage the cutting attachment, such as metal items. • Fig.
OPERATION CUTTING • Adjust the handle so that it fits the intended cut and start the product as described. • Cut and remove branches exceeding the cutting capacity of this product using a proper pruner before operation. • Move the cutting device lightly through the cutting surface in a sweeping motion following the shape of the hedge or shrub. A slight tilt downwards of the cutting device in the direction of motion is recommended for optimum cutting performance.
OPERATION ROTARY HANDLE • The Hedge Trimmer’s rear handle can be set in three positions by pressing down the button on the handle (see Fig. 12, 13, 14). When the handle is adjusted the Hedge Trimmer should be idling or not running. • While working the handle should always be facing upwards irrespective of how the Hedge Trimmer is directed Fig. 12 Fig. 13 Fig.
MAINTENANCE ENGINE OIL REPLACEMENT WARNING. Old engine oil is considered special waste and has to be disposed according to your local environment protection regulation. Do not pour the oil into garbage can, sewer, soil etc. 1. The engine oil replacement is easier if engine is warm (NOT HOT!). 2. Open the oil tank cap and drain the old oil into an approved container. 3.
MAINTENANCE MUFFLER The muffler is designed to keep noise levels to a minimum and to direct exhaust fumes away from the user. (see Fig. 19) For mufflers it is very important that you follow the instructions on checking, maintaining and servicing your machine. Never use a machine that has a faulty muffler. (see Fig. 20) WARNING! The exhaust fumes from the engine are hot and may contain sparks which can start a fire. Never start the machine indoors or near combustible material! Fig.
MAINTENANCE THROTTLE LOCKOUT Throttle Lockout The throttle lockout is designed to prevent accidental operation of the throttle control. When you press the lockout (2) (i.e. when you grasp the handle) it releases the throttle control (see Fig. 21). Throttle Control When you release the handle, the throttle control and the throttle lockout both move back to their original positions. This movement is controlled by two independent return springs.
MAINTENANCE GEAR There is a grease nipple and a plug for injecting lubricant into the gear housing. Use a grease gun to fill with grease. This should be done after every 25 working hours. (see Fig. 23) CAUTION! The gear housing must not be filled completely with grease. The grease expands as the machine heats up during operation. If the gear housing was completely filled with grease it could damage the seals and lead to leakage of grease.
Problem Possible Cause Solution No spark Check spark. Remove spark plug. Reattach the spark plug cap and lay spark plug on metal cylinder. Pull the starter rope and watch for spark at spark plug tip. If there is no spark, repeat test with a new spark plug. No fuel Push primer bulb until bulb is full of fuel. If bulb does not fill, primary fuel delivery system is blocked. Contact customer service. If primer bulb fills, engine may be flooded, proceed to next item.
This Service is to be complete within 20 hours or 3 months of purchase, which ever comes first. This Service is to be complete within 40 hours or 6 months of purchase, which ever comes first.
For any queries or assistance call Customer Service AUST. 1300 660 457 NZ 0800 474 876 www.stanleyproducts.com.au Hours of operation: Monday to Friday 8.00am - 5.00pm AEST Do not return to place of purchase. Keep your purchase receipt, this will be required to make any claims under the 2 year warranty.