C.
IMPORTANT SAFETY PREC AUTIONS 1. 2. 3. 4. 5. 6. 7. 8. 9. 10. 11. 12. 13. 14. 15. Servicing - The user should not attempt any service to the appliance beyond that described in the operating instructions. All other servicing should be referred to qualified service personnel.. 16. Ventilation - Slots and openings in the cabinet are provided for ventilation and to ensure reliable operation of the product and to protect it from overheating, and these openings must not be blocked or covered.
IMPORTANT TO SAFETY WARNING: • TO PREVENT FIRE OR SHOCK HAZARD, DO NOT USE THIS PLUG WITH AN EXTENSION CORD, RECEPTACLE OR OTHER OUTLET UNLESS THE BLADES CAN BE FULLY INSERTED TO PRES ENT BLADE EXPOSURE. • TO PREVENT FIRE OR SHOCK HAZARD. NO NOT EXPOSE THIS APPLIANCE TO RAIN OR NOISTURE. • TO PREVENT ELECTRICAL SHOCK, MATCH WIDE BLADE PLUG TO WIDE SLOT AND FULLY INSERT. CAUTION: 1. Handle the power supply cord carefully Do not damage or deform the power supply cord.
NOTE ON USE • • • • • • • • • • Allow for sufficient heat dispersion when installed in a rack. Handle the power cord carefully. Hold the plug when unplugging the cord. Keep the set free from moisture, water, and dust. Unplug the power cord when not using the set for long periods of time. Do not obstruct the ventilation holes. (For sets with ventilation holes.) Do not place foreign objects in the set. Do not let insecticides, benzene, and thinner come in contact with the set.
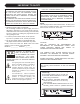
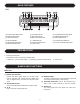
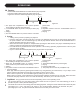
MAIN FEATURES LCD 1 2 39 4 59 15 14 13 12 17 16 12 7 8 8 99 6 11 12 10 (1) PLAY/PAUSE INDICATOR (4) SINGLE INDICATOR (7) LOOP INDICATOR (2) CUE INDICATOR (5) MP3 INDICATOR (8) RELOOP INDICATOR (3) FOLDER/TRACK INDICATOR (6) TIME BAR INDICATOR (9) PITCH INDICATOR (10) PITCH METER (11) TIME DISPLAY (12) CHARACTER DISPLAY (13) ELAPSED INDICATOR (16) TRACK INDICATOR (14) REMAIN INDICATOR (17) AUTO CUE (15) TOTAL REMAIN INDICATOR PREPARATIONS 1.
NAMES AND FUNCTIONS Main Unit (1) POWER (Power ON/OFF Switch) When the POWER switch is pressed, the power turns on. (13)PITCH SLIDER Use the slider to adjust the CD pitch. Slide up to decrease the pitch, down to increase the pitch. (2) DISC HOLDER Place the discs in the holder. Press the OPEN/CLOSE button to open and close the disc holder. (14)PITCH LOCK Use this button to enable or disable BPM adjustment with the pitch sliders. BPM adjustment with the pitch sliders is disabled when the PITCH LED lights.
NAMES AND FUNCTIONS LCD (1) PLAY / PAUSE INDICATOR When the unit is in play mode the “PLAY” indicator will glow, when the drive is in pause mode the “PAUSE” indicator will glow. (10) PITCH METER Shows the percentage change in pitch of the song. The meter will display the pitch percentage applied by the PITCH SLIDER. (2) CUE INDICATOR This indicator will glow when the unit is in CUE mode and will flash every time a new CUE POINT is set. (11) TIME DISPLAY This displays the Minutes, Seconds, and Frames.
OPERATIONS 1. Opening and Closing the Disc Holder Turn the unit power on. Press the OPEN/CLOSE button to open the disc holder. The disc holder cannot be opened during playback to prevent playback from being interrupted if the OPEN/CLOSE button is pressed accidentally. Stop the playback first, then press the OPEN/CLOSE button. 2. Loading discs Hold the disc by the edges and place it in the disc holder, then press the OPEN/CLOSE button again to close the disc holder.
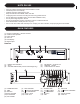
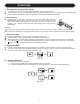
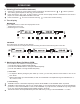
OPERATIONS 5B. Pausing ˙ Press the PLAY/PAUSE button to switch between play and pause. ˙ The play indicator flashes when the pause mode is set. ˙ Figure 5-2 shows the relationship between play and pause. 2 4 6 3 7 1 1) 2) 3) 4) 5 The player has completed the cue or pause operation and is waiting for the play start command. PLAY/PAUSE button is presse d and player enters play mode. Playing. The PLAY/PAUSE button is presse d and the unit enters Figure 5-2 5) 6) 7) pause mode. Pausing.
OPERATIONS 8. Scanning (Fast forward/Fast backward) or button is pressed. Scanning is a function for moving quickly forward or backward in the track when the The scanning speed depends on how long you hold the button. Press and hold the or to begin scanning. The disc moves rapidly forward or backward and the sound is played. The current scan point is indicated on the LCD. Press and hold the to scan in the forward scanning, to scan in the reverse scanning. 9.
BEFORE SWITCHING OFF THE POWER CAUTION: Do not forcibly close the disc holder when the power is off. Do not switch off the power when the disc holder is open. To avoid damage, please don’t switch the power until the disc holder has been closed with the OPEN/CLOSE button and the LCD displays "no disc”or "time code” shows. COMPACT DISCS 1. Precautions on handling compact discs ˙ Do not allow fingerprints, oil or dust to get on the surface of the disc.
WARRANTY & RETURN POLICY WARRANTY & RETURN POLICY Warranty Through Stantons authorized dealers around the World, Stanton, or one of Stantons authorized distributors outside the U.S., will, without charge, repair or replace, at the sole discretion of the entity responsible for making the repair or providing the replacement, any Stanton merchandise proved defective in material or workmanship for a period of one (1) year following the date of original purchase.