Professional Dual CD Player C.
Congratulations and thank you for purchasing the latest addition to the growing Stanton family of professional DJ gear. Sporting a new attitude and a fresh, modern look, the Stanton C.503 is a dual rackmount CD player with designed to give club and mobile DJs a powerful, yet simple tool to mix, create, and perform their best. Designed for DJs who want solid, reliable performance and the latest technology, the workhorse C.
1 Read these instructions. 2 Keep these instructions. 3 Heed all warnings. 4 Follow all instructions. 5 Do not use this apparatus near water. 6 Clean only with dry cloth. 7 Do not block any ventilation openings. Install in accordance with the manufacturerÅfs instructions. 8 Do not install near any heat sources such as radiators, heat registers, stoves, or other apparatus (including amplifiers) that produce heat. 9 Do not defeat the safety purpose of the polarized or grounding-type plug.
TABLE OF CONTENTS 1. Functions and Controls (Layout) 1-1. Main Unit (Front Panel) 1-2. Main Unit (Rear Panel) 1-3. Remote Controller (Front Panel) 1-4. Remote Controller (Bottom Panel) 1-5. LCD 2. Standard Operation 2-1. CUE 2-2. MEMORY/CUE 2-3. Flash Start 2-4. Looping 2-5. Adjusting the tempo 2-6. Pitch Bending 2-7. KEY LOCK 2-8. PITCH LOCK 2-9. BPM/TAP 3. Advanced Operation 3-1. KEY SHIFT 3-2. BRAKE 3-3. VINYL 3-4. Track Memory 3-5. Fader Start 3-6. Relay Play 3-7. Auto Cue 3-8. Program Play 3-9.
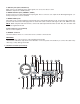
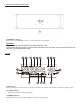
FUNCTIONS & CONTROLS 11. Main Unit (Front Panel) 1. Disc Trays Insert CDs into these trays, label side upwards. NOTE: The C.503 reads Audio from CDs & CD-Rs. + Audio Only CD-RWs 2. Tray LEDs When power is turned on, these two LEDs will light. 3. OPEN/CLOSE Buttons Open and close the appropriate disc tray. To avoid mistakes direct mode is off by default, therefore the CDs cannot be ejected when in Play mode. NOTE: Direct Mode allows the CD to eject regardless of play / status (see Preset Menu) 4.
5. OUTPUT jacks (RCA, unbalanced) RCA connectors providing line level output signals, one set each for discs 1 and 2. Maximum output level is +6dBV (2Vrms) 6. DIGITAL OUTPUT jacks (COAXIAL, S/PDIF) Coaxial connectors provide S/DIF digital output signals. These connectors can output the 44.1KHz digital signals constantly even if pitch control is activated. 7. FADER START jacks The C.503 can be controlled using the external fader start command through these jacks.
10. Jog wheel The following functions can be controlled by using the Jog wheel: * Pitch Bend * VINYL / Scratch * Brake time * KEY SHIFT control * Preset menus [SHIFT + Jog Wheel] * Effect parameters * Program edit * Track memory number select * Search (in Paused mode) 11. OPEN/CLOSE [RESET] Button Opens and closes the appropriate tray. When DIRECT mode is off (in preset menu) and disc is being played back, these buttons cannot be used.
15. SEARCH Buttons Search within the track selected, either forward >> or backward << with these buttons. When unit is pausing, pressing this button shortly moves the start / cue point in 1 frame steps. This also enters is stutter mode. 16. CTN/SGL [PROGRAM] Button Selects the play mode, either continuous or single mode. Pressing and holding the SHIFT button then pressing this button enters the program edit mode and program play mode. When unit is in single play mode, “SGL” indicator in the LCD will light.
returns the CUE point again (Stutter play). At this time (playing with holding the CUE Button), pressing the PLAY Button enters into the normal playback mode. Pressing and holding the SHIFT Button then pressing this Button toggles the AUTO CUE function on and off. 26. MEMORY/CUE [MEMO/INS] Button Activates the three buttons below (1/IN, 2/OUT, and 3/RELOOP) ready for CUE mode. When these three buttons are set to CUE mode, this button will light green, press again to SET cue for bank 1, 2, or 3.
1-4. Remote Controller (Bottom Panel) 34. REMOTE connector Connect this to the REMOTE connector on the rear panel of the main unit. WARRNING * DO NOT use any cable except the cable supplied with the C.503. * Connect the cable to the C.503 as shown on the illustration on the rear panel. If you connect the cable in any other way, you may damage the C.503. 1-5. LCD 35. M indicator If there is track memory data for the current selected track in the current selected memory bank, this indicator lights. 36.
38. SGL indicator When the play mode is set to single play, this indicator lights. 39. RPT indicator When the play mode is set to either single repeat or all repeat play mode, this indicator lights. 40. PGM indicator When the play mode is set to programmed play, this indicator lights. 41. Time display This section is used to show track number, time values or messages. 42. Memory bank indicators Lights the current selected memory bank indicator. 43. A.CUE indicator Lights when AUTO CUE function is turned on.
Stutter play with the CUE Button Once a CUE point has been created, the unit will play when this button is pressed, and enter pause mode when CUE button is released. If the PLAY button is pressed during CUE playback, the unit will go into normal play mode. 2-2. MEMORY/CUE The C.503 can have three flash (seamless) cue points stored with the CUE 1-3 buttons.
CUE button, etc…). At this time, the RELOOP button start flashing, but the loop points are not erased. Re-looping When loop play is disengaged and loop points are already stored, pressing the RELOOP button starts looped playback and the RELOOP button lights. Seamless playback from the LOOP start point Pressing the RELOOP button always play starts from the loop start point. Changing the LOOP points Loop start and end points cannot be erased but can be over written.
2-9. BPM / TAP Button The C.503 features a manual BPM calculation. Set the parameter display mode to BPM by Pressing [RECALL DISPLAY] until BPM shows in LCD or just begin tapping the BPM/TAP button. Pressing the BPM/TAP button repeatedly (suggested 8 times or more) enters the song tempo (BPM) in manually. This manual BPM is shown in the LCD parameter display and the BPM/TAP button blinks in tempo. The BPM displayed is affected by the pitch slider.
When VINYL function is on, the Jog wheel works as the search dial. 3-4. Track Memory The C.503 can memorize the various playback settings of current selected tracks. Up to 100 tracks of memory in each of 5 banks (A to E) can be stored. You could use each bank for a different user style / preference or use the each bank for a different setting for each track, for example. To store the Track Memory Data 1.
the track memory number. NOTE: CUE 1-3 and loop points can be memorized and/or recalled. However, just after the recall operation, start from the CUE 1-3 or loop points will not be seamless when performed on the first try (because there are no data in the RAM buffer just after the recall operation). Once playing from cue points (CUE 1-3) and/or loop start point, flash start and/or looping can again be performed seamlessly. 3-5.
5. Exit the program edit mode [PROGRAM] by pressing and holding the SHIFT button then pressing the CNT/SGL button. Edit program 1. Enter the program edit mode [PROGRAM] by pressing and holding the SHIFT button then pressing the CNT/SGL button. 2. Program number is shown in the parameter display. Select the desired program number with the Jog wheel. 3. Select desired track with track skip buttons. 4. Repeat 2-3. 5.
4. Pressing the TIME/ENTER button confirms the new parameter. 5. Pressing any other button exits the preset operation. 01 t PLAY Timer Play OFF*, ON Turns the “Power on play” on and off 02 dIrECt Direct OFF*, ON When direct mode is set to on, disc can be ejected when disc is played, and when insert the disc, playback is started automatically. 03 rEAd 04 rECALL TOC Read Mode nor*, AUt Selects the TOC read mode. nor: Uses the previous servo value. AUt: Adjust the servo value every time.
SPECIFICATIONS 8cm / 12cm CD Disc type: Number of channels: 2-channel Resolution: 16-bit Sampling frequency: 44.1kHz RCA pin jack Analog output: Output impedance: <1kohm Maximum output level: +6dBV Digital output: Coaxial Format: S/PDIF Voltage requirements USA/Canada: 120V AC, 60Hz UK/Europe: 230V AC, 50Hz Australia: 240V AC, 50Hz Power consumption: 27W Peak inrush current: 0.
ERROR MESSAGES & TROUBLESHOOTING Error Messages occur when there is known issue / problem with the playback device. Below are the Error numbers, and explanation of the problem and how to correct it.
WARRANTY & RETURN POLICY Warranty Through Stanton’s authorized dealers around the World, Stanton, or one of Stanton’s authorized distributors outside the U.S., will, without charge, repair or replace, at the sole discretion of the entity responsible for making the repair or providing the replacement, any Stanton merchandise proved defective in material or workmanship for a period of one (1) following the date of original purchase.
ADDITIONAL SAFETY INFO For U.S.A TO THE USER This equipment has been tested and found to comply with the limits for a Class A digital device, pursuant to Part 15 of the FCC Rules. These limits are designed to provide reasonable protection against harmful interference when the equipment is operated in a commercial environment.