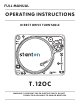
FULL MANUAL OPERATING INSTRUCTIONS DIRECT DRIVE TURNTABLE T.12OC WARNING: TO PREVENT FIRE OR ELECTRIC SHOCK, DO NOT EXPOSE THIS APPLIANCE TO RAIN OR MOISTURE.
IMPORTANT SAFETY INSTRUCTIONS 1. 2. 3. 4. 5. Read these Instructions – All the safety and operating instructions should be read before this product is operated. Keep these Instructions – The safety and operating instructions should be retained for future reference. Heed all Warnings – All warnings on the appliance and in the operating instructions should be adhered to. Follow all Instructions – All operating and use instructions should be followed.
IMPORTANT SAFETY INSTRUCTIONS 21. Lightning – For added protection for this product during a lightning storm, or when it is left unattended and unused for long periods of time, unplug it from the wall outlet and disconnect the antenna or cable system. This will prevent damage to the product due to lightning and power-line surges. 22.
ASSEMBLY Remove all the parts from the box. Please check to make sure the following items are included with the main unit in the carton: (1) (2) (3) (4) (5) (6) (7) (8) (9) (10) Platter Slip mat Counterweight 45-rpm adapter Headshell AC cord RCA cable Target light Operating instructions Cloth dust cover CONNECTIONS 1) Connect the power cord to an AC outlet. 2) Connect the RCA cable to the PHONO input of your mixer.
TONE ARM AND CARTRIDGE SETTINGS The third adjustment is the needle (or stylus) pressure. Start with the cartridge-headshell assembly mounted into the tone arm. Remove any needle protectors provided. With tone arm free, adjust the tone arm counterweight by rotating the rear section until the tone arm floats in a balanced condition above the record or mat. Do not allow the needle to drop onto the mat or the turntable platter during this adjustment. You might damage the needle tip.
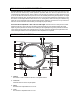
PART NAMES & FUNCTIONS 5) STROBE DOTS The dots around the edge of the platter are used in conjunction with the light located inside the motor ON/OFF switch. While the platter is in rotation, the dots help to indicate the speed of rotation. The speed is lower than the displayed speed (33,45,78) when the dots are flowing to the right. It is higher than the displayed speed (33,45,78) when the dots are flowing to the left. When the strobe is stopped, the platter is rotating at the displayed speed.
PART NAMES & FUNCTIONS 19) COUNTERWEIGHT Use this to balance the tone arm and to adjust the stylus pressure. See “tone arm and cartridge settings” for proper adjustments. 20) 45-RPM ADAPTOR HOLDER Place on the attached 45-rpm adaptor here. Push down the rear side of 45 rpm adaptor to take it. 21) EXTRA STYLUS HOLDER Place extra headshells here.
SPECIFICATIONS Time for Speed Change Audio Output Less than 0.2 sec. from 331/3 to 45 rpm. Less than 0.2 sec. from 45 to 331/3 rpm. Less than 0.5 sec. from 331/3 to 78 rpm Phono/Line output TONEARM SECTION: Type Effective Arm Length Tracking Error Angle Applicable Cartridge Weight Anti-skating Range High of Cue (First Track) Descend of Cue Static balanced S shaped tone arm with detachable headshell 230mm Less than 3 degree 13~18g 0~3g 7.5~10 mm 1~3 sec.
Stanton Magnetics, Inc. – Warranty Provision – Returns for Repairs or Replacement WARRANTY Through Stanton’s authorized dealers around the World, Stanton, or one of Stanton’s authorized distributors outside the U.S., will, without charge, repair or replace, at the sole discretion of the entity responsible for making the repair or providing the replacement, any Stanton merchandise proved defective in material or workmanship for a period of one (1) year following the date of original purchase.
cut along dotted line State Where did you buy this product? Date of Purchase Serial Number Model Number PRODUCT INFO Telephone Country City Address Name PERSONAL INFO Zip If you have internet access, please register your product at www.stantondj.com. Otherwise, return this card completely filled out in order to validate your warranty.
PLACE STAMP HERE Stanton Magnetics, Inc. 3000 SW 42nd Street Hollywood, FL 33312 U.S.A.