
User Manual


-4-
(Direct Wiring Guide CONT’D)
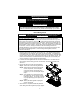
5. All of the wires coming from outside of the lightbar are terminated on the same side of
the terminal block and the wires leading to the internal components terminate on the
opposite side of the terminal block. Loosen the screws on the terminal block and
remove only those wires that exit the lightbar through the hole in the base. There
may be “dead” wires from the harness connected to the terminal block inside your
lightbar, but there will be no wires connected to the terminal across from them. These
are extra wires in the harness that are not used. Replacing these wires in your new
harness is not necessary.
6. Run the new external wires up through the wire bushing into the base and into the
terminal block(s). The function of each of the colored wires in the original wiring harness
is listed in the Wire Harness Usage Table on page 1. There should also be a label next
to the terminal block indicating which color wire should be connected to each terminal.
7. Strip each wire 1/4". Connect the external wires to the proper poles of the terminal
block by inserting the stripped portion of the wire under the rising clamp screw and
tightening down the screw. No wire terminals are needed for connecting wires to this
terminal block.
Be sure to check that no strands of wire are loose and shorting to the
adjacent terminal or to the base of the lightbar.
The correct wire size and color listed in the table on page 1 corresponds directly with the
wiring of the lightbar. All switches used should be rated for at least 125% of their rated load.
8. Once your new wire harness has been connected to the lightbar, you may continue to
the Electrical Connections section.
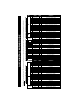
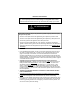
From Lightbar Components
From Wire Harness
Remove
These