
Datasheet


-
15
-
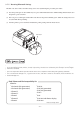
< Current Setting >
Auto Connection : OFF
To enable this setting, turn
Printer Power OFF and turn ON.
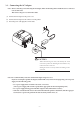
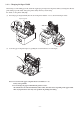
PAIR
RST
PAIR
RST
RST button
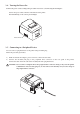
3-7-4. Setting up Auto Connection
uSetting up from the Main Unit for the TSP650II
Note : e following procedure explains how to change the Auto Connection function setting from ON to OFF.
If you want to change it from OFF to ON, please follow the same procedure.
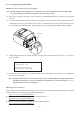
(1) When paper is loaded in the printer and it is turned on, the [POWER] LED(green) on the front of the printer
turns on.
(2) If you hold down the [RST] button on the back of the printer for at more than ve seconds, initial operations are
performed in the same way as when the power is turned on, and the LEDs on the front of the printer ash. If you
press the [RST] button when the printer is placed upright, place it horizontally again while the LED is ashing.
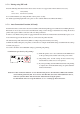
(3) The following information is printed. After that, turn the printer off and then back on again to set "Auto Con-
nection" to OFF.
(4) To make sure "Auto Connection" is set to OFF correctly, perform self-printing as described in "3-7-3. Conrmation
procedure by self-printing”.
Note: OnlyBluetoothFirmwareVersion2.0orlaterallowsyoutoswitchON/OFFbypushingthe[RST]button.
e Bluetooth Firmware version can be conrmed by self-printing. (For more information, see "3-7-3.
Conrmation procedure by self-printing”.)
u
Setting from the Software
Aer pairing your device and the TSP650II, change "Auto Connection" in the following application provided by our company.
l iOS: Download "Star Setting Utility" from the following Web site.
http://www.star-m.jp/prjump/000003.html
l Android: Download "Star Setting Utility" from the following Web site.
http://www.star-m.jp/prjump/000004.html
l Windows: Download "Star Bluetooth Utility" from the following Web site.
http://www.star-m.jp/prjump/000006.html