The Windows™ Color Presentation Printer WinType 800C Users Manual 80825100
Federal Communications Commission Radio Frequency Interference Statement This equipment has been tested and found to comply with the limits for a Class B digital device, pursuant to Part 15 of FCC rules. These limits are designed to provide reasonable protection against harmful interference in a residential installation.
Introduction iii A word about the printer System requirements This users manual How to use this manual Features of the printer Printer components iii iii iii iv iv v Chapter 1 Setting up your printer 1 Unpacking and checking the package contents Package contents Genuine Star supplies Placing the printer Preparing to print Loading coated paper Installing the film roll Connecting the power cord Performing a test print Connecting the printer to your computer 1 1 2 3 3 4 5 8 8 9 Chapter 2 Installing the
ii Getting ready to print Printing DIP switch settings Changing halftones and image quality Changing halftones Changing gamma correction Changing color balance High speed printing Print speed Other buttons in the Options dialog box Black Representation Intensity Photo Text Printing on Special A4 and Legal size media Replacing the film roll Changing the film roll setting Printing with iron-on transfer Steps for printing on the transfer sheets Steps for transferring the image on the cloth Steps for the finis
Introduction Thank you for purchasing the Star WinType 800C color presentation laser quality printer. This Users Manual has been organized into five chapters, a glossary and an index to help you learn the proper operation and care of your printer. The first three chapters explain the basic care and handling of this printer and the operation of the printer driver software. The remaining chapters are intended as a reference guide for troubleshooting any printing problems you may encounter.
Chapter 5 Reference information This chapter lists the printer's specifications. Glossary This provides you with the definitions of commonly used printer and computer words. Index This lists, in alphabetical order, topics which appear in this manual. How to use this manual Each chapter provides you with simple explanations of the printer's operation. We have included illustrations of the printer and Windows screens wherever necessary and wherever space allowed.
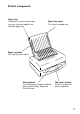
Printer components Paper tray The paper tray cover and the paper tray base, when put together, are called the paper tray. Paper tray cover This covers the paper tray. Paper tray base This holds your print media. Control panel Top cover release The control panel includes the Ready button and the Ready, Paper and Film Roll lamps. Press this to open the printer's top cover.
Power switch AC cord socket DIP switches Air vents Parallel interface connector This connects the printer to the computer. Platen roller Top cover Top cover support Thermal head Bobbin sockets These are used to mount the film roll to the inside of the printer.
Federal Communications Commission Radio Frequency Interference Statement This equipment has been tested and found to comply with the limits for a Class B digital device, pursuant to Part 15 of FCC rules. These limits are designed to provide reasonable protection against harmful interference in a residential installation.
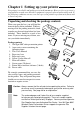
Chapter 1 Setting up your printer Your printer is a reliable and quality precisioned instrument. However, it is every owner's responsibility to make sure that their equipment is properly placed and sensibly used. If the following conditions are met, you can expect your printer to perform at its finest and to last a long time. Unpacking and checking the package contents When you open the box, you will find the items in the list below included.
Genuine Star supplies Description 3 color film roll (Letter/A4 size) Model Number TL1-11C3H Yield Per Roll 80 pages 3 color film roll (Legal/Special A4 size) TL1-14C3H 69 pages 4 color film roll (Letter/A4 size) TL1-11C4H 59 pages 4 color film roll (Legal/Special A4 size) TL1-14C4H 47 pages Monochrome film roll TL1-CBH 200 pages Note: Description Coated paper Presentation grade paper OHP film Iron-on transfer sheets 2 All film rolls are sold with 2 rolls per package.
Placing the printer If you take good care of your printer, you can expect it to perform at its finest and to last for a very long time. You can do that by first setting your printer in an area which meets the following requirements. • A firm, level surface which is free from vibration. • An area free from excessive heat such as direct sunlight or heaters. • A dust free environment. • A steady power supply.
Loading paper You must always follow the Steps below to load paper before installing the film roll. Steps: 1. Insert the paper tray base into the positioning holes at the back side of the printer. 2. Fan the paper. This will prevent paper jams from occurring. 3. Load one sheet of paper into the paper tray base with the printing side facing the paper tray base. Note: Recommended coated paper will have the words "PRINT OPPOSITE SIDE" printed in light blue letters on the back side. 4.
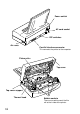
5. After inserting the paper, place the paper tray cover on top of the paper tray base in the direction indicated by the arrows in the illustration at the right. Installing the film roll Caution: It is essential that you have paper in the paper tray, that the paper tray cover and the top cover support are in place when you open the top cover of the printer. Failing to do so will allow the top cover to drop down when opened. This can cause unexpected and painful injury. Steps: 1.
3. Press the cover release and open the top cover. Caution: Always leave the paper tray and top cover support in place when opening the printer's top cover. Removing them while top cover is open will cause it to fall shut while your hands are inside the machine. 4. Lift up the Top Cover Support located on the left on the inside of the printer and slip the end of the support bar into the latch located on the inside of the Top Cover. Gently lower the Top Cover until it stops. 5.
6. Place the larger half of the film roll into the rear portion of the printer. Fit the geared bobbin side into the slot first. Then slip the other end into the opposing slot. The smaller bobbin (on the left side) should pop into place. The bobbin and printer gears should mesh. Insert the take-up roll (smaller half) into the slots in the front portion of the machine by following the procedures described above. 7.
Connecting the power cord Steps: 1. Make sure that the power switch, located on the back of the printer, is in the OFF [ ] position. 2. Securely plug the power cord into the socket located at the rear of the printer. 3. Plug the other end of the power cord into a grounded wall outlet. 2 3 Performing a test print To make sure that you have correctly prepared your printer for printing, we suggest that you perform a test print.
Connecting the printer to your computer Follow these Steps to connect the printer to a computer with a high quality 36 pin shielded Centronics parallel interface cable (not supplied). Steps: 1. Make certain that both your printer and your computer are turned OFF. Power OFF! Power OFF! 2. Plug one end of the parallel cable into one of the interface ports on the computer. 3. Plug the other end of the interface cable into the printer's interface port which is located on the back of the printer. 4.
10
Chapter 2 Installing the printer driver and TrueType fonts If you have prepared your printer, you can install the printer driver which accompanied this printer on floppy disk number one. This printer comes with two floppy diskettes. One disk contains the printer driver and the other contains the 35 scalable TrueType fonts which are designed especially for Windows version 3.1 applications printing. To operate the printer, you must follow these steps to install the printer driver software.
2. Insert disk #1 into the drive. (Use the drive depending on your computer.) 3. In the Windows Program Manager, choose Run from the file menu. 4. In the Command Line box, type "A:\setup" and press , if A: is the letter of the drive containing the software program. You can also select this by clicking on the Browse... button and selecting the drive in which the software program floppy is located. Select setup.EXE and click OK. 5.
Automatic Install 1. If you selected Automatic Install, (All Fonts) at Step 6 on page 12, the install program will prompt you to insert Floppy disk #2, and will automatically proceed with installing all 35 TrueType fonts before requesting you to select a default printer. 2. When the TrueType fonts have been installed, you will be prompted to select a default printer. The install program will automatically open up the Printer's dialog box in the Control Panels. 3.
5. Click on OK. The Fonts dialog box will appear. When installation is complete, the fonts will appear in the Installed Fonts list box. 6. After clicking Close, the printer driver install program will prompt you to select a default printer. You can then proceed with Automatic Install Steps 3 – 5 described on the previous page. Without Install Font 1. If you didn't select to install any fonts, you will be prompted to select a default printer.
Chapter 3 Printing with WinType 800C The WinType 800C prints exceptionally vivid and glossy color presentation materials on genuine Star supplies including our coated paper, presentation grade paper, overhead projection (OHP) film and iron-on transfer sheets. The WinType 800C accepts media from the paper tray or you can load media manually. This printer is also easy to use because it works within the graphical interface of the Windows environment.
Features of the printer This printer includes the following capabilities. • Printing from any Windows 3.
Operating the printer Turning ON the power to the printer Flip the switch located above the power cord on the back side of the printer in the direction of arrow in the illustration at the right. The switch should be in the [ ] position. Turning OFF the power to the printer Flip the same switch on the back side of the printer in the direction of arrow in the illustration at the right. The switch should be in the [ ] position.
2. Fan approximately 50 sheets of coated/ presentation grade paper. This will help prevent paper jams from occurring. Note: It is best to insert one sheet of media first and make sure that is all the way into the printer before adding more media. When printing with OHP film, insert one sheet of coated/presentation grade paper at the bottom and place the OHP film on top of it. 3. Place the media into the paper tray with the printing side facing the paper tray.
Manual loading This printer can also receive manually loaded print media. The steps required for manually loading media are outlined below. Steps: 1. Remove any media that has finished printing. 2. Load the media with the printing side down into the opening in the paper tray cover. Make sure that it is inserted completely into the printer feeder. Caution: Do not manually load more than one sheet of media at a time.
B F (H) D Printable Area Tolerance E A B C (Dots) D (Lines) E F (G) (H) A, B, C D, E, F 20 C A Letter Size A4 Size (inches) (mm) Color Mono Color Mono 8.5 8.5 210 210 11 11 297 297 8.1 8.1 200.5 200.5 (2432) (2432) (2368) (2368) 9.5 10.1 258 273.6 (2850) (3034) (3048) (3232) 0.2 0.2 4.75 4.75 0.55 0.55 14 14 (0.2) (0.2) (4.75) (4.75) (0.95) (0.35) (25) (9.4) ±0.06 ±0.06 ±1 ±1 ±0.12 ±0.12 ±3 ±3 (G) Legal Size (inches) Color Mono 8.5 8.5 14 14 8.1 8.1 (2432) (2432) 12.5 13.1 (3750) (3934) 0.2 0.
Getting ready to print Before printing, there are a few things that you should do to setup the WinType 800C for printing. You will need to select the WinType 800C printer driver and make selections on media size, media type, orientation, etc. The Steps required for making these selections are outlined below. Steps: 1. In the Program Manager, open the Main group by double-click on its icon. 2. Double-click on the Control Panel icon in the Main group. 3.
7. Select either Portrait, Landscape or Mirror printing. If you select Portrait, your documents will be printed vertically. If you select Landscape, your documents will be printed horizontally. Mirror is used to reverse the image . 8. Click on the Options button. This will call up the Options menu where you can make further changes there. 9. Select the media type you want to use in the drop-down list box. Selections include: Coated Paper, Plain Paper and OHP Film. Default is Coated Paper.
Printing When you select the Print command from the File menu of your Windows application, printing will begin. Operation may vary somewhat, however, per software application program. If you have selected Fast Print to Port (see "High speed printing" on page 26) in the Options dialog box, a message like the one at the right will be displayed. This will provide you with the status of the document being currently printed.
There are other selections in the Options dialog box that can enhance the performance and color graphics quality of your printer. These selections - changing halftones, image quality, gamma correction, color balance and high speed printing - are described in the following sections. Changing halftones and image quality The Options dialog box, introduced earlier, contains three parameters for changing halftone and image quality. The following explains how to change them and what each setting means.
6. Click on the Options button. There is a box in the Options dialog box titled "Halftone" which is where you can select the halftone that meets your needs. The following lists the meanings of each type of halftone. Spiral This gives a sharp image and is best for computer graphics and presentations. Because the "cells" for the basic image are smaller, you can print much finer images. Mesh This also gives a sharp image and is good for computer graphics and presentations.
Changing color balance You can use the color balance scroll bars, also part of the Options dialog box, to change the balance of the colors you are going to use. Again, this printer driver is equipped with scroll bars for the three colors of red, green and blue. This is good for enhancing some of the colors you want to use in your presentation documents. For example, if you move the R: (red) scroll bar to the right, you can increase the reddishness of the overall image.
3. Double-click on the Printers icon. 4. Click on STAR WinType 800C on LPT1 in the Installed Printers list, if LPT1 is the port to which this printer is connected. 5. Click on the Setup button. 6. Click on the Options button. 7. Click on Fast Print to Port. Putting an X in the Fast Print to Port box will cause your print job to be sent directly to the printer without going through Windows Print Manager. This will increase printing speed.
Film Roll Paper Size Monochrome 3-color 4-color A4 or Letter Special A4 or Legal 1MB 1.2MB 3MB 3.6MB 4MB 5MB Print speed Another way you can change the printing speed is by changing the settings in the Options menu. Steps: 1. Open the Main group by double clicking on its icon. 2. Double-click on the Control Panel icon in the Main group. 3. Double-click on the Printers icon. 4. Click on STAR WinType 800C on LPT1 in the Installed Printers list, if LPT1 is the port to which this printer is connected.
6. Click on the Options button. The fourth item from the top in the Options dialog box is Print Speed. Here you can select between Auto, Medium and Low speeds. An explanation of each is below. Auto: This is the default setting which prints documents at the standard speed of this printer. Medium: This is slightly slower than Auto. Low: This is the slowest speed available. It is useful when printing graphics with patterns or high intensity.
Intensity This will change the lightness and darkness of the printed image. Photo When you click on the Photo button, Gamma Correction will automatically change to the values of R = 0.8, G = 1.0 and B = 1.4 to give your photographs more true color printing. Color Balance will be set to R = 0, G = 5 and B = 0 If you click on this when using 4 color film ribbons, Black Representation will be set to Y+M+C+Black.
Printing on Special A4 and Legal size media This printer can also print on special A4 size media (210 x 356mm/8.27 in. x 14 in.) and Legal (8 1/2" x 14"). However, you must install the proper Special A4/Legal size film roll and setup the new paper size through the Printers Setup dialog box in Windows. Steps: 1. Open the Main group by double clicking on its icon. 2. Double-click on the Control Panel icon in the Main group. 3. Double-click on the Printers icon. 4.
6. Click on the Drop-down list box to reveal media sizes. 7. Click on Legal 8.5 x 14 in. When using Letter type, A4 will become Special A4. 8. Click on the OK button. 9. Click on the Close button to save your settings and return to the Program Manager. 10. You must manually feed Legal print media for printing. This is because the paper tray does not automatically feed SA4 media. Note: Note: 32 You must install the proper TL-1-14C3H (3 color), TL-1-14C4H (4 color) film roll to be able to print.
Replacing the film roll You must replace the film roll whenever you change from color to monochrome printing (or the reverse) or whenever the film roll is used up. Follow the Steps below to replace the film roll. Steps: 1. Make sure that the power switch is in the OFF position. 2. Open the top cover of the printer while the paper tray is in place. Use the Top Cover Support bar to prop up the Top Cover. Caution: Always use the Top Cover Support Bar to prop open the Top Cover.
3. Remove the film roll. First remove the take-up roll located in the front of the printer. Next, remove the film roll in the back of the printer. Caution: Be careful not to touch the thermal print head because it may be very hot. 4. Remove the film roll bobbins from the roll you just removed. Note: You can dispose of used film rolls as normal garbage. However, you should remember that all printed data will remain in reverse image on the film roll.
Changing the film roll setting You must setup the printer driver in Windows when changing to a different type of film roll. Follow the Steps below. Steps: 1. Open the Main group by double clicking on its icon. 2. Double-click on the Control Panel icon in the Main group. 3. Double-click on the Printers icon. 4. Click on STAR WinType 800C on LPT1 in the Installed Printers list, if LPT1 is the port to which this printer is connected. 5. Click on the Setup button. 6. Click on the Options button.
7. Click on the Film Roll Drop-down list box and select the new type of film roll you have just installed. See page 2 of Chapter 1 "Setting up your printer" for a list of genuine Star printer supplies for a description of the types of film rolls you can use with this printer. 8. When finished making your selection, click on the OK button. 9. A message to confirm your changes will appear. Click on OK. 10. Click on the OK button of the Setup dialog box. 11.
Printing with iron-on transfer This printer can print not only on coated paper for laser quality color output, but it also can output laser quality color images on iron-on transfer sheets. However, you should observe the Steps below when printing on iron-on transfer sheets. Note: Use only Genuine Star Iron-on Transfer Sheets for this application. The iron-on transfer is a great way to create original designs for T-shirts or other cloth items.
4. Click on the Mirror checkbox in the Printers Setup dialog box. This will cause the printer to print a mirror image of your design. 5. Load the iron-on transfer sheet, with the printing side down, into the opening in the paper tray cover. Make sure that it is inserted completely into the printer. Caution: Do not manually load more than one sheet at a time. Wait until the first sheet has been completely printed before loading more sheets. 6. Print your image on the transfer sheet.
Steps for the finishing process 1. Place the finishing sheet over the image on the cloth, with the cut out corner in the top left. Make sure that the silicon side is down. The finishing sheet should completely cover the image. 2. Iron the finishing sheet at the same setting used to iron the transfer sheet. Note: Do not remove the finishing sheet until it has cooled to room temperature. 3. Slowly remove the finishing sheet from the cloth starting from a corner. 4.
40
Chapter 4 Maintenance & troubleshooting Your printer is a reliable, precisioned instrument. It was built with care and should, if handled properly, perform at its finest and serve you well for a long time. However, like any piece of equipment, there may be times when it may not perform as you had expected.
To clean the inside of the printer, you should prepare the following items. • A soft cloth dampened with ethanol. Caution: Gasoline, Benzine and thinners cause irreversible damage to plastic. They should never be used to clean this printer. Caution: Do not use sharp objects to clean the inside of the printer because this could cause damage. Steps: 1. Dampen a soft cloth with ethanol. Ethanol 2. Make sure that the printer is not printing and turn off the power to the printer. 3.
Caution: Because cleaning is done while the paper tray cover and paper tray are removed from the printer, it may slam shut. Always hold the top cover with one hand while cleaning to prevent injury. 5. Remove the film rolls as described on page 28. 6. Wipe the thermal head using the soft cloth. Caution: If you have used the printer recently, be especially careful because the thermal head may still be hot. 7. Gently wipe the platen roller with the soft cloth.
8. Wipe the paper feeders with the soft cloth. Wipe the entire roller while rotating the gear. 9. Wipe the paper extract rollers with the soft cloth. Wipe the entire roller while rotating the gear. 10. While holding up the paper guide, wipe the area of the paper pinch rollers you can see with the soft cloth. 11. Rotate the gear, shown in the illustration, to expose the opposite side of the pinch rollers.
12. Wipe the pinch rollers in the back of the inside of the printer. 13. Lay the Top Cover Support Bar down to its original position while holding the top cover with one hand and gently close the top cover. You should hear a clicking sound as it closes tightly. 14. Place the paper tray and paper tray cover back into their normal operating positions and turn ON the power to the printer. Make sure that the Ready lamp is lit.
Clearing paper jams If you should experience a paper jam, Windows will display an error message and the Paper lamp on the control panel will light. Observe the following steps should a paper jam occur. Steps: 1. Turn the printer's power OFF once and then turn it ON again. Note: Turning the printer's power OFF and ON again will initialize the printer which makes removing the jammed paper easier. 2. Turn the power OFF again. 3.
5. If your print media becomes jammed inside of the machine, press the cover release and open the top cover while the paper tray is in place. Use the Top Cover Support Bar to prop up the Top Cover. 6. Your print media will appear if you gently rotate the gear, as shown in the illustration at the right. Note: Do not leave any paper scraps inside of the printer if your paper should rip. 7. After removing the jammed paper, close the top cover. You should hear a clicking sound as it closes tightly.
8. Turn ON the power to the printer and confirm that the Ready lamp is lit. Transporting your printer We suggest that you take the following precautions when transporting your printer to a new location to prevent damage to it. Steps: 1. Get the original carton box and protective items out and ready for packing the printer. 2. Make sure that the printer is not printing and turn OFF the power. 3. Unplug the interface cable and the power cord. 4.
5. Remove the film roll as described on page 33. 6. Replace the protective inserts as shown in the illustration at the right. 7. Replace the protective sheet. This should protrude through the sheet. 8. Lay the Top Cover Support Bar down to its original position while holding the top cover with one hand. 9. Close the cover completely while gently pressing the protective pieces toward the inside of the printer.
9. Remove the paper tray cover and the paper tray base. 10. Wrap the printer in its original protective sheet and place it in its original box.
Troubleshooting Your printer is a reliable, precisioned instrument and should not cause you any trouble if it is used and treated sensibly. However, we are providing you with this troubleshooting section to help you should you encounter any problems with your printer. Remember that your printer is a highly sophisticated device and that this section is intended to be only a brief guide. As with many other precisioned instruments, this printer contains high voltage.
Power supply Power is not being supplied to the printer. Check Is the printer turned ON? Possible remedy Check to make sure that the power switch on the back of the printer is in the ON [ ] position. Is the AC adapter properly plugged into the printer and the electrical outlet? Turn the printer OFF. Make sure that the power cable is securely connected and then turn the printer back ON. Is the voltage correct? Use only the AC adapter that came with this printer.
The overall print is light - continued. Check Possible remedy Are you using the correct side? Recommended coated paper will have the words "PRINT OPPOSITE SIDE" printed in light blue letters on the back side. The side from where you can read the silver colored letters on the recommended OHP film is the print side. Is the media type set correctly? Check the media type settings in the Printers Setup dialog box in Windows.
Only part of the image is printed. Check Is the proper media being used? Possible remedy Special A4 media must be either manually fed or rework your data for A4 size. Paper feeding Paper won't feed from the paper tray or manually. Check Is paper feed roller dirty? Possible remedy Clean the inside of the printer. See page 41 for an explanation of the proper way to clean the inside of your printer. Is the paper too thick or too thin? Use only the recommended paper types.
Other DIP switch settings This printer has 10 DIP switches located on the back, as mentioned earlier in this manual. The following information is provided to help you should you ever need to adjust the printer's performance in the future. We recommend that switches other than 7 through 9 for print intensity ordinarily be left alone.
Pinout of interface connector This printer uses a standard 8 bit parallel interface connector (Centronics interface). The following information is the pin assignment of the interface connector. Pin Signal 1 2 3 4 5 6 7 8 9 10 11 12 13 14 15 16 17 18 56 DATA STROBE DATA 1 DATA 2 DATA 3 DATA 4 DATA 5 DATA 6 DATA 7 DATA 8 ACKNLG BUSY EOP ON LINE GND GND CHASSIS GND +5V (Max.
Chapter 5 Reference information Specifications Engine Printing process Resolution Printing speed Letter size paper Thermal wax transfer 300 X 300 dpi Monochrome 3 color (YMC) 4 color (YMCB) 31 seconds/page 64 seconds/page 80 seconds/page A4 size paper Monochrome 3 color (YMC) 4 color (YMCB) 32 seconds/page 67 seconds/page 85 seconds/page Legal size paper Monochrome 3 color (YMC) 4 color (YMCB) 37 seconds/page 87 seconds/page 107 seconds/page Special A4 size paper Monochrome 3 color (YMC) 4 color (
TrueType fonts are supplied on disk for use with Windows 3.1 applications. Memory Standard RAM size is 512 KB. Interface Centronics parallel Power supply 120VAC, 220VAC, 230VAC, 240VAC, 50/60Hz (varies according to the country of purchase) Power consumption Dimensions Weight Reliability information Printer life Printer head life Noise level Environment Temperature Humidity At standby: 17W At printing: 120W 14.13" (W) x 10.08" (D) x 5.04" (H) (359mm (W) x 256mm (D) x 128mm (H)) 16.5 lbs. (7.5 kg.
Printer supply options Film roll TL1-11C3H Color type: Size: Life: 3 color (YMC) film roll Page length is less than 11" (Letter and A4) 80 pages per roll TL1-14C3H Color type: Size: Life: 3 color (YMC) film roll Page length is less than 14" (Letter,A4, Legal, SA4) 69 pages per roll TL1-11C4H Color type: Size: Life: 4 color (YMCB) film roll Page length is less than 11" (Letter and A4) 59 pages per roll TL1-14C4H Color type: Size: Life: 4 color (YMCB) film roll Page length is less than 14" (Letter,
Glossary To further aid you in the understanding of the printer and computer peripherals, we have created this glossary of terms. Some of the terms listed in this glossary appear in this User's Manual, while others are commonly used computer terminology. A Application A program that you use to perform a specific task on your computer. These include programs for word-processing or graphics creation. ATM fonts An abbreviation for Adobe Type Manager. This font system was developed by Adobe Systems.
Click To position the pointer arrow on an object on your display and to press the left button of your mouse. Color balance This function adjusts the overall balance of the three colors of red, green and blue. This is good for enhancing some of the colors you want to use in your presentation documents. E EEPROM Electronically Erasable Programmable Read Only Memory. It has an internal switch to permit the user to erase the contents and write new contents into it by means of electrical signals.
G Gamma Correction Gamma is used to adjust the mid-range color density of your image. H Halftone This setting in the Options dialog box allows you to define how sharp you want the printed image to appear. There are three types with this printer driver: Spiral; Mesh; Error Diffusion. Handshaking In data communications, the automatic acknowledgment by the receiving device of information that has been sent to it, either by signals and the interface ("hard") or by software controls ("soft").
Portrait Printing on paper across the narrower dimensions, such as a letter on paper which is 8.5 inches wide and 11 inches high; portrait pictures are usually taller than they are wide. PostScript T Title bar The bar at the top of your window that shows the name of the current window. TrueType font PostScript is a printer page description language developed by Adobe Systems to communicate between software applications and printers, independent of the printer's resolution.
Index Symbols 3-color 386 Enhanced 4-color 22, 28 27 22, 28 A A4 Accessories carton Auto 28 1 29 11 41 29 29 25 12 C Centronics parallel interface cable 9 Changing density 26 Changing gamma correction 25 Changing halftones 24 Changing halftones and image quality 24 Changing the film roll setting 35 Characters 57 Cleaning the inside of the printer 41 Cleaning the outside of the printer 41 Clearing paper jams 46 Coated paper 2, 22 Color balance 26 Connecting the power cord 8 Connecting the printer to you
I O Installing the film roll 5 Installing the printer driver 11 Installing the printer driver software 11 Intensity 30 Interface 58 Interface cable 9 interface connector 56 Interface port 9 Iron-on transfer sheets 2, 21, 37 Operating the printer Options button Options menu Organic solvents Overhead projection (OHP) film J Jammed inside of the machine 47 L Landscape Lightness Loading print media 22 23 17 Low LPT1 29 14 M Main group 21 Maintaining your printer 41 Maintenance & troubleshooting 41 Man
Printing speed 57 Printing with iron-on transfer sheets 37 Printing with WinType 800C 15 Program Manager 12, 21 Protective pieces 6, 49 Protective sheet 49 R RAM Ready button Ready lamp Ready mode Recommended coated paper Reference information Region of problem Reliability Replacing the film roll Run iii, 11 15 15 15 4 57 51 58 33 12 Text Thermal print head Thinners Top cover Top Cover Support Bar Transporting your printer Troubleshooting TrueType font samples TrueType fonts Turning OFF the power Turning
Customer service information In the event that you are experiencing some technical difficulty with your Star printer, please refer to Chapter 7 Maintenance & troubleshooting. That chapter provides you with easy methods to diagnose and resolve problems which you may encounter. For further technical support, you should first contact your Authorized Star Dealer. If you require additional support, Star Micronics offers a wide variety of technical support services.