SF-15HA USER’S MANUAL BEDIENUNGSANLEITUNG MODE D’EMPLOI MANUALE UTENTE 80825730
NOTICE ● All rights reserved. Reproduction of any part of this manual in any form whatsoever without STAR’s express permission is forbidden. ● The contents of this manual are subject to change without notice. ● All efforts have been made to ensure the accuracy of the contents of this manual at the time of press. However, should any errors be detected, STAR would greatly appreciate being informed of them. ● The above notwithstanding, STAR can assume no responsibility for any errors in this manual.
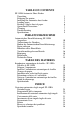
TABLE OF CONTENTS SF-15HA Automatic Sheet Feeder Unpacking Preparing the printer Installing the automatic sheet feeder Loading paper Feeding a single sheet of paper Operational Precautions Cleaning Troubleshooting Specifications 1 2 2 4 6 7 7 8 9 INHALTSVERZEICHNIS Automatischer Einzelblatteinzug SF-15HA Auspacken Vorbereitung des Druckers Einbau des automatischen Einzelblatteinzugs Papier einlegen Einziehen eines Einzelblatts Vorsichtsmaßregeln zum Betrieb Reinigung Fehlersuche Technische Daten 10 11 11
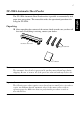
1 The SF-15HA Automatic Sheet Feeder makes it possible to automatically feed paper into your printer. This manual describes the operational procedures for using the SF-15HA. Unpacking ❏ After unpacking the contents of the carton, check to make sure you have all five items. If anything is missing, contact your dealer. Automatic sheet feeder Hopper attachment User’s Manual Note: The automatic sheet feeder is protected by packing material and tape during shipping.
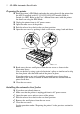
2 SF-15HA Automatic Sheet Feeder Preparing the printer ❏ Enter the printer’s EDS Mode and make the setting that tells the printer that ❏ ❏ ❏ ❏ the ASF is installed (with LC-1511/1521/4511/4521 models, Bank A, Switch 4 is OFF). Refer to the User’s Manual that comes with the printer for details on using the EDS Mode. Unplug the printer from its AC power source. Open the mute cover of the printer. Push the release lever back to the cut-sheet position.
Installing the automatic sheet feeder 3 ❏ arms enter into grooves in the printer mechanism that was exposed when you removed the two small pieces (see “Preparing the printer” in the previous section). The top of the automatic sheet feeder angled towards the front of the printer when you do this. Swing the back of the automatic sheet down, and press down gently until it settles securely in place. ❏ Close the mute cover. ❏ Insert the three hopper attachments on top of the hopper support as shown below.
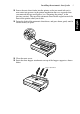
4 SF-15HA Automatic Sheet Feeder Loading paper ❏ Pull the paper tray cover of the automatic sheet feeder forward. ❏ Align the left paper guide with the scale mark that matches the size of the ❏ paper you are using. For any paper size other than A3 landscape (horizontal), align the left paper guide with the A4 or LTR mark. For A3 landscape paper, align the paper guide with the A3 mark. Adjust the right paper guide so there is enough space to insert the paper.
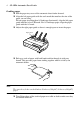
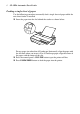
Loading paper 5 ❏ Carefully place the paper into the paper tray against the stationary paper Paper guide Retaining clip ❏ Close the paper tray cover. ❏ Make sure that the release lever is pushed back to the cut-sheet position. You are now ready to print with the auto sheet feeder. English English guide on the right side. Make sure that the left and right edges of the paper stack are under the retaining clips inside the tray.
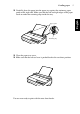
6 SF-15HA Automatic Sheet Feeder Feeding a single sheet of paper Use the following procedure to manually feed a single sheet of paper while the auto sheet feeder is installed. ❏ Insert the paper into the slot behind the stacker as shown below. A4 ❏ ❏ For any paper size other than A3 landscape (horizontal), align the paper with the A4 mark when you insert it. For A3 landscape paper, align the center of the paper with the center of the slot.
Operational Precautions 7 ✓ ✓ ✓ ✓ Loading too much paper can lead to problems that damage the auto sheet feeder mechanism. Use only single-ply paper. Never use multi-part forms or label paper. Printing may become misaligned when only two or three sheets of paper are left in the hopper. To avoid this, always make sure that there is enough paper in the hopper. When replenishing paper, remove any leftover sheets, stack it with the new paper, and fan the entire stack before placing it in the hopper.
8 SF-15HA Automatic Sheet Feeder Troubleshooting Use the following table to help track down the causes of problems and to determine the best solution to deal with them. Problem Automatic sheet feeder does not function. Possible Cause Recommended Action Paper is not stacked properly. Load the paper correctly Platen is not operating properly. Confirm that the feeder is properly installed and that all gears are meshing correctly. Printer is not in the ASF mode.
Specifications 9 Dimensions: (without hopper) 8.7(W)" × 3.5"(D) × 3.5"(H) 220(W) × 90(D) × 88(H) mm Weight: 1.7 lbs. / 0.8kg Paper size: B5, A4, LTR, B4, A3, Legal Paper thickness: 0.00375" to 0.00472" / 0.08 to 0.12 mm Paper weight: 16 to 24 lbs / 60 to 90 g/m2 / 52 to 77 kg (one-ply) Printing area: 4 mm (0.16") 5 mm (0.2") 5 mm (0.2") 8 mm (0.
10 Automatischer Einzelbatteinzug SF-15HA Der automatische Einzelbatteinzug SF-15HA erlaubt es, Einzelblattpapier automatisch in Ihren Drucker einzuziehen. Diese Anleitung beschreibt den Betrieb des SF-15HA. Auspacken ❏ Nach dem Auspacken des Kartoninhalts prüfen Sie, ob alle fünf Teile vorhanden sind. Wenn ein Teil fehlt, wenden Sie sich an Ihren Fachhändler.
Vorbereitung des Druckers 11 Vorbereitung des Druckers ❏ Den Drucker in den EDS-Modus schalten, und die Einstellung vornehmen, Deutsch ❏ ❏ ❏ ❏ die dem Drucker mitteilt, daß der ASF installiert ist. Bei LC-1511/1521/ 4511/4521 steht Schaltergruppe A, Schalter 4 auf OFF. Einzelheiten zum EDS-Modus siehe Bedienungsanleitung des Druckers. Das Netzkabel aus der Steckdose ziehen. Die transparente Schalldämpfabdeckung des Druckers öffnen. Den Papierwahlschalter nach hinten in Einzelblattstellung stellen.
12 Automatischer Einzelbatteinzug SF-15HA Einzelheiten siehe “Vorbereitung des Druckers” im vorherigen Kapitel. ❏ Den automatischen Einzelbatteinzug in den Drucker absenken, so daß die ❏ beiden runden Zapfen an den Armen in die Nuten im Druckermechanismus eingreifen, der freigelegt wurde, als die beiden kleinen Stücke aus der Rückwand ausgebrochen wurden (siehe “Vorbereitung des Druckers” im vorherigen Kapitel).
Papier einlegen 13 Papier einlegen ❏ Die Papierfachabdeckung des automatischen Einzelbatteinzugs nach vorne ziehen. ❏ des verwendeten Papiers entspricht. Für A3-Papier im Querformat richten Sie die Papierführung an der A3Markierung aus. Für andere Papierformate als A3 Querformat richten Sie die Papierführung an der Markierung A4 oder LTR aus. Die rechte Papierführung so einstellen, daß genug Platz zum Einsetzen des Papiers vorhanden ist.
14 Automatischer Einzelbatteinzug SF-15HA ❏ Legen Sie das Papier an der rechten festen Papierführung ausgerichtet, vorsichtig ins Papierfach ein. Stellen Sie sicher, daß die linke und rechte Kante des Papierstapels unter den Halteclips im Papierfach ist. Paper guide Papierführung Haltclip Retaining clip ❏ Die Papierfachabdeckung schließen. ❏ Sicherstellen, daß der Papierwahlschalter in Einzelblattpapier-Stellung steht. Jetzt kann mit dem automatischen Einzelbatteinzug gedruckt werden.
Einziehen eines Einzelblatts 15 Einziehen eines Einzelblatts A4 ❏ ❏ Für A3-Papier im Querformat richten Sie die Mitte des Papiers an der Mitte des Schlitzes aus. Für andere Papierformate als A3 Querformat richten Sie die Papierführung an der Markierung A4 oder LTR aus. Die Taste ON LINE am Bedienfeld drücken, um den Drucker auf Off-line Betrieb zu schalten. Die Taste FORM FEED am Bedienfeld drücken, um Papier in den Drucker einzuziehen.
16 Automatischer Einzelbatteinzug SF-15HA Vorsichtsmaßregeln zum Betrieb ✓ Bis zu 50 Blatt Papier (Stärke 64 g/m2) können in den Papierbehälter ✓ ✓ ✓ ✓ eingelegt werden. Durch Einlegen von zuviel Papier kann der automatische Einzelbatteinzug-Mechanismus beschädigt werden. Immer nur einlagiges Papier verwenden. Niemals mehrlagige Vordrucke oder Etikettenpapier verwenden. Die richtige Druckausrichtung kann verloren gehen, wenn nur zwei oder drei Blatt Papier im Papierbehälter übrig sind.
Fehlersuche 17 Fehlersuche Problem Automatischer Einzelbatteinzug arbeitet nicht. Mögliche Ursache Abhilfemaßnahme Papier nicht richtig gestapelt. Druckwalze arbeitet nicht richtig. Papier richtig einlegen. Bestätigen, daß der automatische Einzelbatteinzug richtig eingesetzt ist und alle Räder richtig ineinandergreifen. Den EDS-Modus verwenden, um die erforderlichen Einstellungen vorzunehmen. Den EDS-Modus verwenden, um die erforderlichen Einstellungen vorzunehmen. Papier nachfüllen.
18 Automatischer Einzelbatteinzug SF-15HA Technische Daten Abmessungen: (ohne Papierbehälter) 220 × 90 × 88 mm(B×T×H) Gewicht: 0,8 kg Papierformat: B5, A4, US-LTR, B4, A3, US-Legal Papierstärke: 0,08 bis 0,12 mm Papiergewicht: 60 bis 90 g/m2, 52 bis 77 kg (einlagig) Druckbereich: 4 mm (0.16") 5 mm (0.2") 5 mm (0.2") 8 mm (0.
19 Introducteur automatique de feuilles SF-15HA L’introducteur automatique de feuilles SF-15HA vous permet de charger automatiquement du papier dans votre imprimante. Ce manuel fournit les instructions d’utilisation du SF-15HA.
20 Introducteur automatique de feuilles SF-15HA Préparer l’imprimante ❏ Activez le mode EDS de l’imprimante et effectuez le réglage signalant à ❏ ❏ ❏ ❏ l’imprimante que l’introducteur automatique de feuilles est installé (avec les imprimantes LC-1511/1521/4511/4521, banque A, le commutateur 4 est positionné sur “OFF”). Pour plus de détails relatifs à l’utilisation du mode EDS, reportez-vous au mode d’emploi accompagnant l’imprimante. Débranchez la prise secteur de l’imprimante.
Installer l’introducteur automatique de feuilles 21 ✓ Cassez les deux petites pièces en plastique du capot arrière. ✓ Fermez le capot arrière. ❏ Français Français ❏ Pour plus de détails, reportez-vous aux étapes de la section précédente “Préparer l’imprimante”.
22 Introducteur automatique de feuilles SF-15HA Charger du papier ❏ Tirez vers l’avant le capot du magasin d’alimentation de l’introducteur automatique de feuilles. ❏ Alignez le guide gauche de papier sur la marque de format correspondant ❏ au format du papier que vous employez. Pour tout format de papier autre que le format A3 horizontal, alignez le guide gauche de papier sur la marque A4 ou LTR. Pour du papier A3 horizontal, alignez le guide de papier avec la marque A3.
Charger du papier 23 ❏ Placez soigneusement le papier dans le magasin d’alimentation contre le guide droit de papier. Assurez-vous que les bords gauche et droit de la pile de feuilles se trouvent bien sous les pinces à l’intérieur du magasin. Paper Guideguide de papier Français Français Pince clip Retaining ❏ Fermez le capot du magasin d’alimentation. ❏ Assurez-vous que le levier de relâchement se trouve bien sur la position d’introduction de documents séparés.
24 Introducteur automatique de feuilles SF-15HA Introduire une seule feuille de papier Si vous souhaitez introduire manuellement une seule feuille de papier lorsque l’introducteur automatique de feuilles est installé, suivez les étapes ci-dessous. ❏ Introduisez le papier dans la fente derrière le récepteur de papier de la manière illustrée ci-dessous. A4 ❏ ❏ Pour tout format de papier autre que le format A3 horizontal, alignez le papier sur la marque A4 lorsque vous le chargez.
Précautions relatives à l’utilisation 25 ✓ ✓ ✓ ✓ m , format A4). Ne chargez pas trop de papier. Les problèmes créés par une surcharge de papier pourraient entraîner un endommagement du mécanisme de l’introducteur automatique de feuilles. Utilisez uniquement du papier simple exemplaire. N’utilisez jamais de formulaires multi-parties ou de feuilles d’étiquettes. L’impression pourrait être décalée lorsque le magasin d’alimentation ne contient plus que deux ou trois feuilles.
26 Introducteur automatique de feuilles SF-15HA Guide de dépannage Utilisez le tableau suivant pour déterminer l’origine des problèmes et connaître le meilleur moyen de les résoudre. Problème Cause possible Marche à suivre Le papier n’est pas chargé correctement. Chargez correctement le papier. Le rouleau ne fonctionne pas correctement. Vérifiez si l’introducteur est correctement installé et si tous les mécanismes s’engrènent de manière adéquate. Le mode ASF de l’imprimante n’est pas activé.
Spécifications 27 Spécifications Dimensions: 220 (L) × 90 (P) × 88 (H) mm (sans magasin d’alimentation) Poids: 0,8 kg Format de papier: B5, A4, LTR, B4, A3, format légal Epaisseur du papier: 0,08 mm à 0,12 mm Poids du papier: 60 à 90 g/m2 / 52 à 77 kg (un seul exemplaire) Zone d’impression: 5 mm (0.2") 5 mm (0.2") 8 mm (0.
28 Caricatore automatico fogli singoli SF-15HA Il caricatore automatico fogli singoli SF-15HA consente di alimentare automaticamente la carta nella stampante. Questo manuale illustra le procedure necessarie per l’utilizzo dell’unità SF-15HA. Disimballaggio ❏ Dopo aver disimballato il contenuto della confezione, accertatevi che vi siano tutti e cinque i componenti. Nel caso mancasse qualcosa, rivolgetevi al vostro rivenditore.
Preparazione della stampante 29 Preparazione della stampante ❏ Entrate nel modo EDS della stampante ed eseguite le impostazioni ❏ ❏ ❏ ❏ necessarie per specificare che è stato installato l’alimentatore automatico ASF (sui modelli LC1511/1521/4511/4521, il Gruppo A, Interruttore 4 va spostato su OFF). Consultate il Manuale Utente fornito con la stampante per istruzioni dettagliate sull’uso del modo EDS. Staccate la stampante dalla presa elettrica. Aprite il coperchio silenziatore della stampante.
30 Caricatore automatico fogli singoli SF-15HA ❏ ❏ Per ulteriori dettagli, vedere la procedura illustrata nella sezione precedente, “Preparazione della stampante”. Abbassate il caricatore automatico fogli singoli nella stampante in modo che i due perni rotondi posti alle estremità dell’asta entrino nelle scanalature del meccanismo della stampante che è stato esposto dopo aver staccato le due piccole coperture di protezione (vedere la sezione precedente, “Preparazione della stampante”).
Caricamento della carta 31 Caricamento della carta ❏ Tirate in avanti il coperchio del vassoio carta del caricatore automatico fogli singoli. ❏ Allineate il guida carta sinistro rispetto all’indicatore di regolazione ❏ corrispondente al formato della carta che state utilizzando. Per tutti i formati carta tranne l’A3 ruotato (orizzontale), allineate il guida carta sinistro sull’indicatore A4 o LTR. Per il formato A3 ruotato, allineate il guida carta sull’indicatore A3.
32 Caricatore automatico fogli singoli SF-15HA ❏ Collocate accuratamente la risma di carta nel vassoio allineandola contro il guida carta destro. Controllate che i bordi sinistro e destro della risma cadano sotto le linguette di arresto nel vassoio. Paper Guideguide carta Linguetta clip di arresto Retaining ❏ Chiudete il coperchio del vassoio carta. ❏ Verificate che la leva di rilascio sia spinta indietro sulla posizione foglio singolo.
Inserimento di un singolo foglio di carta 33 Inserimento di un singolo foglio di carta Utilizzate la seguente procedura per inserire manualmente un singolo foglio di carta quando è installato il caricatore automatico fogli singoli. ❏ Inserite il foglio nella fessura posta dietro l’accatastatore come illustrato qui sotto. ❏ ❏ Per tutti i formati carta tranne l’A3 ruotato (orizzontale), allineate il foglio sull’indicatore A4 mentre lo inserite.
34 Caricatore automatico fogli singoli SF-15HA Precauzioni d’uso ✓ Il caricatore può contenere fino a 50 fogli di carta (da 64 g/m2 in formato ✓ ✓ ✓ ✓ A4). Caricando un quantitativo eccessivo di carta possono verificarsi degli inconvenienti che danneggerebbero il meccanismo dell’caricatore automatico fogli singoli. Utilizzate esclusivamente carta a copia singola. Non utilizzate mai moduli multi-copia o fogli di etichette.
Ricerca e soluzione dei problemi 35 Ricerca e soluzione dei problemi Problema Possibile causa Operazione consigliata Il caricatore automatico fogli singoli non funziona. I fogli di carta non sono stati ben allineati l’uno sull’altro. Il rullo non sta funzionando correttamente. Caricate la carta in modo corretto. Controllate di aver installato l’alimentatore in modo esatto e che tutte le ruote dentate si ingranino correttamente. Utilizzate il modo EDS per eseguire le impostazioni necessarie.
36 Caricatore automatico fogli singoli SF-15HA Specifiche tecniche Dimensioni: (senza caricatore) 220 (L) × 90 (P) × 88 (A) mm Weight: 0,8 kg Formato carta: B5, A4, Letter, B4, A3, Legal Spessore carta: da 0,08 a 0,12 mm Grammatura: da 60 a 90 g/m2 / da 52 a 77 kg (copia unica) Area di stampa: 4 mm (0,16") 4 mm (0.16") mm 55mm (0,2") (0.2") 55 mm mm (0,2") (0.2") 8 mm (0,31") (0.
Customer service information Star Micronics Technical Hotline: North America: 1-908-572-3300 United Kingdom: 44-1277-232036 Hong Kong: 852-2795-2335 Australia: 61-2-748-4300 New Zealand: 64-9-570-1470 Star Micronics FaxBack (Document Retrieval) System: Requires access to a facsimile machine or board with receive capability North America: 1-908-572-4004 Star Micronics Bulletin Board Service: Requires a computer modem North America: 1-908-572-5010 United Kingdom: 44-1494-461395 France: 33-1-305807 Germany: 49
Serviceleistungen in Deutschland Im Servicefall wenden Sie sich bitte an Ihren STAR Fachhändler, hier erhalten Sie kompetente Unterstützung. Sie können sich auch direkt an unser Service Center wenden. Es bietet Ihnen folgende Leistungen: • 12 Monate kostenloser Garantieservice • Ersatzteilverkauf • Service Hotline (Fragen zur Reparaturabwicklung) Sollten Sie Ihren Drucker an das STAR Service Center (SSC) schicken, sind während der Garantiezeit lediglich die Kosten für den Transport zum SSC zu tragen.