
Printer User Manual


Table Of Contents
- Surface
- English
- Notice
- About this manual
- Contents
- Chapter 1: Printer Setup
- Choosing a place for the printer
- Unpacking the printer
- General guide
- Installing the platen knob
- Opening the front cover
- Installing the ribbon cassette
- Removing the ribbon cassette
- Installing the paper guide
- Connecting to a power outlet and turning power on and off
- Loading fanfold paper
- Printing on fanfold paper
- Parking fanfold paper
- Unparking fanfold paper
- Using the tear-off function
- Connecting to your computer
- Chapter 2: Control Panel Operations
- Switching between on-line and off-line
- Selecting a font
- Entering the Font Lock Mode
- Setting the character pitch
- Entering the Pitch Lock Mode
- Line feed
- Paper eject (cut-sheet paper)
- Form feed (fanfold paper)
- Parking fanfold paper
- Micro feed
- Setting the top of form position
- Tear-off function (fanfold paper)
- Selecting the Quiet Print Mode
- Changing the auto load position
- Saving a macro
- Clearing the printer’s buffer
- Initializing the printer
- Chapter 3: Using the EDS Mode
- Chapter 4: User Setup Utility
- Installing the User Setup Utility
- Starting up the User Setup Utility
- Changing the General, Font, Paper and Adjust Settings
- Adjusting the dot alignment
- Changing the printer port
- Saving setup data in a configuration file
- Importing setup data from a configuration file
- Returning to default settings
- Exiting the User Setup Utility
- Using the Help menu
- Chapter 5: Using the Printer with Windows 3.1
- Chapter 6: Using the Printer with Windows 95
- Chapter 7: Using the Printer with OS/2 Warp
- Chapter 8: Using the Printer with MS-DOS
- Chapter 9: Paper Handling
- Appendix A: Troubleshooting
- Appendix B: Specifications
- Appendix C: Interface Pin Outs
- Appendix D: Character Sets
- Appendix E: Printer Control Codes
- Appendix F: Control Panel Operation Guide
- Francais
- Remarque
- A propos de ce manuel
- Table des matières
- Chapitre 1: Installation de l’imprimante
- Choix d’un emplacement pour l’imprimante
- Déballage de l’imprimante
- Schéma de l’imprimante
- Montage de la molette du cylindre
- Ouverture du capot avant
- Mise en place de la cartouche de ruban
- Retrait de la cartouche de ruban
- Installation du guide-papier
- Branchement sur une prise secteur et mise sous et hors tension
- Chargement du papier
- Mise en attente du papier continu
- Remise en circulation du papier continu
- Utilisation de la fonction de découpe
- Connexion de l’imprimante à votre ordinateur
- Chapitre 2: Utilisation du panneau de commande
- Alternance entre l’état en ligne et hors ligne
- Utilisation du panneau de commande
- Mode de verrouillage de la police
- Avance du papier
- Ejection du papier (feuilles séparées)
- Saut de page (papier continu)
- Mise en attente du papier continu
- Alimentation du papier par micro-lignes
- Réglage du début de page
- Fonction de découpe (papier continu)
- Sélection du mode d’impression silencieux
- Changement de la position de chargement automatique
- Sauvegarde des réglages du panneau de commande
- Vidage de la mémoire tampon de l’imprimante
- Réinitialisation de l’imprimante
- Chapitre 3: Utilisation du mode EDS
- Chapitre 4: Utilitaire d’impression
- Installation de l’utilitaire d’impression
- Exploitation de l’utilitaire d’impression
- Changement des réglages de généralités, de la police, du papier et des paramètres
- Réglage de l’alignement des points
- Changement du port de l’imprimante
- Sauvegarde des données dans un fichier de configuration
- Importation de données d’un fichier de configuration
- Retour aux réglages par défaut
- Sortie de l’utilitaire d’impression
- Utilisation du menu d’aide
- Chapitre 5: Utilisation de l’imprimante sous Windows 3.1
- Chapitre 6: Utilisation de l’imprimante sous Windows 95
- Chapitre 7: Utiliser l’imprimante avec le logiciel OS/2 Warp
- Chapitre 8: Utilisation de l’imprimante avec MS-DOS
- Chapitre 9: Manipulation du papier
- Annexe A: Dépannage
- Annexe B: Caractéristiques techniques
- Annexe C: Broches du connecteur interface
- Annexe D: Jeux de caractères
- Annexe E: Codes de contrôle de l'imprimante
- Annexe F: Guide de fonctionnement du panneau de commande
- Deutsch
- Eingetragene Warenzeichen
- Über dieses Handbuch
- Inhaltsverzeichnis
- Kapitel 1: Drucker-Setup
- Wahl eines Aufstellungsorts für den Drucker
- Auspacken
- Allgemeine Anleitung
- Befestigung des Walzendrehknopfes
- Öffnen der Frontabdeckung
- Einsetzen der Farbbandkassette
- Entnehmen der Farbbandkassette
- Ansetzen der Papierführung
- Anschluß an eine Steckdose und Ein-/Ausschalten der Netzversorgung
- Papier einlegen
- Drucken auf Endlospapier
- Die Papier-Park Funktion
- Fortsetzung des Endlospapier-Druckbetriebs
- Verwendung der Abreißfunktion
- Anschluß an den Computer
- Kapitel 2: Bedienfeld
- Umschalten zwischen Online- und Offline-Betrieb
- Wahl einer Schriftart
- Einstellen des Schriftart-Sperrmodus
- Einstellen des Zeichenabstands
- Einstellen des Zeichenabstand-Sperrmodus
- Zeilenvorschub
- Blattauswurf (Einzelblattpapier)
- Blattvorschub (Endlospapier)
- Papier-Park Funktion
- Mikro-Papiertransport
- Einstellen des Blattanfangs
- Abreißfunktion (Endlospapier)
- Einstellen des Leisedruckmodus
- Änderung der automatischen Papiereinzugposition
- Speichern der Bedienfeldeinstellungen
- Löschen des Druckerspeichers
- Initialisierung des Druckers / Reset
- Kapitel 3: Verwendung des EDS-Modus
- Kapitel 4: Drucker-Installationsprogramm
- Installierung des Drucker-Installations
- Starten des Drucker-Installationsprogramms
- Änderung der Einstellungen unter Allgem., Font, Papier, Justage und Port
- Änderung des Bidirektionalen Druckertests
- Änderung der Schnittstelle
- Speichern der Einstelldaten in einer Konfigurationsdatei
- Einlesen von Einstelldaten aus einer Konfigurationsdatei
- Rückstellung auf die Standardeinstellungen
- Verlassen des Drucker-Installationsprogramms
- Verwendung der Hilfe
- Einstellungen des EDS-Modus
- Einschalten des EDS-Modus
- Wahl einer Gruppe
- Wahl eines Schalters
- Änderung der Schaltereinstellung
- Ausdrucken der gegenwärtigen Schaltereinstellungen
- Verlassen des EDS-Modus
- EDS-Modus-Einstellungen
- Kapitel 5: Einsatz des Druckers unter Windows 3.1
- Kapitel 6: Drucker mit Windows 95 anwenden
- Kapitel 7: Der Einsatz des Druckers unter OS/2 Warp
- Kapitel 8: Verwendung des Druckers mit MS-DOS
- Kapitel 9: Papierhandhabung
- Anhang A: Fehlersuche
- Anhang B: Technische Daten
- Anhang C: Schnittstelleninformationen
- Anhang D: Zeichensätze
- Anhang E: Drucker-Steuercodes
- Anhang F: Steuerung über Bedienfeld
- Serviceleistungen in Deutschland
- Italiano
- Avvertenze
- Informazioni sul manuale
- Indice
- Capitolo 1: Installazione della stampante
- Scelta di una collocazione per la stampante
- Disimballaggio della stampante
- Guida generale
- Installazione della manopola del rullo
- Apertura del coperchio anteriore
- Inserimento della cartuccia del nastro
- Rimozione della cartuccia del nastro
- Installazione della guida della carta
- Collegamento ad una presa di corrente e accensione e spegnimento
- Caricamento della carta
- Stampa su carta in modulo continuo
- Parcheggio della carta in modulo continuo
- Riattivazione della carta in modulo continuo
- Uso della funzione di taglio
- Collegamento al computer
- Capitolo 2: Uso del pannello comandi
- Alternazione tra on-line e off-line
- Selezione del font
- Attivazione del modo font bloccato
- Selezione del passo di stampa dei caratteri
- Attivazione del modo passo di stampa bloccato
- Avanzamento di riga
- Espulsione carta (carta in fogli)
- Avanzamento pagina (carta in modulo continuo)
- Parcheggio del modulo continuo
- Avanzamento micrometrico
- Selezione della posizione di inizio stampa
- Funzione di taglio (carta in modulo continuo)
- Selezione del modo di stampa silenziosa
- Cambiamento della posizione di caricamento automatico
- Memorizzazione delle regolazioni del pannello comandi
- Liberazione del buffer della stampante
- Inizializzazione della stampante
- Capitolo 3: Uso del modo EDS
- Capitolo 4: User Setup Utility
- Installazione di User Setup Utility
- Lancio di User Setup Utility
- Cambiamento delle impostazioni generali, font, carta e Tarature
- Regolazione dell’allineamento dei punti
- Cambiamento della porta stampante
- Salvataggio dei dati di impostazione in un file di configurazione
- Importazione di dati di impostazione da un file di configurazione
- Ritorno alle impostazioni default
- Uscita da User Setup Utility
- Uso del menu Help
- Capitolo 5: Utilizzo della stampante con Windows 3.1
- Capitolo 6: Utilizzo della stampante con Windows 95
- Capitolo 7: Utilizzo della stampante con OS/2 Warp
- Capitolo 8: Uso della stampante con MS-DOS
- Capitolo 9: Gestione della carta
- Appendice A: Soluzione di problemi
- Appendice B: Specifiche tecniche
- Appendice C: Uscite terminali interfaccia
- Appendice D: Gruppi di caratteri
- Appendice E: Codici di controllo stampante
- Appendice F: Guida all’uso del pannello comandi
- Customer service information
- Customer response
114
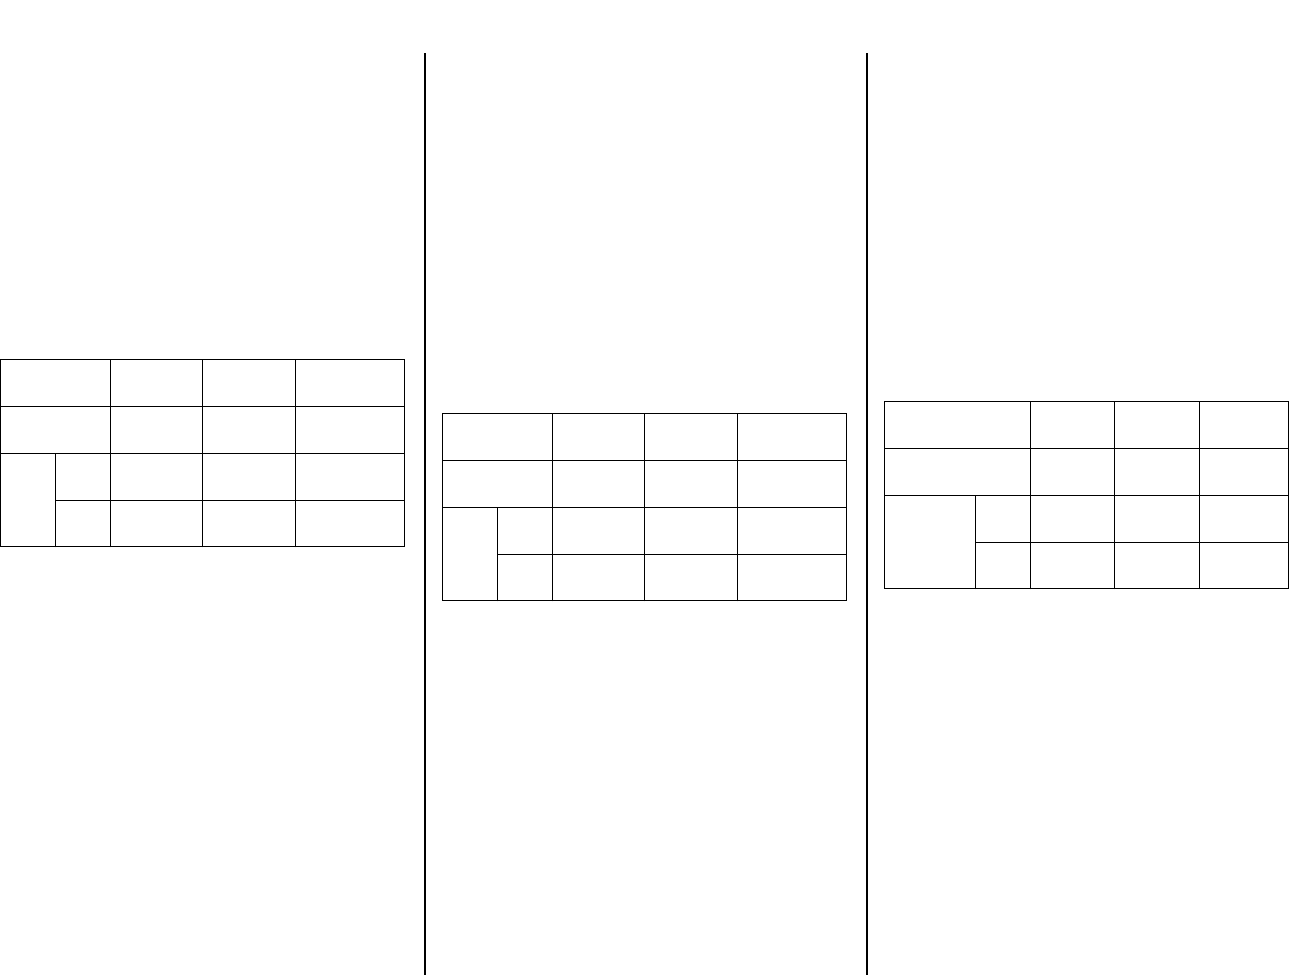
Réglage de l’épaisseur du papier
Le papier existe en différentes épaisseurs,
normalement exprimées en gm
2
(grammes par mètre
carré) ou lbs (livres). Il existe par exemple des
formulaires à feuilles multiples qui sont relativement
épais. Effectuez les démarches suivantes pour régler
la distance entre la tête d’impression et le cylindre.
❏ Réglez le levier de réglage sur une des quatre
positions. Pour les feuilles séparées, réglez le
levier sur la position 2.
Le tableau suivant sert de référence pour le réglage
du levier. Essayez les différentes positions pour
choisir celle qui convient à la qualité d’impression
souhaitée.
Une impression continue avec le levier
incorrectement réglé peut réduire considérablement
la durée de vie de la tête d’impression!
Type de papier
Poids par
feuille
Epaisseur
Position
recommandée
Feuille séparée
52 gm
2
à
90 gm
2
0,07 à
0,12 mm
2 ou 3
Copie
2
feuilles
40 gm
2
à
52 gm
2
0,12 à
0,14 mm
2 ou 3
3
feuilles
40 gm
2
à
52 gm
2
0,18 à
0,21 mm
3 ou 4
Einstellung der Papierstärke
Papier wird in verschiedenen Stärken geliefert, die
normalerweise als g/m
2
(Gramm pro Quadratmeter)
oder als lbs (Pfund pro Quadratfuß) angegeben
werden. Vordrucke können aus mehreren Lagen
bestehen, wodurch das zu bedruckende Papier
ziemlich dick wird. Stellen Sie den Abstand
zwischen Druckkopf und Druckwalze auf folgende
Weise ein, um der Papierstärke zu entsprechen.
❏ Bewegen Sie den Einstellhebel in eine seiner vier
Stellungen. Stellung 2 ist für Einzelblattpapier
am besten geeignet.
Die folgende Tabelle bietet eine allgemeine
Übersicht zur Einstellung des Einstellhebels.
Probieren Sie verschiedene Einstellungen aus und
finden Sie diejenige heraus, die in Ihrer Situation die
besten Ergebnisse bringt.
Längerer Betrieb bei falscher Einstellung kann die
Lebensdauer des Druckkopfes drastisch verkürzen!
Papiersorte
Gewicht pro
Blatt
Dicke
Empfohlene
Stellung
Einzelblatt
52 g/m
2
bis
90 g/m
2
0,07 bis
0,12 mm
2 oder 3
Kopie
2
Lagen
40 g/m
2
bis
52 g/m
2
0,12 bis
0,14 mm
2 oder 3
3
Lagen
40 g/m
2
bis
52 g/m
2
0,18 bis
0,21 mm
3 oder 4
Regolazione per lo spessore della
carta
La carta esiste in diversi pesi, normalmente espressi
in gmq (grammi per metro quadro) o kg
(chilogrammi). Alcuni tipi di carta per moduli
esistono in versione autocopiante a più pagine che li
rende abbastanza spessi. Usare il seguente
procedimento per cambiare lo spazio tra la testina di
stampa e il rullo e regolare per lo spessore della carta.
❏ Spostare la leva di regolazione su una delle sue
quattro posizioni. La posizione 2 è la più adatta
per carta in fogli singoli.
La seguente tabella offre una guida generale per la
leva di regolazione. Provare con diverse posizioni
fino a trovare quella che produce la qualità di stampa
desiderata.
Un uso continuato con la leva di regolazione su una
posizione sbagliata può abbreviare drasticamente la
durata della testina di stampa!
Tipo di carta
Peso per
foglio
Spessore
Posizione
consigliata
Fogli singoli
Da 52 gmq
a 90 gmq
Da 0,07 a
0,12 mm
2 o 3
Autocopiante
2 fogli
Da 40 gmq
a 52 gmq
Da 0,12 a
0,14 mm
2 o 3
3 fogli
Da 40 gmq
a 52 gmq
Da 0,18 a
0,21 mm
3 o 4