LaserPrinter 4 OPERATIONSMANUAL
Safety Notkea This printeris certified as a Class 1 laser productunderthe U.S.Departmentof Health and Human Services (DHHS) RadiatiarPerformanceStandardaccordingto the RsdiationControlfor Healthand Safety Act of 1968. llris menns thatthe printerdoes not producehamrdouslaser rsdiat.iar.
Statement of The Canadian Department of Communications Radio Interference Regulations ratu.s&e.sn@exceedtbe ClassB linsitsfor radionoiaeenrissicxtsfromdigitalapparatus Regulationsof the CanadianDepartmentof %%Y%%’Lohterferenes brnsttuoicatiom. Le pn%rstappascilnunk%iquen’&rtenpas de bruitssadiofrlectriquesdLpassantles lintites applicable reds nusm%iquesde la classe B ~rescritesdam le Rk-glementsurle brouillageradid.lextsique &tt ‘F( pas Ie Ministkre.des Gartrrtunieatmns du Canada.
TABLE OF CONTENTS 1. How to Use This Manual .........................................................................l 1.1LaserPrinting.............................................................................2 l.2The StarLaserPrinter 4—An Introduction ...............................4 2. SettingUp the STARLaserPrinter4 ....................................................7 2.1Unpacking..................................................................................8 2.1.1UnpackingthePrinter..............
4.4ManualFeed.............................................................................57 4.5PaperSize................................................................................. 58 ............................................59 4.6PrintinginLandscapeOrientation 4.7ChangingCharacterSet............................................................59 4.8SeleetingDisplayLanguage.....................................................60 5. SettingUp A Page ....................................................
9.4OperatorInformation Messages...............................................87 9.4.1HostCommunication problem......................................87 ..................................87 9.4.2Functionor SizeIncompatibility 9.4.3Font/Emulation Cartridge.............................................88 9.5StatusMessages........................................................................ 9.6PaperJamming.........................................................................:T 9.6.1Clearingpaperjams ......
I How to Use This Manual ‘” “ Congratulationson purchasinga StarLaserPrinter4. You willbe delighted with both the qualityof the printedimagesand the ease of operation.With your computerand this printer,you can createprofessional-lookingdocuments. This OperationsManual is one of two that explore the entire range of printingpossibilitiesof theStarLaserPnnter4.Thismanualis forbeginners and for those who plan to concentrateon the basics.
I Withthis capability,the StarLaserPrinter4 will operatewith a widerange of applicationsprograms on the market, both old and new. Chapter 7 providesthe informationthat will allow you to use yourprinter with four popularapplicationsprograms:Lotus1-2-3,WordPerfect,MicrosoftWord, and MicrosoftWindows. Chapter8 and9 describethe maintenanceandtroubleshootingoperationsto keep your Star LaserPrinter4 workingin “perfect”condition. 1.
Whentextor graphicsare sentby the computerto the printer,laser beamis generatedby a semiconductorlaser diode.Thisbeam is focusedby special scanningmirrorsthatturnthelightbeamintoa toolthat“writes”or’’pnnts” on the surfaceof the drum.The areasof the drumtouchedby thelaserbeam lose their negativecharge and containa reverseimage of the information sentfrom the computer.As the drumrotates,it passesa developerunitthat is also rotating,but in the oppositedirection.
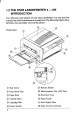
I 1.2 THE STARLASERPRINTER4— AN INTRODUCTION You will meet each portion of your Star LaserPrinter4 as you read this manual,but a briefintroductionis in orderhere.Thefollowingfigwes show the front, mar and insideviewsof the printer.
Rear ‘@ @ ParaLlelInterfaceConnector @)Air Vent @ AppleTalkInterfaceConnector @ Power Receptacle @)SerialInterfaceConnector @ DensityAdjustmentLever @ TransferRoller @ EP-L Cartridge (@Paper AccessDoor @)Pick-upRoller @ SeparationPad @ Fixing AssemblyCover @ Feed Roller 5
6
Setting Up the STAR LaserPrinter4 ‘ “ ● The factthat you’renow readingthismanualshowsthat you’vegot at least . as openingthe cartoncontainingyournew StarLaserPrinter4.This chapter will help you to unpackthe printer,set it up, and get it running. First, though,you shouldmake somepreparations.You may alreadyhave decidedon the printer’snew location.
I 2.1 The printercomesin two boxes.The largebox containsthe printer and its accessories,and the smallerone containsthe EP-L cartridge.Followthese instructionswhen unpacking. 2.1.1 Unpackingthe Printer Followthe instructionsbelowto unpackthe printer. 1. Openthe large box, and removethe accessoriesbox. 2. Removethe printerfrom the box.
3. Removethe packingmaterialfrom roundthe printer. 4. Open the accessories box. Remove the face-up tray, power cord, Operations Manual and Applications Manual. NOTE: Save the packing boxes and materials. If you need to move the printer (for new location or semice etc.), use these materials to protect the printer from darnage.
2.1.2 Checkingthe Parts Before setting up the printer, make sure that all standard items shown below are provided and they are free fmm damage. If any of these items aIEmissing or damaged,contactyour supplier. Standard Items I 2.1.3 Unpackingthe EP-L Cartridge Open the small box (see the illustrationbelow) and remove the packing materialfmm the EP-L cartridge.
CAUTION: 1) Donotopenthealuminumbagcontainingthecartridgeuntil you are readyto installit in the printer. 2) Do not lean the cartridgeagainstanythingor turn it upside down. 2.1.4 OptionalItems Some of the followingitems may have been ordered.Unpackthem. For details,refer to Chapter10. Options. . Paper feeder ● Cassette (A4, Letter, Legal, Executivesize) ✎ RAM board (1, 2 or 4MB) ✎ Emulation cartridge 2.1.
I NOTE: When moving the printer, remove the EP-L cartridge from the printer.Afterremovingthe cartridgefromtheprinter,replaceit in thealuminumbaginwhichit wasoriginallypacked,orcoverit with a thick clothto protectit from directlight. 2.1.6 Openingand Closingthe Printer . Whenopeningtheprinter’ssidecover,donotstopit in thehalf-way.This will open the protective shutter of the drum, and light will permanently damage the drum. ● ● Do not place anythingbesidethepnnter.
Opening the Cover 1. Hold the knob of the multi-purposetray and pull it to open the tray. 2. The tray opensto about80 degrees.
3. Press the dease button(at the right) upwardsand openthe ecwer. The coveropensto about80 degrees(themulti-purposetray then opensto about90 degnxs.).
NOTE: Removethe two orangestoppersby pushingthe lower part of the stoppersupwards and removingit (as shown in the illustration below). Closing the Cover 1. Using both hands,lift the coverand close it gentlyuntil it latches.
I 2. Lift the multi-purposetray and closeit until it latcheson both sides. 2.2 INSTALLING THE EP-L CARTRIDGE Important Notice ● ● ● ● Installthe EP-L cartridgeimmediatelyafteropeningthe aluminumbag. Permanentdamagecan be causedby light to the photosensitivedrum. NEVERexposethecartridgeto thestronglight(mo~ than 15000IUX)or roomlighting(1000IUX)for more than five minutes. Do not o@ the drumprotectiveshutteron the EP-L cartridge. Keep the cartridgeaway from CRTs,disk drives,diskettes,etc.
● Alwayskeep the EP-L cartridgewith the label facingup. Do not turn it upsidedown or stand it on end. The tonermay becomecaked,and this causesprint qualityto deteriorate. ● Usethecartridgebeforetheexpirydateprintedon the carton.Otherwise, print qualitymay deteriorate. ● Use only genuineEP-L cartridgesas ~commendedby your supplier. Followthe instructionsbelowto installtheEP-Lcartridgefor thefirsttime, or replacean used one. 1. Open the multi-purposetray and the side cover as describedin “2.1.
3. Openthe aluminumbag containingthe EP-L cartridgeand removeit. NOTE: Savethealuminumbag,asyoumayneedit forstoringthecartridge when you movethe printerto anotherplace in the finure.
4. Holdingthe cartridgewithboth hands,mck it gentlyfmm end to end, 5 or 6 times, to distributethe toner evenly.If the toner is not distributed evenlyin the cmridge, it may adverselyaffectprint quality. 5. Place the cartridgeon a flat surface.Whileholdingdown the cartridge withonehand,usetheotherhandtopulltheorangetabto removetheseal. \- Make sure that the tab is pulled smoothlyin a directionparallelto the flat surface. Otherwise, the tape may break or snap, making the cartridge unusable.
6. Holdingthe cartridgeby thetab,alignthe arrowon thecartridgewiththe 7 mark on the printer. 7. 20 the cartridgeinto the printergently.
8. Make sure that the cartridgeis securely seated, then close the cover gently. NOTE: 1) If you have purchased optional accessories,install them in accordancewith their installationmanuals. 2) When replacingthe cartridge,clean the fixing assembly, as describedin “8.3 Cleaningthe FixingAssembly”.
2.3 LOADING 2.3.1 About Paper Printqualityandprinterlifearegreatlyaffectedby thepaperused.Papercan be fedintotheprintereitherfmmthemulti-purposetrayorpapercassette(if cassetteis installed).~s and sizesof papercan be used with the multipurposetray m listedbelow.
2. Hold the arrow at the centerof the multi-purposetray, then pull out the 3. Slidethe paper guideto the left.
4. Take a small stack of paper and align the edges by tappingit on a flat surface. I 5. Alignthe rightsideof the stackof paperwiththe right-handpaperguide. Slidethe paperstackgentlyintotheprinteras far as it willgo. Makesure that the heightof the paperstackdoesnot exceedthe markon the paper guide.
6. Slidetheleft-handpaperguidesothatit touchestheleft sideof the paper stack.Makesurethatthe paperguidedoesnot presstoo tightlyor fit too looselyagainstthe paper stack.Otherwise,this can causepaperjams or other problems. Y The printer providestwo types of paper delivery;face-up and face-down. With face-downdelive~, the paper is ejected from the printer with the printed side facingdownward.With face-updelivery,the paper is ejected with the printedside facingupward. Selecting Face-down Delivery 1.
SelectingFace-upDelivery 1. Openthe multi-purposetray by unlatchingand bringingit forward. 2. Switchthe paper deliveryselectorfor the face-upposition. 3. Attachthe face-upprint tray to the sidecoverof the printer.Fit the pegs at the sidesof the tray into the holesin the printer. Whenface-upprintingis ftished and the multi-purposetray is closed,the printerautomaticallyswitchesback to face-downdelivery.
2.
I O c f a u t p c s i f w ag p a s n b i c aq e w t p T g I as t r N t t i a i g s t s p s i n v 2.
4 C c t o e o t c t t a i o t h m Mmgm N T i p t p f s i t b u y S “ S o i n i f ap t s t t S I i i I t s o t c f s t 2
2.
T y d m a t l i c l r I I I I ~ L h f a e II I ~———m I—-–; s o t f t l p t r A i t ‘m 31
MEMO 3
Initial Operation 3.
3.1.
3.1.
I [ T F1 T k b h c p M > 1 P r p t w s f t b w o b 2 I t “ s o b i h 3 I t p b i r w p as 4 I t “ S b “ f t t p i i t T t s t t I t r p b i t t s w d o n w o w a t p b i d L w s b ( p 3 i p a o w o s af l w b p i p t ac a w o p w T P P M a i p i r t s o S t ( s “ w b p 6 I t b i h d f m t 6s S i d t s w d “ t b i r w t m i d at p m ( 3 P T S I t N p 5 I t b w b d T S ● i O L s F t p S p f “ i d d W S w w i t d m t a t t s 3 w d P
W P ● t t T t e L ● i t s b o t t d p P t w v h s l M w t a b i c t b c S d m ( “ E t p D a I P R P P T s u t P M y O L t p t [ r s p t [ M t t n h p r M a d “ R f t C P [ S m b s t p W ap b t t l o e f t F d r t 3 PROGRAM A =L g El T b c f w w p T c f p m b O L p L L i o t h d T s w d “ FEEDER SELECT f h aw 1 I t d p b i r t c w c w t s t o f t C m ( b r t p o s O L t F t f w e p t a t b i t O S b S i d m t t s F Only Auto Seleetion C M Tray
N ( T C d ( ( s u d w i n i i o M o a s M a I t F L a i T F i i I t I S t F D S L a d “ t 2 H d i d F i M S i l H t L C t C w b c b at i w t n o t f t s p O w b s s i t p f m t 2s c T I t b i r w t s w d t c m w c t t o b p u b S t t n i s t m t s i Paper: Letter Paper: Legal Paper: A4 Paper: Executive Paper: B5 ENV: Monarch .
3.1.
3.1.4 Hex Dump T S L m t i w n ( b c i t c r i aH D s 4c i p 1 n a i t h s t i i i e T m i u i c s c an S o f F i b i t o m h c T L o p a 4 “ T r 3.2 SELF TEST T S L t p p ac s a o w i i c c d f y I s t q o t p o t I s t p c i a o m a w f a i o a I e h t p p w l at c s T i p s a p l I t w t p o s i i a uo 3.2.
3 P ac H “ t P t p [ b u b ’ t s d “ F T t S [ i d T W p A y r i u 4 P s t t c at K T h W p P y P p d t t m o s “ b t [ S “ r w d p f a P w p ( a ’ S ac C 8 p t T F p b “ u t s P p w d w p “ t t b t b a t d “ F M m S “ a s 3.2.
I ● P T ● f ● ● ✎ ✎ ● ● p w -t -c f o J J S f S s M i t v E o l -w A p af I F -w t QM t s T M P P T ● I I T ● 42 I t i r o l V o ya w t t r t t s L f p s -p c a t f o p t b u f i -m -p i i am a t o V i o o o w b f G o t p s t e c b t o f B a ~ o e ( l a a a i G B f I -t M t b p r -w t i a a b a a l f ( f ( a e p P p i a G ● o e t r a i n l F ● c o l V -V c b m T i i s t a -l ( p L s L i G -p M a p G
I 3.3 PROGRAMMINGFROMTHE CONTROL PANEL & s r i t c p a a t m m g a R s G y t e p t v i a o s l ( p p ( [ [ f f w t o e y c s T h o o e ( p o n ( p [ [ I f m aL w t a [ t ‘ - t [ T g i ● ● T t P [ P p [ P M .
Y m f o i t [ d t n i o d t v t i t P M P [ s l y a c ( l H g r h h “ T p P t u t s w d [ c S y w F o o t t L ● P [ ● P [ ap a p N ● P p E F H Dump t s E P [ T f t J S t E 4 t i n [ t a t l o t E s t [ s f a t a F l a w s r d L P e e a t o e M s t [ e L “ i o t s d C ● i P 1 w l g i u d H L P [ p w i M l S t p O O C [ [ t n i t l b p t n h l I n s b s w @a [ r t d t t p [A] d i P F w i o “ “ O P
P Y [ w P [ T s h t s d i t g i y P [ T i b i d “ P [ L T s i t p ● C T T o t p e L o t h “ d F 1 a t d s t t w i t “ f e w F e e y m t w A w t p t s F t e h b s [v].
STARLASERPRINTER4 CONTROLPANELHIERARCHY T e L. 2 E 3 F p m t p o b p p m b p t c b m t O t P w t b b b i — H I -M A.
N 0 H L @E F @S w * S i H I m m E D o o I J L F * * * P B m N C S A r+! M T S A L T F E L O P @ C S O S D MANUAL SET MARGIN M N V M OF C + AUTO RIGHT LEFT TOP TEXT LENGTH MARGIN MARGIN MARGIN S S
MEMO 48
L A T T c i d f d u s m c o t c S p l t r t d b t e O l t p r i t d a aq r a m T b c o i c i f b b u g I c a as b r a u f i t h i s m o w t o f u r a o t 4.
4.2 CONTROLPANEL T i y m f p o t a o w t c N P T b p s p p I a a n T S i o m t s m h B w t d i a y L b b i e P M (WHITE BUTTONS) [ LINE] t p i f y ( w i t b b f F t p m P M (BROWN BU’ITONS) When light is on printer can Fastexit(termination) of proprint.
R s G T y t e p f p R ( A ( D a h s —t p a ( [ [ e —t ( ( —t W l t f p c e r n y p i r i aL I w t [A]) [ a m i r p p o e ( p o n ( p l —i O L P ( p ( p o f p a t p O L f p i 4.2.1 Basic operations T a f c O c L f p ● ● b o p f t p O L i nf a p i o w i i O L W t p i O t l o t [ L b w b l F a o t p m b O L T i a b t [ L b u i l i out. F f —T p m h u i i i m T i i b t l D l T c i f t p t t p O L T p [ W a t r i i p t p w b e a t D l w g aft.
I B y b p a a t b e w y a n t t p i i ag i t r at o s p T d t t t p O L T p a h [ u t d r S S T p w p as s s ● i c ● t ● as o q o i t p a o i s —i a p p 4.
I y a g c I p r k a f c p t f t u w y s i d aC i y d n t m a t u a R i y m p a w i p v p P r t i p o t d s T t s f w t @s f 4.3.
I s T o p [ D BAUD RATE Pressing [ d d t B P S B P R O D T P s f t f f t o a 8b n p 1s b D H W y w t c s a f s p [ t a S P [ w d P [ w y c L w r t I y r ● a t a o t s p f r F e t c t [ u D B i d o t t f o a [ w g t r a o t s F p S L 4f p t p D P r “ [v] t b XoN/XoFP h a s i f [ u y t S ( m b [ t e s P ● P [ d DTR ● 5 Pressing [A] until the d r X P t s d b s o t [ p h
I T n s i t a s P [ 3t [ t d y c t t p t d I ● P S ● ● P P [ P p [ s to t L t c s w s t a i t E S L 4t b i 4.3.
I 4.3.3 Savingthe Setting T n s o T u o s s T u ● w r i t p w y s r i t p m F S R R w a t f m T P S w p m c E at e o t s i w t o t F S b o t o a ● T I t p R m ● S i n t T c T C m T o s T m p t S m s P [ ● P [ S . P t t p u c a s w a t b s s t i t p n b i t i i t c i t P m t a u a l o v a S s p s i c R t i i E O L o a P t r d w E p c t L D [ w L o s w d Y p n s i d a n s a y 4.3.4 Returningto FactorySettings I f f s r f P L 5 y s .
I . P [ T s w d E S c P [ d t o o U S ● S t o y P [ T s L F L F w w d R b O t T a f S s a n r a y c g O L f o c 4.4 MANUALFEED T S L 4c c I a o c C O T c t O L a p [ ● P [ u P .
P ● . F p f p r M ( m p t I d c t [v] c t f I O t f e o “ [ c L s a t t m b s t m b d l s b u o a f f w t S t m f L 4 t a t b fr o e y g ap j t c t mT r t t 4.
Press [v] when the required paper/envelopesize is displayed on the screen. ● ● “Finally,press [ON LINE], which readies the Star LaserPrinter4 for printing. Beforeyou stan printing,reffl the cassettewith the appropriatepaper. 4.
s Press [v] displays NUMBER I@ ● Pressing [v] againgivesvariousoptionsfor SYMBOLSET. ● Pressing [<] until you see the desiredone. ● Then press [v]. ● Press [ON LINE]. 4.8 SELECTINGDISPLAYLANGUAGE The languagefor displaycan be selectedfrom English,Fnmch, German, Italianor Spanish.To selectthe displaylanguage,turn off the printerthen followthe procedu~ below. 1. Holddown [RESET/V]andtumontheprinter (makesurethat [RESET/ v] isheldatleastuntilthescreendisplays’’SELECTLANGUAGE”).
Setting Up A Page h As the sampleprintshows,yourStarLaserPrinter4 can fill a sheetof paper with text and/orgraphicsto within3/16- 1/2in (8 - 12mm)of the margins. Someof the choicesare made for you by the printer.But most of them are underyourcontrol,eitherfromthefrontpanelof theprinter,or throughyour computerand the applicationsoftwareyou are using on it. Some of the choices may be limited. Printer emulation and the page orientationare examples.
Format: Orientation Form size Text length Margins Line spacing Text: Characterset/symbolset Typeface Characterspacing Pitch Point size Style Strokeweight If you are a beginner, you may want to limit the amount of computer programmingyoudo forpageset-up.Remember:youcanprinta veryniceloo~ng pagewithvery little manipulation, by relying on thedefaultsettings in your printerand applicationprogram.By using the programmingavailablefmm the frontpanelof the printer,youhave a widevarietyof options.
Font Selection The style of printingthat appeansin your finished work consistsof five elements: .
Samplesof the two residentfonts follow. Sample of Courier typestyle: ABCDabcd#$‘12 3 [ A~- k‘““fYyq I Ltiiia ABCDabccl#$ ’123[A’- r #f’<-~’”J’A~b ~ -4L ABCDabcd#$ ’123[”’-66il=+D ABCDabcd#$ ’123[A’-66fi~Zx ~]~~ ABCDabcd#$ ’123[A’-b6tl=%~ 11111,–HE Sample of LinePrinter typestyle: Many of the availablefonts can deselected from the controlpanel. The ultimateimprintingflexibilityis providedby programmingwith thecomhandsets.
I 6.1 HEWLEll PACKARDLASERJET11P Default Values,primary and secondaryfonts: Characternumber: Symbolset: 1 (Courier,locpi, 12point,Medium) Roman-8 Available Values,primaryand secondaryfonts: Characternumber: Symbolset: 1* (courier, locpi, 12point,Medium) 2 (Courier,locpi, 12point,Bold) 3 (Courier,locpi, 12point,Italic) 4 (Courier,12cpi,lopoint, Medium) 5 (Courier,12cpi,lOpoint,Bold) 6 (Courier,12cpi,lOpoint,Italic) 7 (LinePrinter,16.66cpi,8.
1S0 84:Portug 1S0 85: Spanish HP German HP Spanish 6.
Interfacing With Applications Programs If this wem the best of all possible computer worlds, every software applicationwouldrun automaticallyon the StarLaserPrinter4 or anyother printer. The fact is that software applications-word processing,spreadsheets,databases,or others-m designedto workwitha specificprinteror a limitedgroupof printem. Someverypopularsoftwareapplicationswerewrittenbeforelaserprinters became common,and require a dot-matrixor daisy-wheelprinter.
7.1 LOTUS1-2-3 RELEASE2 This sectionexplainshow to installingLotus 1-2-3for use with your Star LaserPrinter4. For detailedinformation,referto the LotusGettingStarted manual. First, addthefollowingcommandstotheAUTOEXEC.BATfile,depending on parallelor serialinterfaceused. Parallel:If yourprinteris connectedto the computer’sparallelport LPT1, add the followingcommandto the AUTOEXEC.BATfile: MODELPT1:,,P Serial:If yourprinteris connectedto thecomputer’sserialport COM1,add the followingcommandto the AUTOEXEC.
5) Select“GraphicsPrinter(s)”and press [RETURN], which displaysthe GraphicsPrinter(s)screen. 6) Select “HP” and press [RETURN] to display the GraphicsPrinter(s) screen. 7) For 1500r3(XIDPI,select’’LaserJet+”andpress[RETURN].For75DPI, select“LaserJet”and press [RETURN]. When you have completedthe selectionof a graphicsprinter,press [F1O]. Your current selectionswill displayed.Make sure that the selectionsare correct.If not, repeatthe installationprocess.
3) When you have completed,type [Q]uit, then [U]pdate.The 1-2-3will save your selectionsand use these defaultswhenprinting. Now, you are ready to use your Star LaserPrinter4. Youcan alsousetheStarLaserPrinter4’sEpsonFX-850emulation,following the same routinefrom the LotusMenus. 7.2 WORDPERFECTVERSION5.0 WordPerfectmust be installedbeforeyou can selecta printer.Refer to the “Installation”sectionin yourWordPerfectManual.Oncethisisdone,follow the pmcedumbelow to selecta printer.
7.3 MICROSOFTWORD4.0 To use MicrosoftWordwith your Star LaserPrinter4, appropriatePrinter Descriptions(PRDs)must be installed.PRDs are found on Supplemental Printer Diskettes.These PRDs provide(1) internal and cartridgefonts in both orientationsand (2) Hewlette-Packardsoft fonts.Installthemfollowing the proceduredescribedin MicrosoftWord manuals. In MicrosoftWord,you can makeyourprinterselectionsthroughthe Print Menu. 1) At the text screen,type [E]sc and [P]rint.
AA OK CANCEL Insertthe Utilitiesdisk in drive A and press OK Now the scmm displaysthis box: AvailablePrintem PrinterFile: EpsonFX-80 NEc 3550 HP LaserJet HP LaserJetPlus HP 7470A Add Cancel HighlightHP LaserJetPlus or Epson and select ADD Anotherbox appmx in response: Copy associatedprinterfile HPLASERP.DRV to drive/directory: C:\Windows(if you have a hard disk) Yes No Cancel selectingYES confirmsyour printer choice and returns you to the CONTROLPANEL Menu.
If you are using a serial printer, go to SETUP once again, and select COMMUNICATIONS Afteryou indicatethe activeport youhave alreadychosen,Windows willpnxent a seriesof settingsoptions.Type in the desiredbaud rate and “pushthe button”for your selectionof word (bit) length,parity, stop bits, handshake,and port. SelectHARDWAREhandshakeand 1 stop bit. Be sure that the other selectionsmatch the printer settings shown under InterfaceGroup on the Star LaserPrinter4’s sampleprint.
74
Maintaining the Star LaserPrinter 4 TheLaserPrinter4 doesnot requiremuchcare andmaintenance.However, it is importantto perform a few cleaningtasks to maintainyour printerin goodcondition.This chapterwillexplainsprocwhuesfor replacingtheEPL cartridge, handling the EP-L cartridge and printer, and cleaning the printer. 8.1 REPLACINGTHE EP-LCARTRIDGE Replacethe EP-L cartridgein the followingcases: .
I ● ● ● . ● ● ● Do not stem the cartridgewhereit will be exposedto directsunlight. Storethecartridgewiththelablefacingup. Donotturnit upsidedownor sttid it on end. Stem the cartridgeat a temperate of betweenO“Cand 35°C(32°Fand 95”F). Do not storethe cartridgein saltyair, or wherethere are corrosivegases such as ammonia. Keep the cartridgeaway from CRTs,disk drivesand floppydisks.The magnetin the cartridgecan adverselyaffectthem. Alwayskeep the cartridgeaway from children.
3) Releasing the buttonwill producea cleaningpaper. Whenthe cleaning paper id produced,the screendisplays“MPLOADTHE PAP”. 4) Nowplacethe cleaningpap faceup in themulti-purposetray,inserting it as far as it will go withoutforcingit. Makesure that the paperguides are alignedwith the paper. 5) Press the [TEST] button.The printerwill feed the paper and the screen displays“NOW CLEANING”. 6) Whencleaningis done,the screenwill display “CLEANINGDONE”for one second. 8.
MEMO 78
An important key to nAiableoperation of your Star LaserPrinter 4 is knowinghowto respondwhentroubleoccurs.Someproblemconditionscan be handledon the spotby the printeroperator.Othersrequireservicingby trainedpersonnel.Thischapterwillexplainwhento dowhat.It willalsohelp you deal with the paperjamming and otheroperationalproblems. 9.1 ERRORMESSAGESDISPLAYEDON THE SCREEN The control panel screen may display a variety of messages during the courseof operationof theStarLaserPrinter4.
I 9.2 SERVICECALL MESSAGES 9.2.$ EngineServiceCall Messages Engineservicecall messagesare relatedto the interfacewithengine.They canresultfromeitheracommunicationfailure,ora haltintheengine’sready level.
Uessage CALLSERVICE05 Meaning Action CRC error in controller programhalts;fatal mainROMprogram CALLSERVICE06 CRC error in resident programhalts;fatal fontROM CALLSERVICE07 read/writetest errorin programhalts;fatal on-boardRAM CALLSERVICE08 read/writetest error in sequencestops; alarm beeps; expansionRAM (if in- shut off power and fm probStalled) lem; or press D3WORSKIP] to continue,in whichcase the expansion RAM will be ignored CARTRIDGEBAD CRCerrorin Cartridgesequencestops; alarm beeps; (if install
9.3 OPERATORCALL MESSAGES Whenever the screen displays operator call messages, the printer goes off line and the alarm sounds. The problem is one that the operator should be able to resolve. After making any corrections, you should press [ERROR SKIP] to recheckthe status.If theerrormessageis notdisplayedagain,you may continueprinting straight away (if the error was one of the Engine Problemsbelow). If the error messagewas of any other type, you should press [ON LINE] before continuingthe printjob. 9.3.
9.3.2 Font7EmulationCartridgeProblems The font and emulationcartridgeare pluggedinto the printer.They can shouldnot be insertedor withdrawnwhilethe DATALED is continuously lit. If someonedoesthis,the screenwillindicate“CARTRIDGEERROR”. Theprintermustbe reinitializedby turningoff thepowerandthenon again. If an emulationcartridgeis removedwhileit is being accessed,the screen willindicate“CARTRIDGEERROR”untilthe printeris re-poweredup.
9.3.4 ChangePaper Size Certainemulationspermitjob size to be specifiedby the host computer. Also,job size can be selected fium the menu. If a change in job size is required,thescreenwilldisplayamessagetothateffect.The alarmwillbeep and the printer will go Off Line. You may have the printer ignoresuch a messageby pressing[ERROR SKIP]. (Inthiscase,theprinterwillprintthe job size imageon the differentsizepaper.
Actwn Message Meaning ,CASS:CHANGE FION Monarchsize is requi~d; followprocedureabove cassette TRAY:CHANGE Monarchsize is requi~d; followprocedureabove multi-pmposetray MON CASS:CHANGE COM Com-10 size is required; followprocedureabove cassette COM Com-10 size is required; followprocedureabove multi-ptuposetray CASS: CHANGE DL DL size is required;cas- followprocedureabove sette TRAY: CHANGE DL DL sizeis required;mult.
I 9.3.5 ManualPaper Feed Certain emulationspermit specifyingmanual paper feed from the host compuler.Also,youmay selectmanualfeedfmmthe menu.The following messagetell youto handfeedpaperof a specificsize.The alarmbeepsand the printer goes Off Line. When you feed the appropriatepaper into the multi-purposetray andpnxs [ONLINE], themessagewillheturnedoff and printing will continue.The operatorhas the optionof pressing [ERROR SKIP], which turns off the message and causes the printer to continue printing.
9.4 OPERATORINFORMATIONMESSAGES Certain problems with communicationwith the host computer may be detected.Messageslisted below provideinformation,but do not halt the printing process.The printer uses a defaultvalue if necessary.You may removethe messageby pressing [ERROR SKIP]. Note that if them are multipleerrors, the last one detectedis displayed. 9.4.
I 9.4.3 Font/Emulation The font and emulationcartridgeampluggedinto theprinter.The operator may insert or withdraw a cartridgeonly when the DATALED is off or blinking.The followingmessagesacknowledgethe change. Message Meaning CART.CHANGED fontcarhidgeis inserted message will Rmtin orremovedwhenDATA for one second LED is off CART. CHANGED fontcartridgeis inserted message wi~ rem~n for when DATA LED is onesecond Status blinking CART.CHANGED CART.
9.5 STATUSMESSAGES .Statusmessages a~ low priority messages that either indicate normal conditionsor providewarningsthat need not be acted upon immediately. These conditionsshouldnot occur whenthe printeris On Line. If they do, however,the alarm will beep artdthe printer will go Off Line. For some conditionshowever,there is the possibilityof a conditionoccurringwhen theprinteris OnLine.If it does,thealarmwillnot soundandtheprinterwill remain On Line.
Message Meaning ActionlSWUs TEST PRINT MODE testpatternprintout occurs when [TEST]is held for more than six secondsand terminating switchnorpressed TEST PRINT STOP testpatternstop occurs when test print terminating switch pressed REPRINT LOST PGS retransmissionof lostsheets may occur after paper jamming ROTATING FONT waitfor fontrotation PRINTER READY all condition normal and properbut printeris not operation; no unused data in controlleror pages in printing PRINTER ACTIVE all condition norma
9.6 PAPERJAMMING Aspapertravels from themulti-purpose tray (orcassetteif installed) through the printing area and is ejected,it canjam at the followinglocations: A :Paper pick-uparea (multi-purposetray) B :Paper pick-upma with optionalcassettepaper feeder C :Fixing assemblyarea D :Face-upprint deliverya~a E :Paper accessdoor 9.6.1 Clearingpaperjams 1)Removeany paper fmm the multi-purposetray and closethe extension tray.
2) If the face-uptray is installed, I 3) Openthe side coverby pressingthe releasebuttonupwards.
I 4) If you have been printingwith the multi-purposetray, checkthe paper pick-upmeafirst.If thereis a paperjamhere,removethepaper by pulling it in the directionof the arrow. CAUTION: The fixing assembly area becomes extremely hot when the printerhasbeen operatedforsometime. Never touchthis a~a when the printer is open. Otherwise,personal injury may result. 5) If you areusingthecassettepaperfeeder,pullout the cassetteandcheck the paperpick-uparea.
6) If paper is jammed in the fixingassemblyarea,pull the paperback into the printerand removeit. 7) If thepaperdoesnotextendfromthesideofthefixingassemblyarea,pull it in the direction of the black arrow. If the paper is extractedin the opposite direction, infused toner can be deposited inside the printer, stainingthe back of subsequentlyprintedpages.
8) If thepaperhaspassedcompletelythroughthefixingassemblyma, pull it out in the directionof the arrow. 9) If a paperjam has occurredin the face-updeliveryarea, put the paper straightupwardsto removeit. I 4 10) Aftercheckingallthe areasdescribedhere,closethe sidecover,replace the face-uptray(if it is beingused),pullout theextensiontray andrefill the multi-puxposetray. Printingwill restart.
11) If thejam is stillpresent,a smalltorn pieceof papermay be remaining insidethe printer.Checkthe sideupper door for any such paper.
9.7 STREAKYPRINTS 9.7.1 WhiteStreaks Whitestinks occur if the tonerlevel is low and the toner insidethe EP-L camidgeis notdistributedevenly.Theycanbeeliminatedby m-distributing the toner. 1)Leave the printer power on to prevent data corruptionduring a print operation.Remove any paper in the multi-purposetray and close the extensiontray. Press the releasebuttonupwardsto open the side cover. 2),Removethe EP-L cartridgeby pullingthe tab.
3) Hold the EP-L cartridgeas shownbelow,then rock it gentlyback and forthabout45 degreesin eachdirection,about5 or 6 times.This willredistributethe toner insidethe cartridge. 4) Replacethe EP-L cartridgein the printer,then closethe side cover. If verticalwhite streaksstill appearafterthe toner insidethe cartridgehas beenre-distributed,thecartridgeneedstobe replaced.See“2.2Installingthe EP-L cartridge”for replacingthe cartridge.
9.7.2 Stainson TransparencyFilms ,Transpamncyfbs may sometimesshowstainsat eitherthe top or bottom of the fihns.Thesestainsmaybe causedby a dirtypaperpathor the flawon the EP-L cartridge. s Cleanthe fixing assembly. The fixing rollerinside the fixing assembly may have been stainwith toner.For cleaning, referto “8.3 Cleaningthe Fixing Assembly”. If the stains still appear, use a different type of transparencyfti. ● ReplacetheEP-Lcartridge.
100
Options The followingoptionsam availablefor the printer.This chapterprovides brief explanationfor these options.For detailson installationand maintenance,pleaserefer to their own manuals. ● Paper feeder ● Cassette(A4, Letter,Legal,Executiveand Envelope) ● ExpansionRAMboard (1, 2 or 4MB) ● Font cartridge ● IBM emulationcamidge 10.1 PAPERFEEDERAND Theoptionalpaperfeederisusedwithoneofoptionalpapercassettes,to feed paper from the paper cassette into the printer.
I Types and sizes of papercan be used with the cassettesare listedbelow. Size Type Weight I print delivery Plain paper Letter, ~gal, A4, B5? 60. 105g/m2 Face-dow~p Executive :;;sparency Letter,A4 Face-up Labels Letter,A4 Face-up Envelopes 98X 190-162 X250mm 60- 90g/m2 Face-up 10.2 EXPANSIONRAM BOARD Threekindsofmemoryexpansionboardm availablefortheprinter:a 1MB RAMboard,a2 MBRAMboardanda4 MBRAMboard.TheseRAMboard permitprintingof full pagegraphics.
10.3 FONTCARTRIDGE Fonts can be added to the printerby installingan optionalfont cartridge. Thefontcartridgeis installedin theslotbeneaththecontrolpanelof theStar LaserPrinter4. Insertthe fontcartridgewiththe arrowlabelfacingup. If the fontcartridge is insertedupsidedown,the cartridgeand/orprintermaybe damaged. CAUTION: The Font Cartridgesfor LaserPrinter8 cannotbe used with this printer.
104
Specifications 11.
● Paper Manualfeed: 97x 148mm- 216x 356mrn Cassettefeed (Option) Legal/Letter/Executive/A4/B5/EnveloP Face down:approx.50 sheets output Face up: approx.20 sheets Weight: 60- 105g/m2(plainpaper) Special: OHP film Adhesivelabels Postalcards Envelopes c PrintingA~a: top and left margins:2.5mm bottommargin:4.5mm rightmargin: 4.Omm ● ● Acousticnoise:standby: max.43dB printing:max. 53dB Environment Operating: 50”Fto 90”F(10”Cto 32.
—1 r 387 nun 1 I [ l--..
I 11.2 RELIABILITY c Suggestedmonthlyprint volume 2500prints c Deftition of failure Any loss of operationthat n3quirescabg a serviceperson. Operationerrors and installationfailuresare not included. ● Productlife Five years or 150,000prints,whichevercomesfirst.
I 11.3 PIN FUNCTIONSON INTERFACES ● ParallelInterface Function Goesfrom High to Low (for at least 0.5 microseconds)when dataare valid. 2 10 DATA1 DATA2 DATA3 DATA4 DATA5 DATA6 DATA7 DATA8 ACK IN IN IN IN IN IN IN IN OUT 11 BUSY OUT PAPER OUT 3 $ 5 6 7 B 9 12 OUT 13 14-15 SELECTED OUT N/C 16 SIGNAL , GND 17 CHASSIS GND 18 +5VDC 19-30 GND OUT 31 RESET — IN 32 ERROR — OUT 33-36 N/C Eight-bit character data.
● Serial interface Pin No. Signal Name Direction 1 2 3 4 GND TXD RXD RTS 5-6 7 8-19 N/C GND N/C — 20 DTR OUT 21-25 N/C 110 — OUT IN OUT Function Chassisground. Carries data fromtheprinter. Carriesdata to the printer. On whenthe printeris readyto reeeivedata. Unused. Signalground. Unused. On whenthe printeris readyto receivedata. Unuswl.
I Glossary ASCII (as’kee)— a standardizedandcommonlyacceptednumericalcode that representsletters,numbers,and symbols,as well as command sets. ASCII stands for American StandardCodefor Information Interchange. Baud— a measu~ of the speed at which information is transmitted. The baud rate, which is set for serial transmissions, is approximately the number of characters transmitted per second multiplied by 10. Byte — a series of 8 bits that representsone character.
Face-down delivery— A type of paper delivery in which the paper is ejectedfrom the printerwiththe printedside facingdownward. Face-updelivery— A typeof paperdeliveryin whichthe paperis ejected from the printer with the printed side facing upward. Face-up delive~ is used for printing envelopes,transparencyfihns and labels. Fixingassembly— Theassemblyused to fix the toneron to the paper or other material using heat and pressure in printing process.
Parallel— a communicationsinterfacethat sends or receives 8 bits of informationplus controlsignalsat a time. Parity— a bit in a serialinformationthat allowsa computerandprinterto automaticallycheckfor errors in transmission. Pitch— thewidthof a typefacemeasuredin charactersper inch. Point— theheightof a type fon~measumdin points,or 1/72of an inch. Portrait— printingonpaperacrossitsnarmwerdimension, suchasa letter on paper that is 8.5 in. wide and 11 in.
114
m ALARMligh~39 ASCIICo(k), 111 m BADCHARCODEmessage,87 BADFONT CODEmessage,87 BADFONT DATAmessage,87 BAUDrate, 53 Buttons,controlpanel,33,35-38 D CALL SERVICEmessage,80-81 CANNOTROTATEmessage,87 CANNOTDOWNLOADmessage,87 CARTRIDGEBADmessage,81 CART.
u Initialsettings,56 INPUTOVERFLO W message,87 INSUFFICIENT RAMmessage,83 grollp, 42 INTERFACE INTERFACEmessage,43,53-55 El LANDSCAPE message, 59 Landscapeorientation,42,59 Laser,2 Laserprinting,2-3 LAYOUTgrOUp, 42 LAYOUTmessage,45,59 LINEERRORmessage,87 LinePrintertypeface,64 LOADCASSmessage,82 LOAD FACTORYSET message,43, 56 Lotus1-2-3,68-70 ml Maintenance,79-99 MEMORY TESTIMBmessage,34 M-FEEDmessage,86 MicrosoftWindows,71-73 Microsoftword,71 Multi-purpose tray(MPtray),4, MPLOADTHEPAPmessage,89 ml NO
ROTATING FONTmessage,90 RS-232Cconnector, Seeserialconnector cm Selftesti40-42 Selfteststatussheet,40 Serialinterfaee,52-55 Serialinterfaeeeonneetor,5,28-29 Serialinterfaeepinfunction,110 SETEP/CLOSEmessage,82 Specifications, 105-107 Statusmessages,89-90 STATUSSHEETmessage,40,89 STOPBITmessage,54 Stains,99 Streakyprints,97-98 El TEST/> button, 36,50 TEST PRINT MODE message,41,90 TESTPRINTSTOPmessage,41,90 TIMERERRORmessage,81 TRAYREFILLmessage,82 TRAY,CHANGEmessage,84 m’ Unpacking,8-16 I_@ WordPerfect
Consumer Response Star MicronicsCo., Ltd. invitesyour suggestionsand commentson your printerand this manual.Pleaseaddressyourcormpondence to: WorldwideHeadquarters: STARMICRONICSCO., LTD. 194Nakayoshida Shizuoka,JAPAN422-91 Attn:ProductManager AmericanMarket: STARMICRONICSAMERICA,INC. 420 LexingtonAvenue,Suite2702-25 New York,NY 10170 Attn:ProductManager EuropeanMarket: STARMICRONICSDEUTSCHLANDGMBH WesterbachstraBe59 P.O. Box 940330 D-6000FranMiM/Main90 F.R. of Germany Attn: ProductManager U.K.
PRINTED IN JAPAN