LC-IO COLOURPRINTER USERS MANUAL NOT INTENDED FOR SALE PN 8082025 I
Federal Communications Commission Radio Frequency Interference Statement This equipment generates and uses radio frequency energy and if not installed and used properly, that is, in strict accordance with the manufacturer’s instructions, may cause interference. to radio and television reception.
HOW TO USE THIS MANUAL This manual is organized into five chapters and four appendixes. To learn how to make the best use of your printer you are urged to read all of chapters 1 through 5. The appendixes can be referred to as necessary. Chapter 1 explains how to get the printer unpacked and set up. Read this chapter before you do anything else. Chapter 2 explains the control panel. After getting set up, read this chapter and try out the procedures in it to find out how the printer works.
FEATURES OF THE PRINTER This printer is a compact, colour, dot-matrix printer that supports the IBM/Epson commands and character sets. An excellent partner for your personal computer, it prints text and graphics in black-and-white or six bright colours. A print sample generated by a BASIC program is included inside the back cover. With more advanced software, you can produce even more striking colour graphics.
TABLE OF CONTENTS Chapter 1 SETTING UP THE PRINTER Locating the printer Unpacking and inspection Check the carton contents Setting up Mount the platen knob Remove the top cover Install the ribbon cartridge Replace the top cover Connect the printer to the computer Connect the printer’s power cord Loading single sheets Mount the paper guide Semiautomatic loading Manual loading Loading and parking fanfold forms Paper parking Paper unparking Test printing Short self test Long selft test Interface test Adjustin
Top of form Forward micro-feed Reverse micro-feed Left margin Right margin Clearing the buffer Chapter 3 USING THE PRINTER WITH COMMERCIAL SOFTWARE Installing your software Printer menu Printer command options Type styles Page width Initialization sequence Setting the DIP switches Using your software Page alignment Type style and pitch selection Embedding printer commands Chapter 4 Chapter 5 31 31 33 33 USING THE PRINTER WITH DOS AND BASIC 37 Hard-copying Programming Programming 37 38 40 the scre
I Appendix C DOWNLOAD CHARACTER GENERATOR 89 Draft character NLQ character Appendix D CHARACTER SETS Standard character set IBM character set #2 IBM character set #l Additional character set International character sets INDEX REFERENCE CARD 97 98 100 102 103 104 105 Inside the cover
SETTING UP THE PRINTER Subjects covered in Chapter 1 include l Locating the printer l Unpacking and inspection (names of parts) 0 Setting up l Loading single sheets l Loading and parking fanfold forms l Test printing l Adjusting the printing gap l Setting the DIP switches LOCATING THE PRINTER Give some thought to the best place to put the printer. Both the printer and computer should be used in a normal indoor environment.
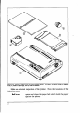
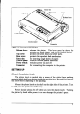
Figure 1-f. Check to make sure you have all five items: 1) Printer, 2) Paper guide, 3) Platen knob, 4) Ribbon cartridge, and 5) User’s manual. Make an external inspection of the printer. following parts: Bail lever: 2 Note the locations of the opens and closes the paper bail which holds the paper against the platen.
Bail lever Poa Release lever: Top cover: Rear cover: Entry slot: Control panel: Power switch: Connector: releases the platen. This lever must be down for printing on single sheets, and up for fanfold forms. protects the print head and other parts. protects the sprocket feed mechanism. for inserting single sheets of paper. controls various printer functions. switches power on and off. for connecting the computer to the printer.
- Remove the top cower Lift the front edge of the printer’s clear plastic top cover. Then disengage the tabs at the back of the cover and remove the cover completely. - igure 1-4.
hstall the ribbon cartridge The top side of the ribbon cartridge has a handle for turning the ribbon. Turn this handle in the direction of the arrow to tighten the ribbon. Next place the ribbon cartridge on the print head assembly, guiding the ribbon between the print head and the metal platen guard. Press down lightly on the cartridge until it locks into place. Caution: Don’t touch the brass gear on the carriage. I Figure l-5.
Figure l-6. r;onnectmg tne mtertace caue Connect the printer’s power cord. Check that the printer’s power switch (located at the left front) is OFF. Then plug the printer’s power cord into an AC wall outlet. Never plug or unplug the power cord while the printer is turned on. LOADING SINGLE SHEETS This section will take you through the procedures for loading single sheets of paper. If you are using the optional automatic ASF instruction booklet.
igure i-7. Mounting the paper guide for single sheets Semiautomatic loading Single sheets can be matically with on. We loading. 1. 3. manually with off, or start the way with that the lever is and the lever back closed), then power on. will hear short beep and the indicator on control panel flash. These are the printer’s paper-out signals. Place a sheet on paper guide insert it into the slot. You feel a resistance as paper engages paper detector Work the past this and insert down as as it go.
lever Manual loading It is also possible to load paper manually while the printer’s power is off. The procedure is: 1. 2. 3. 4. 5. 6. 8 Check that printer power is off and the release lever at the back of the printer is down. Insert a single sheet of paper into the entry slot as far as it will go, the same way as for semiautomatic loading. Move the bail lever on top of the printer forward to open the paper bail.
LOADING AND PARKING FANFOLD FORMS Fanfold forms have holes along the sides and perforations between the sheets. They are also called sprocket forms, punched forms, or just plain “computer paper”. This printer accepts forms up to 10” wide. Fanfold forms are loaded, parked, and unparked as explained next. 1. 2. 3. 4. 5. 6. Place a stack of fanfold paper behind and at least one page-length below the printer. Turn the printer’s power OFF. Set the release lever to the up position.
lever - Figure l-10. Opening the sprocket covers to expose the sprocket teeth igure l-71. Closing the sprocket covers 10. Fit the holes in the paper over the sprocket pins. Check that the paper is even. 11. Close the sprocket covers (Figure l-l 1). 12. Raise one of the clamp levers to lock one sprocket unit in place.
13. Turn the platen knob to feed the paper forward until it comes out from under the top cover. 14. Move the bail lever back to close the bail. 15. Check that the paper is feeding in flat, then raise the other clamp lever to lock the other sprocket unit. 16. Replace the rear cover. Hold it tilted upward and insert the two tabs at the bottom into their slots. Then rotate the cover forward, pressing down on the thumb pads on the left and right to snap it into place. 17.
3. 4. 5. 6. 7. Tear off the printed form at the last perforation, leaving not more than about half a page showing above the top cover. If necessary, press the Paper Feed switch to feed paper forward until a perforation is located just above the top cover, and tear there. Press the Print Pitch switch on the control panel and hold it down. Still holding the Print Pitch switch down, press the Paper Feed switch.
I Figure 7-13. Short test pattern Long se/f test To see the printer’s variety of type styles, you can run the long version of the printer’s self test. 1. 2. 3. Check that paper is in position for printing. With power off, press the Paper Feed switch on the control panel and hold it down. Still holding the Paper Feed switch down, turn the printer’s power ON. The printer will automatically start printing a test pattern of its full character set in various type styles.
ADJUSTING THE PRINTING GAP The distance between the print head and the platen can be adjusted to accommodate different paper thicknesses. To make this adjustment, remove the top cover. The adjustment lever is located near the left end of the paper bail. Pulling the adjustment lever towards you widens the gap; pushing it away from you narrows the gap. There are four positions; you can feel the lever clicking into each position.
I I Figure l-15. DIP switches L 2-3 L L i.. International character set (See below) 2-4 The printer is delivered with all DIP switch set to the ON position. These are the standard settings. By changing the settings, you can alter various printer functions to match your requirements. The following questions will help you make the right settings.
Switch l-l: Is the page length of your paper 11 inches or 12 inches? Leave this switch ON if you will be using 11-inch OFF position if you will be using 12-inch forms. forms. Move it to the Do you want an automatic carriage return? Switch 1-2: Leave this switch ON. The printer will automatically perform a carriage return by moving to the left margin at each line feed.
ON selects character set #2, which is for computers with an g-bit interface (the most common kind). OFF selects character set #l, for computers with a 7-bit interface. Do you want an automatic line feed? If you leave this switch at the ON position, a separate line-feed code is required to obtain a line feed. If you move this switch to the OFF position, the printer performs both a carriage return and line feed each time it receives a carriage-return code.
MEMO
Chapter 2 CONTROL PANEL OPERAT/O/VS This chapter explains how to use the control panel to: 0 Pause printing l Feed paper (fast and slow, forward and reverse) l Select the print pitch 0 Select a type style 0 Print test patterns l Prevent software from changing the panel pitch and style selections l Print a hexadecimal dump l Park fanfold forms l Set the top-of-form l Set the left and right margins l Clear the printer’s buffer position SWITCHES AND INDICATORS The control panel has four switc
The control panel switches can be pressed singly to perform the operations indicated by their names. Other functions can be obtained by holding these switches down when you turn the printer’s power on. Still further functions can be executed by pressing the control panel switches in combination. This chapter explains all the switch and indicator functions. Power indicator The power indicator lights (yellow) when power is on. When paper is not present, the power also alerts you to the need to load paper.
When you press the On Line switch again to go back on-line, the paper feeds backward about one inch, stopping in the right place to resume printing. Paper Feed switch This switch operates only when the printer is off-line. If you press it once the paper feeds forward by one line. If you hold this switch down, the printer performs consecutive line feeds. While you are feeding lines, if you also press the On Line switch, the paper will feed to the top of the next page. This is explained later.
Samples of these pitches are shown in Figure 2-2. Note that with proportional pitch different letters occupy different widths. (For example, “i” and “1” are narrower than other letters.) Proportional pitch is attractive and space-efficient, though not always convenient when column alignment is required. Note that you cannot select condensed proportional pitch on the control panel. You can make this selection by the printer commands < SI > < ESC > “p” 1 - see Appendix B.
-/- l”i _i_ .y::) .; j.. i::i I t.l t:\ 1. <,j /_. 2, .+: + “’ :i,t \I ’ 8, This is near-letter-quality Courier. This is Courier This is italic. This is Sanserif TtiIs IS THIS This This IS ORATOR is Orator is Orator Sanserif. ORATOR Figure 2-3. Type styles selectable italic. WITH SMALL CAPITALS. ITALIC with italic WITH lower with SMALL case. lower CAPITALS. case. from the control panel The other type styles do not have a small-capitals option.
Short test pattern: On Line switch If held down during (shown in Chapter 1). Long test pattern: power-up, Paper If held down during The test cycles endlessly. this switch prints a short test pattern Feed switch power-up, this switch prints a long test pattern. To stop the test you must switch power off. Stay in pane/ pitch: Print Pitch switch By holding this switch down during power-up, you can prevent software interference with the print pitch selected from the control panel.
3. At the end of the hexadecimal dump, set the printer off-line with the On Line switch. This is necessary to print the last line. The following BASIC program is a simple test you can run in hexadecimal mode: 10 20 30 40 50 FOR I-O *TO 255 LPRINT CHR$(I); NEXT I LPRINT END If your system passes the codes directly to the printer without changing them, you will get a printout like Figure 2-5.
When the IBM-PC BASIC interpreter sends hex code OD (carriage return) it adds an extra hex OA (line feed). Hex code 1A (end-of-file) also gets special treatment: the interpreter does not send it at all. This can cause problems in programs that generate graphics or download character data, but there is a solution. Try changing line 20 in the preceding program and adding the coding shown below.
Paper parking: Print Pitch and Paper Feed switches This procedure feeds the paper backward. It parks the fanfold form at the back of the printer so that you can switch to single-sheet feeding (by moving the release lever to the down position). Before parking fanfold forms, tear off all but the last page, leaving less (at least three inches less) than a full page showing above the top cover. 1. Press the On Line switch to set the printer off-line. 2. Press the Print Pitch switch and hold it down. 3.
Reverse micro-fee& On Line and Print Pitch switches You can also feed the paper in small increments to a higher position on the same page. Note: With fanfold forms, do not try to return perforation may catch inside the printer. 1. 2. 3. in reverse, to a previous page. The Press the On Line switch to set the printer off-line. Press the On Line switch again and hold it down. Press the Print Pitch switch. The paper will start moving backwards in a series of small steps.
1. 2. 3. 4. 5. 6. Halt the printing program on the computer. If printing stops immediately, the buffer is clear and the rest of this procedure is unnecessary. If printing does not stop, continue as follows: Press the On Line switch to set the printer off-line. Printing will now stop, but there may be data remaining in the buffer. Press the Print Pitch switch and hold it down. Press the On Line switch and hold it down. Press the Paper Feed switch and hold it down. Continue holding all three switches down.
MEMO - 30
Chapter 3 USING THE PRINTER WITH COMMERCIAL SOFTWARE There is an abundance of commercial software available: spreadsheet programs, word-processing programs, graphics programs, and more. This printer will work with any program that supports a Star, Epson or IBM dot-matrix printer.
A few installation programs may ask you not to select a printer but to describe what your printer can do. The answers to the most often asked questions are: Yes, this printer can do a backspace; and Yes, it can do a hardware form feed. Selecting (or describing) a printer is the main step in the installation process and frequently the only step necessary.
The character pitch can be selected from the control panel before you start printing, or possibly by an initialization sequence as described next. initialization sequence One of the installation options may be to specify the commands your software sends at the beginning of each printing job. These commands are called the “initialization sequence” or “setup string.” If necessary, you can use the initialization sequence to adjust the margins to your paper size or select a particular type style or pitch.
the right position on the page, a short distance below the perforation. With power off, you can align the forms by turning the platen knob. When power is on, use the Paper Feed switch on the control panel. Type style and pitch selection If your software does not control the type style and pitch, you must make these selections with printer commands or panel controls. The default selections are draft style and pica pitch. To select a different style or pitch from the control panel, proceed as follows: 1. 2.
Type style (Font): ((F))O ((F))l ((F))2 ((F))3 ((F))9 Courier Sanserif Orator with small capitals Orator with lower case Draft Size: ((S))O ((S))l ((S))2 ((S))3 Standard size Double width Double height Double width and height Colour: ((C))0 ((C))1 ((C))2 ((C))3 ((C))4 ((C))5 ((C))6 Black Red Blue Violet Yellow Orange Green Bold: ((B))O ((B)) 1 Non-bold Bold Italic: ((I))0 ((I))1 Non-italic Italic If you want to print a title in double-size Orator with small capitals, then change to regular-si
When you use these commands there are several points to note: l The type style ((F)) and italic ((I)) commands are ignored if the NLQ Type Style switch was held down when power was switched on. l The bold command ((B))l gives double-strike printing. In draft mode you may prefer to use emphasized printing, which requires a software command or escape sequence. l A line consisting of commands alone prints as a blank line.
Chapter 4 USING THE PRINTER WITH DOS AND BASIC Although you will probably do most of your printing with the aid of commercial software, at times you will want to employ direct commands or programs of your own. This chapter will give you some ideas.
To switch printer output off, press CTRL-PRTSC or CTRL-P again. Each time you press this key combination, hard copy toggles from on to off or from off to on. PROGRAMMING THE PRINTER WITH DOS COMMANDS If your system includes the file PRINT.COM you can use the main DOS printing command. Simply type the word PRINT followed by the name of the file you want to print. To print a file named README.DOC, for example, type: A >PRINT README.
If you want a particular type style, print pitch, or right or left margin, you can make these settings from the control panel before you start printing. See Chapter 2. If you print from the DOS command level very often, it will be advantageous to create a printer setup tile. Then instead of setting margins etc. manually each time, you can complete the setup with a single command from your computer.
*Il:*-V[xl^V[!“VA^V[X^VL\ 2:*-c “E^V indicates that the following character is a control code. ^V[ enters the < ESC> code. < ESC > has character code 27, and “[” is the 27th character in ASCII sequence from A. Similarly, “VA enters the control code < 1 > and “VL enters the control code < 12 > . See your DOS manual if you need further information about EDLIN. You can now set up the printer by sending it the file NLQELITE.DAT.
You will note that this program avoids the printer’s double-parenthesis commands. To change colours, for example, it uses the escape sequence E$: “r”; CHR$(n), where E$ is predefined as CHR$(27), instead of the equivalent command ((C))n. The double-parenthesis commands are great for embedding in documents, but they are less convenient in programs. In their simplest form they cannot be listed; instead of listing them, the printer executes them.
1410 1420 1430 1440 1450 1460 1470 1480 1490 1500 1510 1520 1530 1540 1550 1560 1570 1580 1590 1600 1610 1620 1630 1640 1650 1660 1670 1680 1690 1700 1710 1720 1730 1740 1750 1760 1770 1780 1790 1800 1810 1820 1830 1840 1850 1860 1870 1880 1890 1900 42 LPRINT LPRINT H$;E$;"wl";E$;"r";CHR$(l);"RED, 'I; LPRINT E$;"r";CHR$(2);"BLUE. I'; LPRINT E$;"r";CHR$(3);"VIOLET. "; LPRINT E$;"r";CHR$(4);"YELLOW," LPRINT LPRINT H$;E$;"r";CHR$(5);"ORANGE, "; LPRINT E$;"r";CHR$(6);"GREEN, "; BLACK.
1910 1920 1930 1940 1950 1960 1970 1980 1990 2000 2010 2020 2030 2040 2050 2060 2070 2080 2090 2100 2110 2120 2130 2140 2150 2160 2170 2180 2190 2200 2210 2220 2230 2240 2250 2260 2270 2280 2290 2300 2310 2320 2330 2340 2350 2360 2370 2380 2390 2400 LPRINT E$;"r";CHR$(O); LPRINT E$;"%O" 'Select normal character LPRINT H$;C$;"Dot graphics:"; DIM LOG0$(4) RESTORE 2450 FOR ROW-1 TO 4 FOR COL-1 TO 100 READ DG LOGO$(ROW)=LOGO$(ROW)tCHR$(DG) NEXT COL NEXT ROW LPRINT E$;"A";CHR$(8); 'Set 8/72" line spacing FOR RO
2410 2420 2430 2440 2450 2460 2470 2480 2490 2500 2510 2520 2530 2540 2550 2560 2570 2580 2590 2600 2610 2620 2630 2640 2650 2660 2670 2680 2690 2700 2710 2720 2730 2740 2750 2760 2770 2780 2790 2800 2811-j 2820 2830 2840 2850 DATA 6, 8. 6. 0, 28, 32, 14, 64, 14, 0 DATA 14. 0,124, 0, 0, 12, 64, 12, 32, 14 DATA 16, 14, 0. 14, 0, 12, 0 ' ' Dot graphics data DATA 0, 0, 0. 0, 1. 3, 7. 7. 7. 15 DATA 14, 14, 14. 14, 14, 7, 7. 3, 3, 15 DATA 15, 15, 0. 0, 0. 0, 0, 0. 0. 0 DATA 0, 1, 3. 3. 7.
The WIDTH “LPTl:” 255 statement in line 1110 means infinite line width. It prevents the IBM-PC from inserting unwanted carriage returns and line feeds in graphics data. Actual printing begins in line 1120. Using the preassigned commands, the program prints samples of its different type styles, including a line showing all styles in italics, followed by samples of the print pitches, then some double-size, quadruple-sized, and colour printing.
1510 1550 1560 1610 1620 2020 2140 2240 2250 46 LPRINT CHR$(28);"Q";CHR$(47) 'Set right margin LPRINT E$;"A";CHR$(I);E$;"2"; 'Set line spacing ' LPRINT E$;" ";CHR$(I); 'Increase character space LPRINT E$;"A";CHR$(I);E$;"2": ' LPRINT E$;" ";CHR$(I); LPRINT E$;"A";CHR$(B);E$;"2": 'Set 8/72" spacing LPRINT D$;CHR$(28);":";CHR$(O);CHR$(O~;CHR$(O); LPRINT C$;CHR$(28);":";CHR$(O);CHR$o;CHR$(O~;CHR$(O~; LPRINT E$;"&";CHR$(O);CHR$(6O~;CHR$~6O);
Chapter 5 MAINTENANCE AND TROU5LESHOOTlNG Subjects covered in Chapter 5 include l Cleaning the printer l Replacing the ribbon l Replacing the print l Troubleshooting head Dust and heat will make any mechanism wear more quickly. The best maintenance is preventive, and the first step is correct location of the printer. This is covered in greater detail in Chapter 1, but in general an environment comfortable for humans is best for both the computer and the printer.
- REPLACING THE PRINT HEAD The dot matrix print head has a life of about 200 million dots, or years of normal use. When printing is too light even after replacing the ribbon, you’ll know that the print head has reached the end of its service life. To replace the print head, follow the procedure below. As you remove the old print head, note carefully how the cable threaded, so that you can thread the new cable in the same way.
6. 7. 8. 9. Disengage the cable from the tabs holding it down, then remove the print head. For easy installation of the new print head, move the carriage toward the left end of the rail. Place the new print head on its support, seating it on the two pins. Thread the new cable the same way as the old, securing it under the tabs on the print head carriage. Connector Figure 5-2. Replacing cover the print head 10. 11. 12. 13. Plug the cable into the connector, inserting it as far as it will go.
TROUBLESHOOTING H If the printer doesn’t print: l Check the Power and On Line indicators. l Check that the interface printer ends. l Make a test print. (Turn power OFF, hold the On Line or Paper Feed switch down, then turn power ON.) If the test print succeeds, the problem is not with the printer; try a different printing command, or try using a different cable. If the test print fails, have the printer checked by a qualified serviceman.
n If the printed characters don’t match the characters on the screen: l Check DIP switches 2-2 to 2-4. When these switches are not all ON (back), an international character set is selected and some ASCII symbols are changed to other characters. See Appendix D. l Some software is not able to display international characters on the screen. If you use an international character set you may want to paste labels on the keyboard. l If you are using the IBM mode, check DIP switch l-7.
MEMO
TECHNICAL SPEClHCA T/Oh/S H Printing Mechanism Printing method Serial impact Printing speed 120 characters per second (draft pica) 30 characters per second (NLQ pica) Printing direction bi-directional or unidirectional Draft: (selectable), logic seeking NLQ and graphics: unidirectional, logic seeking Print dot matrix 9 Pins Life: 200 million head dots Black/blue/red/yellow fabric ribbon tridge Life: 1 million draft characters/colour Ribbon Paper feed Friction and push-tractor feed Semiau
DIP switches 12 pins Special features Panel pitch/style lock-in Forward and reverse micro-feed Paper parking Hexadecimal dump W Co/our Printing W Dot Matrix - Black, red, blue, violet, yellow, orange, green Colours .
n Type Styles and Pitches Draft Courier, Sanserif, Orator (with lower case or small capitals), and italic versions of these Extra-large Double width, double height, double width and height, quadruple width and height characters Print pitches Pica (10 cpi) Elite (12 cpi) Condensed pica (17 cpi) Condensed elite (20 cpi) (Standard mode only) Proportional spacing can be selected for each of the above Line spacing l/6 inch (standard) l/8, n/72, or n/216 inch (programmable) Column 8 inches Pica: 80 char
n Electrical Specifications 120 VAC f 10% 220 VAC + 10% 240 VAC + 10% (varies according chase) Line voltage Line frequency 50 or 60 Hz Power Typ. 30 W, Max.
MEMO
PRINTER CONTROL COMMANDS This appendix describes the printer’s control commands. The commands are arranged by function. The name of each command is followed by a table like the one below: Mode Both Hexadecimal Decimal ASCII “X” “X” I‘1” Cl> 27 120 49 1B 78 31 27 120 I IB 78 01 Mode: Indicates Std. IBM Both ASCII: Indicates the ASCII coding of the command. Control characters are enclosed in pointed brackets: For example, < 0 > means character code 0.
_- Select Mode draft elite < ESC Mode “ I” “I” > “I” Changes the NLQ Select Hexadecimal Decimal ASCII IBM characters NLQ 21 13 27 73 49 1 IB 49 31 1B 49 01 to draft quality characters with elite pitch (12 cpi). Type Style switch was pressed during power-up. Ignored if characters Decimal ASCII &lx,’ %‘I ” 27 120 27 120 Hexadecimal 49 1B 78 31 IB 78 01 Both “X” 1 Changes from draft quality to near letter quality.
I Select Sanserii Mode Both IBM characters Decimal ASCII “(” “(” “F” “)” “)” “, 99 28 28 46 29 29 31 c. ESC > “I” “2” 21 73 50 1B 49 32 < ESC > “I” <2> 27 73 2 IS 49 02 Changes to the Sanserif NLQ font. Ignored was pressed during power-up. Select Orator characters Mode Both Hexadecimal 40 40 70 41 41 49 ASCII “(33 “(93 if the NLQ Type Style switch with small capitals Decimal “F.
Emphasized Mode ASCII Both printing Decimal 27 “E” Causes subsequent draft characters thickness to vertical strokes. Cancel emphasized Mode ASCII Both Cancels Double-strike Mode Both IB 45 to be emphasized by adding extra printing Hexadecimal Decimal 27 “F” emphasized 1B 70 46 printing. printing Hexadecimal Decimal ASCII S‘ >> L. 7, ( ( Hexadecimal 69 “B” ‘.
Stop underlining Mode 1 Both Decimal ASCII < ESC > “0" ‘*-” < ESC > “-” Hexadecimal IB 27 45 48 co> 27 45 0 2D 30 1B 2D 00 1 Stops underlining. Start 0 werlining Mode Both Decimal ASCII Hexadecimal < ESC > “A” “1” 27 95 49 “p” 27 95 1 IB Causes subsequent characters to be overlined. zontal tabulation are not overlined.
COLOUR PRINTING Select printing colour ASCII Mode I. Decimal 31 ( Both COMMANDS “C” ‘T’ “)” 7” “)” Hexadecimal 40 40 67 41 41 n 27 114 n 28 28 43 29 29 n n 1B 72 I n n Select the printing colour according to the value of n. Ignored if a colour ribbon is not installed. The value of n may be either the character code or the digit character.
Select IBM character Mode ASCII Both set #7 Decimal “7” 27 Hexadecimal 55 IB 37 Selects IBM character set #I. If the standard character set is currently selected, this command remains dormant and takes effect at the next < ESC > “t” I command. In IBM mode, character set #l is the power-up default if DIP switch I-7 is OFF. Select IBM character Mode ASCII Both set #2 Decimal 27 “6” Hexadecimal 54 IB 36 Selects IBM character set #2.
Enable Mode printing of all character ‘Ln” 27 This command operates for only one character. Select - Mode 1B Decimal “ - .> ‘LN 32 Cl> “ 1” subsequent norma/ SE in effect zero characters 49 27 126 1 to be overprinted 1B 7E 31 1B 01 7E with a slash (S). zero Decimal ‘I - 31 “0” ‘. N >1 co> Causes subsequent a slash.
Condensed printing Mode Decimal ASCII Both r Hexadecimal 15 OF 27 15 1B OF In Standard mode, changes from pica to condensed pica (17 cpi) or from elite to condensed elite (20 cpi). In IBM mode, changes from either pica or elite to condensed (17 cpi). Ignored if the Print Pitch switch was pressed during power-up.
__ Cancel expanded printing Decimal ASCII Mode Roth one-line i Stops one-line expanded printing set with Does not cancel < ESC > “W” 1. Select proportional Mode Both IBM Hexadecimal I 14 I 20 < SO > or < ESC > < SO > spacing Decimal ASCII < ESc > ss P 73 “P ” “p” Hexadecimal 27 112 49 1B 70 31 Cl> 27 112 1 1B 70 01 Cl> 27 1 1B 50 01 “113 80 Causes subsequent characters to be proportionally the Print Pitch switch was pressed during power-up.
increase Mode Std. character spacing ASCII 1 Decimal “” n 1 27 32 Hexadecimal n Increases the space between characters by n/240 number from 0 to 127. Used in microjustification. Select double Mode ASCII Both or quadruple IlB n where n is a size Decimal “h” 20 inches, n 27 104 Hexadecimal n 1B 68 n Selects the size of subsequent characters as shown below.
Select character Mode Both size Decimal ASCII “(” “s., “(33 “)” Selects a combination value of n, as below. “)” n Hexadecimal 40 40 83 41 41 n 28 28 53 29 29 of character height and width Does not move the base line. n Character 0 1 2 3 Single width Double width Single width Double width width Character according n to the height Single height Single height Double height Double height Double-height characters are always printed at near letter quality.
VERTICAL POSITION Set line spacing Mode Both to II8 inch ASCII Decimal “0” 21 Sets the distance to l/8 inch. Set line spacing Mode ASCII Both 27 27 Both the paper advances line feeds 49 Hexadecimal IB or reverses 31 in subsequent line feeds 50 Hexadecimal IB or reverses 32 in subsequent line feeds to n/216 inch Decimal ASCII “ 3” 30 in subsequent Decimal “2” Set line spacing or reverses to 716 inch Sets the distance to l/6 inch.
Execute < ESC > “A” Decimal ASCII Mode IBM 21 “2” Hexadecimal 50 IB 32 Sets the line spacing to the value defined by the last preceding < ESC > “A” command. Sets the line spacing to l/6 inch if there is no preceding < ESC > “A” command. Line feed Mode ASCII Both Decimal Hexadecimal 10 OA Prints the current line and feeds the paper to the next line. If DIP switch l-2 is ON, also moves the next print position to the left margin. See the preceding commands for the line spacing.
Feed paper n lines ASCII Mode Both Decimal Hexadecimal “f’ “1” n 27 102 49 n 1B 66 31 n “f Cl> n 27 102 1 n 1B 66 01 n Feeds 127. the paper n lines from the current line, where n is between 0 and Set top of page at current position Mode IBM Decimal ASCII 1 “4” I 21 Hexadecimal 52 IlB Sets the current position as the top-of-page also be done from the control panel. position.
Set bottom margin Mode ASCII Roth Cancels Hexadecimal Decimal ASCII 21 “0” both the top margin 19 and the bottom IB 4F margin.
Set vertical IModel IBoth T tab stops I ASCII “B” nl n? ~04 I Decimal 27 66 nl Hexadecimal n2 . ..O 1 1B 42 nl 1 n2...00 I Cancels all current vertical tab stops and sets new vertical tab stops at lines nl, n2, etc., where nl, n?. etc. are numbers between I and 255. A maximum of 16 vertical tab stops can be set. The tab stops must be specified in ascending order; any violation of ascending order terminates the tab stop list. Standard termination is by the < 0 > control code.
HORIZONTAL POSITION COMMANDS Set left margin IModel 1 ASCII < ESC > Both “1” Decimal 27 108 n 1 n Hexadecimal 1 n lB6C Sets the left margin at column n (where n is between 0 and 255) in the current character pitch (pica pitch if proportional spacing is selected). The left margin does not move if the character pitch is changed later.
Set left and right margins Mode Decimal ASCII Both I nl “X” n2 Hexadecimal 88 nl I27 n2 I IB 58 nl no Sets the left margin at column nl and the right margin at column n2. See the preceding commands for margin restrictions and other notes. Carriage 1Mode 1 I Both I return ASCII I Decimal I 13 1 1 Prints the current line and returns the next print position If DIP switch l-8 is ON, also performs a line feed.
Center text 1Mode 1 Both 1 ASCII “a” “a” Centers *’ I .. subsequent text between Decimal Hexadecimal I 21 97 49 21 97 I 1B 61 IB I 31 61 01 the left and right margins. Right justify Mode Decimal ASCII Both “a” “7” i 21 91 50 IB 61 32 “a” <2> 21 91 2 1B 61 02 Aligns subsequent ragged. Set horizontal Mode Both text with the right margin, leaving the left margin tab stops Decimal ASCII I Hexadecimal “D” 121 n2 . ..
Horizontai tab 1 Mode ASCII Decimal Hexadecimal 9 09 Both Moves the print position to the next horizontal tab stop. Ignored if there is no next horizontal tab stop in the current line. Note that when underlining is selected, spaces skipped by horizontal tabulation are not underlined. Relative Mode horizontal tab Decimal ASCII Std.
GRAPHICS COMMANDS Print sing/e-density Mode 8-bit graphics Both Hexadecimal Decimal ASCII nl “K”
Select graphics Mode mode Decimal ASCII Both “*” n2 n0 ml nl 21 42 Hexadecimal n0 nl n2 ml m2 m2 1B 2A n0 nl n2 ml m2 . Selects one of seven graphics modes depending on the value of n0 and prints bit-image graphics in this mode. See < ESC > “K” for information on nl, n2, ml, m2, . .
DOWNLOAD CHARACTER Copy standard IModel Std. IBM characters COMMANDS from ROM into RAM 1 ASCII Decimal Hexadecimal 1 < ESC > “:” CO> 27 58 0 0 0 1B3A 00 0000 < FS > -:” 28 58 0 0 0 1C 3A 00 00 00 Copies all the standard characters to the corresponding download character RAM area, overwriting any download data already present. Ignored when DIP switch 2-1 is ON. Define draft download Mode 1 characters Decimal ASCII nl “&” co> n.2 m0 ml m2 m3...
Define NLQ download Mode characters ASCII Decimal “&” n2 Both CO> nl m0 ml m3... m46 m2 27 38 0 nl n2 m0 ml m2 m3... m46 Hexadecimal 26 00 nl n2 m0 ml m2 m3... m46 1B Defines one or more new NLQ characters and stores them in RAM for later use. DIP switch 2-l must be OFF. NLQ mode must be selected before this command is executed.
Select download Mode Both character Decimal ASCII “%” “ 1” “O/O” < 1 > Selects the download Select draft download Mode 1 IBM set character 49 IB 25 31 21 37 1 IB 25 01 when DIP switch 2-l is ON set Decimal ASCII < ESC > “I” < ESC > “I” Hexadecimal "4" 27 73 52 <4> 27 73 4 Select draft elite download IBM 37 set. Ignored character Selects the download character Type Style switch was pressed ON. Mode Hexadecimal 21 1 1B 49 set and draft quality.
MACRO INSTRUCTION COMMANDS Define macro instruction Mode ASCII Both Decimal “f” ..__ IRS> 27 Hexadecimal 43 1B 30 2B . IE Cancels any existing macro instruction and replaces it with the defined instruction. The defined macro instruction consists of the characters between the ” + ” and < RS > . These can be any printable characters or control characters except < RS > , up to a maximum of 16 characters.
Delete last character Mode Both sent Decimal ASCII Hexadecimal 127 Deletes the last character has already been printed, of a command. 7F received. Ignored if the last character received or if the last character received was ali or part Cancel last line Mode ASCII Both Decimal Deletes immediate I Mode I Both the last line currently Hexadecimal 24 18 present in the print buffer.
Set printer on-line Mode ASCII Both Hexadecimal 17 11 Returns the printer to the on-line state, allowing it to receive and process all subsequent characters and commands. This command is ignored if the printer was set off-line by pressing the On Line switch on the control panel. Bell Mode ASCII Both Sounds Bidirectional Mode Decimal a brief beep tone from the printer’s beeper.
Manual Mode feed Decimal ASCII Both . .. ( ,, CO> “o” “)” “)” Hexadecimal 27 25 0 40 40 48 41 41 IB 19 00 28 28 30 29 29 Selects manual sheet feeding even when the optional automatic sheet feeder is mounted. Ignored if DIP switch l-4 is ON (ASF inactive). Auto feed Mode ASCII Both u(., Hexadecimal Decimal <4~ “(3. “4” Selects the automatic inactive). “)” “)” sheet feeder. 21 25 4 40 40 52 Ignored 41 41 1B 19 04 28 28 34 .
Appendix c DOWNLOAD CHARACTER GENERATOR With this printer you can create new characters and symbols, download their dot data, and have them printed in place of selected characters in the regular character set. Characters that can be generated in this way range from simple but useful symbols like the check mark through complex Chinese or Japanese characters. The process of designing new characters with paper and pencil is somewhat time-consuming.
The dot matrix for a draft-quality character is 8 cells high and 11 cells wide. Figure C-l shows the matrix with the car symbol filled in. Note that there are no pairs of horizontally adjacent dots. The pins in the print head cannot fire fast enough to print adjacent dots in the horizontal direction. To the printer, a draft one byte for each column. the data as shown in Figure printer command. If you follows.
By moving the cursor and pressing the Fl, F2, and F3 keys you can quickly build up the dot pattern. If necessary you can clear all dots by pressing F4 and start over. When the character is complete, press Return to store the dot data in the computer’s memory. The program will clear the character box and ask you to select the next character to design. When you have finished program will ask you whether characters you have designed. characters will be saved on a the entire character set from printed out.
If you select near letter quality, the character box is the same size but now has 16 (high) x 23 (wide) dot positions. Each dot is represented by two adjacent sharp signs, occupying its own position and the position to the right. This reflects the fact that the printer still cannot print horizontally adjacent dots, but that even skipping every other dot, the dots appear joined when printed. A near-letter-quality character is represented by 46 bytes of dot data, two bytes for each column.
0 1010 1020 1030 1040 1050 1060 1070 1080 1090 1100 1110 1120 1130 1140 1150 1160 1170 1180 1190 1200 1210 1220 1230 1240 1250 1260 1270 1280 1290 1300 1310 1320 1330 1340 1350 1360 1370 1380 1390 1400 1410 1420 1430 1440 1450 1460 1470 1480 1490 1500 1510 1520 1530 1540 1550 1560 1570 1580 1590 1600 1610 1620 1630 1640 1650 1660 1670 1680 1690 ~**tt**.*t.******tt*frt DOWNLOAD CHARACTER GENERATOR *.'t*****w*********t* WIDTH "LPT1:",255 :KEY OFF :CLS DIM A(126). P(126.23). Q(126.23). DT(16.
! 1700 1710 1720 1730 1740 1750 1760 1770 1780 1790 1800 1810 1820 1830 1840 1850 1860 1870 1880 1890 1900 1910 1920 1930 1940 1950 1960 1970 1980 1990 2000 2010 2020 2030 2040 2050 2060 2070 2080 2090 2100 2110 2120 2130 2140 2150 2160 2170 2180 2190 2200 2210 2220 2230 2240 2250 2260 2270 2280 2290 2300 2310 2320 2330 2340 2350 2360 2370 2380 2390 94 a----- Key expla"atlons --------------------______________---------------LOCATE 10.40 :PRINT "Fl: Clear dot" LOCATE 11.
2400 2410 2420 2430 2440 2450 2460 2470 2480 2490 2500 2510 2520 2530 2540 2550 2560 2570 2580 2590 2600 2610 2620 2630 2640 3000 3010 3020 3030 3040 3050 3060 3070 3080 3090 3100 3110 3120 3130 3140 3150 3160 3170 3180 3190 3200 3210 3220 3230 3240 3250 3260 3270 3280 3290 3300 3310 3320 3330 3340 3350 3360 3370 3380 3390 3400 3410 3420 3430 3440 GOSUB 3730 :GOTO 2180 I----_ wrapmup ___________-----------------------------------------------CLS :LOCATE 1.
3450 3460 3470 3480 3490 3500 3510 3520 3530 3540 3550 3560 3570 3580 3590 3600 3610 3620 3630 3640 3650 3660 3670 3680 3690 3700 3710 3720 3730 96 FOR Y-l TO WI :BS=BO+CHR$(P(CC,Y)) :NEXT Y IF NOT NLQ THEN B5=BE+STRING5(35.0) :GOTO 3480 FOR Y-l TO WI :B$=B$+CHRI(Q(CC,Y)) :NEXT Y LSET A$=BB :PUT X1.
CHARACTER SETS This appendix gives tables of the printer’s standard and IBM character sets. The decimal character code of each character the lower right of the character. is shown in an inset to The hexadecimal code can be found by reading the entries at the top and left edges of the table. For example, the character “A” is in column 4 and row 1, so its hexadecimal character code is 41. This is equivalent (4 x 16 + 1 = 65) to decimal 65, the number in the inset.
STANDARDCHARACTERSET 3 I r--- I I9 h9 I # 3,C.
:IDIE/F 7 I 135 167 8 CBS> ( 136 152 a IEM> 1137 1153 ) 138 Cl * 7 A R C D E F I x I 1140 1I41 8 1 1143 1 199 II I84 1185 : 154 186 I 241 x 232 1201 1217 1233 248 Y z j 218 I.
IBM CHARACTER SET #2 I 5 6 7 - P I<’ I 9 9 1 25 1 10 B 11 ;‘F> I I 1 9 26 ; 59 43 , < I Y 13 J + 27 I I * A ) 105 Z K 75 L j [ 91 F 1 114 I I 106 k \ 15 100 146 1 I 162iNd I ? / 31 107 47 -b&-iid”~ I I 63 79 I 95 { 123 1 I 0 - 0 122 8 I 1 1 130 t I 121 z 90 “I112128144160176 .
101
IBM CHARACTER Hexa- Cledma 1 SET #l -7-4 0 1 2 3 4 5 6 7 8 9 A B C D E F Other characters are identical to IBM character set #2. The duplication of control codes enables systems with a 7-bit interface to obtain control functions when the most significant bit is set to 1 by the “ > ” command.
ADDITIONAL CHARACTER SET Hexadecima 0 1 In IBM mode, additional characters can be printed by special commands.
INTERNATIONAL CHARACTER When an international character 2-4 or by a command from software, character set: SETS set is selected by DIP switches 2-2 to the following changes are made in the See page 17 for the DIP switch settings. The commands Standard Where n are: n means 0 1 2 3 4 104 U.S.A France Germany Denmark Sweden for selecting mode: character ’ I the international < ESC > “R” n code n, i.e.
INDEX m Condensed pitch, 21 I 51, 67 Connector, 3, 5 Control panel, 19 Courier type style, 22, 60 Absolute tab, 79 Ascender, 83, 90 Auto feed, 88 Automatic carriage return, I6 Automatic line feed, 17, 77 Automatic sheet feeder, 6, 16, 56, 88 m Backspace, 77 Bail lever, 2, 7, 8, 9, II, 12 BASIC, 25, 40, 92 Beeper, 20, 24, 27, 28, 29, 87 , 87 Bidirectional printing, 87 Bit-image printing, 37, 45, 51, 80, 82, 82 Bold printing, 35, 62 Bottom margin, 74 Buffer, 17, 28, 53 El Cancel command, 86 Carriage re
Graphics commands, /o/ 80 ml Hard copy, 37 Hexadecimal dump, 24-26 Horizontal position commands, Horizontal tabulation, 51, 79 Off-line, 20, 86 On Line switch, 20, 24, 87 Orator type style, 16, 22, 60, 61 Overlining, 63 76 II/ IBM character sets, 64, ZOO-103 IBM mode, 16, 22, 45 IBM printers, 31 IBM-PC, 25,26 Immediate print, 86 Initialization sequence, 33 Installing software, 3 1 Interface: signals, 56 specifications, 53 test, 13 International characters, 17. 51.
semiautomatic loading, 7 specifications, 55 Slash zero, 66 Small capitals, 16, 22 Software, 31-35 Specifications, 53-57 Sprocket feed, 9-12. 53 Standard character set, 17, 64, 98, 99 Standard mode, 16. 17, 21. 4.5 Star printers. 31 Subscripts, 63 Superscripts. 63 Tabulation, 51, 75, 76, 77 Test patterns, Z2. 13, 24 Top cover, 3, 4.
LC-10 COLOUR PRINTER REFERENCE CARD POWER-UP FUNCTIONS In addition to their normal functions, all the control panel switches have special functions that operate if you hold them down while switching power on. COURIER SANSERIF ORATOR ~~ ITALIC Long tt Hexadecmal SWITCH COMBINATION Several additional functions panel switches in combinations.
DIP SWITCHES International character sets: - * Denmark/Norway Note: when switch l-6 is OFF and switch l-7 is ON. DIP switches are read only at power-up. before changing a DIP switch setting.
PRINT PITCH SELECTION Standard mode Elite Pica 1~~!+~~~&q~y()~‘1! 12:;. 1234567890 < ESC > “M” t 123456789012 1234567890 + 123456789012 1234567890 CHR$(18) < ESC > “~‘7 123456789012 CHR$(18) CHR$( 15) V v 12345b709012345b7 < ESC 12345678901234567 12345678901234567 CHR$( 15) ’ “M” 1234gs7.990:2345b789(1 * + 12345678901234567890 12345b7fl9012345b7890 12345678901234567 < ESC > “~'9 123456789012345678! Condensed Pica Condensed Elite IBM mode Pica Elite 1.2 7;:I.
COMMAND MODE SUMMARY CONTROL CODE IBM STD CBS> < SI > < ESC > < ESC > < ESC > < ESC > < ESC > < ESC 1 < ESC > < ESC > < ESC > < ESC > < ESC > < ESC > < ESC > < ESC 1 < ESC > < ESC Y < ESC > < ESC > < ESC > < ESC > < ESC > “3” “4” “4” “5” “5” “5” “fj” “7” “8” “9” “:” “.
MODE IBM IBM IBM IBM IBM IBM IBM IBM IBM STI) IBM IBM IBM STD IBM STD IBM STD IBM STD CONTROL CODE PUNCTIDN a0 al &? ml Define download characters “>” Set MSB to I < ESC > “‘P n m Convert graphics density < F+SC > “Oi” Reset printer < ESC > “A” n Set line spacing to n/72 inch < ESC > “B” nl n2 <0> Set vertical tab stops “C” ,, Set page length to n inches < ESC > “C” ,I Set page length to n lines < ESC > “D” nl n2......
MODE CONTROL CODE “b” nU nl n2...... < ESC > “c” n < ESC > “e” 0 n STD STD IBM IBM IBM IBM IBM IBM IBM “e” 1 n “f’ On “I” 1 n < ESC > “b” n < ESC > ‘7” 0 < ESC > “i” I < ESC > -j” n < ESC > “k” n 4 ESC z “I” n < ESC > “p” 0 “p” 1 < ESC > Y’ n < ESC > “t” 0 < ESC > “t” 1 < ESC > “w” 0 < ESC > ‘Xv” I < ESC > “x” 0 i ESC > “x” 1 < ESC > “-” 0 < ESC > “e” , “4” < FS > “5” “:” < FS > < FS z “(” “(” “(” “(” “(” “(” “(” “(” “(” “(” ‘.
L Type styles are: i:y f, :s, : {;I (-: .t;, ({+! rCZJ 'i i) ,":;* f.: .t, Courier characters, Sanserif ORATOR characters, WITH SMALL CAPITALS, with ,=jnd L ITALICS lower fat- Print pitches are: Pica pitch, Condensed picapitch, case al I OR characters, stylei!:;,~ Elite pitch. Condensed elite pitch, Proportional spacing for all pitches, L E L L L E L L E E e Various line and character spacings: Other features: Emphasized, Double-sfrike.