
Dot Matrix Printer User's Manual


Table Of Contents
- Surface
- English
- Trademark acknowledgments
- About this manual
- Contents
- Chapter 1: Printer Setup
- Choosing a place for the printer
- Unpacking the printer
- General guide
- Opening the front cover
- Removing the print head protector (LC-240C only)
- About ribbon cartridges
- Installing the ribbon cartridge
- Installing the paper support
- Connecting to your computer
- Connecting to a power outlet
- Loading paper
- Detaching the automatic sheet feeder
- Re-installing the automatic sheet feeder
- Chapter 2: User Setup Utility
- Installing the User Setup Utility
- Starting up the User Setup Utility
- Changing User Setup Utility parameter settings
- Using the General window
- Using the Font window
- Using the Paper window
- Adjusting the printer’s vertical alignment
- Changing the printer port
- Saving setup data as a new configuration file
- Saving changed setup data in the current configuration file
- Importing setup data from a configuration file
- Returning to default settings
- Exiting the User Setup Utility
- Using the Help window
- Chapter 3: Using the Printer with Windows 3.1
- Chapter 4: Control Panel Operations
- Chapter 5: Paper Handling
- Chapter 6: Using the Printer with MS-DOS
- Chapter 7: Other Printing Features
- Appendix A: Troubleshooting
- Appendix B: Specifications
- Appendix C: Interface Pin Outs
- Appendix D: Character Sets
- Appendix E: Printer Control Codes
- Index
- France
- Note concernant les marques déposées
- A propos de ce manuel
- Table des matières
- Chapitre 1: Configuration de l’imprimante
- Choix d’un emplacement pour l’imprimante
- Déballage de l’imprimante
- Guide général
- Ouverture du capot avant
- Retrait de la protection de la tête d’impression (LC-240C uniquement)
- A propos des cartouches de ruban
- Installation d’une cartouche de ruban
- Installation du support papier
- Connexion de l’imprimante à l’ordinateur
- Connexion à une prise secteur
- Chargement du papier
- Retrait de l’introducteur feuille à feuille
- Réinstallation de l’introducteur feuille à feuille
- Chapitre 2: Utilitaire de configuration
- Installation de l’utilitaire de configuration
- Lancement de l’utilitaire de configuration
- Modification des paramètres de l’utilitaire de configuration
- Utilisation de la fenêtre Générale
- Utilisation de la fenêtre Police
- Utilisation de la fenêtre Papier
- Réglage de l’ajustement vertical de l’imprimante
- Changement du port d’imprimante
- Sauvegarde des données de configuration dans un nouveau fichier de configuration
- Sauvegarde des données de configuration modifiées dans le fichier courant
- Importation des données de configuration à partir d’un fichier de configuration
- Rétablissement des valeurs par défaut
- Sortie de l’utilitaire de configuration
- Utilisation de la fenêtre d’aide
- Chapitre 3: Utilisation de l’imprimante sous
- Chapitre 4: Utilisation du panneau de commande
- Chapitre 5: Manipulation du papier
- Chapitre 6: Utilisation de l’imprimante sous MS-DOS
- Chapitre 7: Autres fonctions d’impression
- Appendix A: Dépannage
- Annexe B: Caractéristiques techniques
- Annexe C: Disposition des broches pour interfaces
- Annexe D: Jeux de caractères
- Annexe E: Codes de commande d’imprimante
- Index
- German
- Warenzeichen-Hinweis
- Über dieses Handbuch
- Inhaltsverzeichnis
- Kapitel 1: Grudeinstellung (Setup) des Druckers
- Wahl eines Stellplatzes für den Drucker
- Auspacken des Druckers
- Allgemeiner Leitfaden
- Öffnen der Frontabdeckung
- Abnehmen des Druckkopfschutzes (nur beim LC-240 C)
- Über die Farbbandkassetten
- Einsetzen der Farbbandkassette
- Anbringen des Papierhalters
- Anschluß an Ihren Computer
- Anschluß an eine Netzsteckdose
- Einlegen von Papier
- Abnehmen der automatischen Papierzufuhr
- Wiedereinsetzen der automatischen Papierzufuhr
- Kapitel 2: Drucker Setup Programm
- Installieren des Drucker Setup Programms
- Starten des Drucker Setup Programms
- Änderung der Parametereinstellungen des Drucker Setup Programms
- Benutzung des Fensters Allgemein
- Benutzung des Fensters Schrift
- Benutzung des Fensters Papier
- Einstellung der Vertikalen Punktausrichtung
- Änderung der Schnittstelle
- Speichern der Setup-Daten in einer neuen Konfigurationsdatei
- Speichern der geänderten Setup-Daten in der aktuellen Konfigurationsdatei
- Laden von Drucker Setup-Daten aus einer Konfigurationsdatei
- Rückkehr zu den Defaulteinstellungen
- Beenden des Drucker Setup Programms
- Benutzung des Fensters Hilfe
- Kapitel 3: Einsatz des Druckers unter Windows 3.1
- Kapitel 4: Handhabung des Bedienerfeldes
- Kapitel 5: Papierhandhabung
- Kapitel 6: Verwendung des Druckers unter MS-DOS
- Kapitel 7: Sonstige Druckerfunktionen
- Anhang A: Fehlerbehebung
- Anhang B: Technische Daten
- Anhang C: Interface-Pin-Belegung
- Anhang D: Zeichensätze
- Anhang E: Steuercodes des Druckers
- Stichwort-Verzeichnis
- Serviceleistungen in Deutschland
- Italiano
- Riconoscimento di marchio registrato
- Informazioni sul manuale
- Sommario
- Capitolo 1: Installazione della stampante
- Scelta del luogo dove installare la stampante
- Disimballaggio della stampante
- Panoramica generale della stampante
- Apertura del coperchio frontale
- Rimozione dell’imballo di protezione della testina di stampa (solo per il modello LC-240C)
- Due parole sulle cartucce nastro
- Installazione della cartuccia nastro
- Installazione del supporto appoggia-carta
- Collegamento della stampante al computer
- Collegamento alla presa elettrica
- Inserimento della carta
- Smontaggio dell’alimentatore automatico di fogli singoli
- Reinstallazione dell’alimentatore automatico di fogli singoli
- Capitolo 2: Il programma User Setup Utility
- Installazione del programma User Setup Utility
- Avviamento del programma User Setup Utility
- Modifica dei parametri di configurazione del programma User Setup Utility
- Uso della schermata Generale
- Uso della schermata Carattere
- Uso della schermata Carta
- Regolazione dell’allineamento verticale
- Modifica della porta della stampante
- Memorizzazione delle impostazioni in un nuovo file di configurazione
- Memorizzazione delle modifiche alle impostazioni nel file di configurazione corrente
- Importazione delle impostazioni da un file di configurazione
- Ripristino delle impostazioni predefinite
- Uscita dal programma User Setup Utility
- Uso della schermata “?” (Help) Aiuto
- Capitolo 3: Utilizzo della stampante con Windows 3.1
- Capitolo 4: Il pannello di controllo e le sue funzioni
- Capitolo 5: Uso della carta
- Capitolo 6: Utilizzo della stampante in ambiente MS-DOS
- Capitolo 7: Altre funzionalità della stampante
- Appendice A: Ricerca e soluzione dei problemi
- Appendice B: Specifiche tecniche
- Appendice C: Uscite a terminale interfaccia
- Appendice D: Set di caratteri
- Appendice E: Codici di controllo della stampante
- Indice analitico
- Customer service information
- Customer response
Chapter3.frame Black #11
61
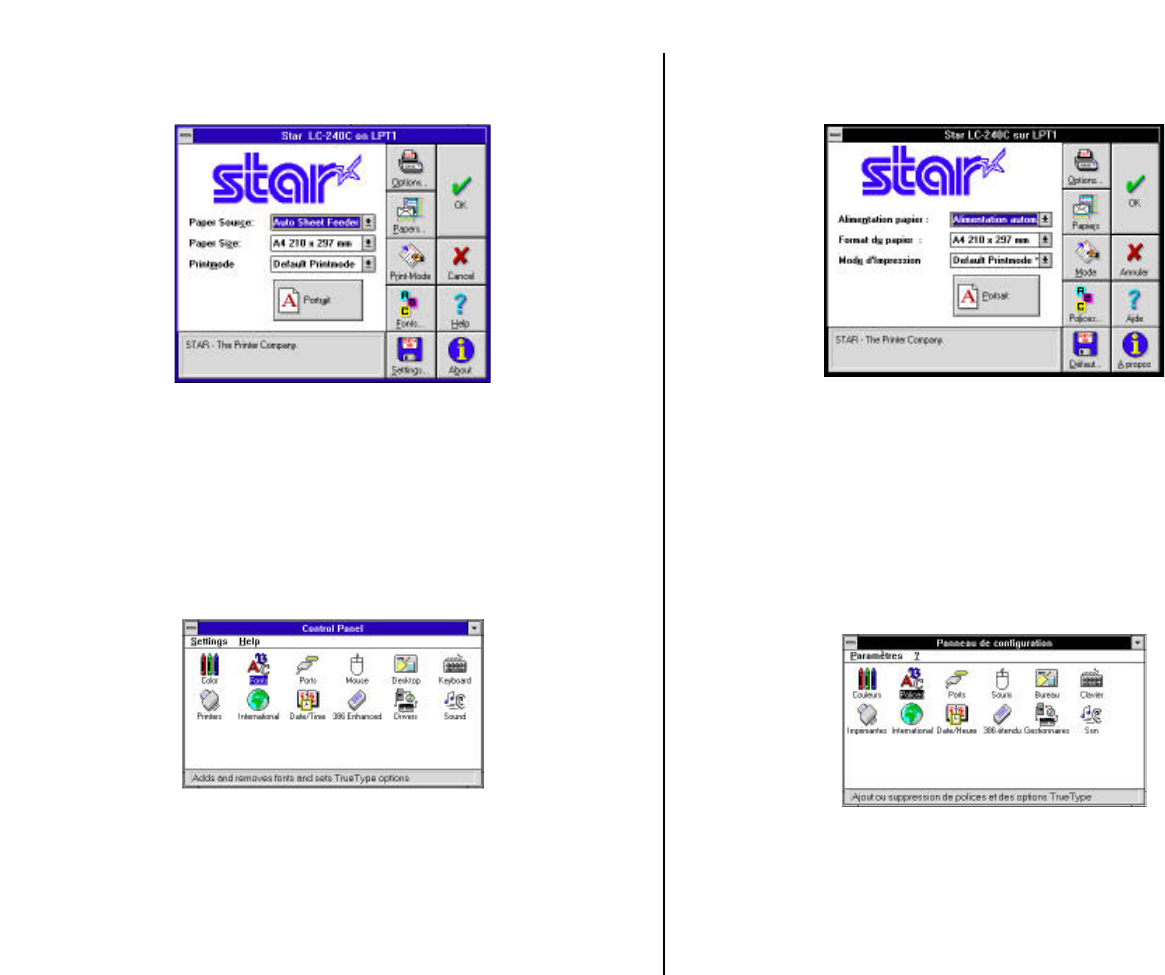
Make any changes that you want by clicking on the appropriate radio button or
highlighting your selection on the appropriate pull-down menu. Clicking on the
Options button displays the following window.
See “Getting ready to print” on page 55 for details on using this window.
Installing TrueType fonts
The TrueType fonts that are supplied on the 3.5” floppy disk that comes with the
printer can be used only when you are running Windows 3.1 or later. Use the
following procedure to install the fonts.
❏ Launch Windows.
❏ Open the Windows Control Panel.
Apportez les modifications nécessaires en cliquant sur les icônes appropriées ou en
mettant des options en surbrillance dans le menu déroulant approprié. En cliquant
sur le bouton Options, vous affichez la fenêtre suivante:
Pour plus de détails sur cette fenêtre, reportez-vous à la section «Préparation à
l’impression», page 55.
Installation des polices TrueType
Les polices TrueType fournies sur la disquette 3,5 pouces qui accompagne
l’imprimante ne peuvent être utilisées que sous Windows 3.1 ou une version
supériuer. Pour installer les polices, procédez comme indiqué ci-dessous.
❏ Lancez Windows.
❏ Ouvrez le Panneau de configuration sous Windows.