USERS MANUAL LC-90 NX-1010 PRINTED IN CHINA DOT MATRIX PRINTER HA 80825641
Federal Communications Commission Radio Frequency Interference Statement The 120V version equipment has been tested and found to comply with the limits for a Class B digital device, pursuant to Part 15 of FCC Rules. These limits are designed to provide reasonable protection against harmful interference in a residential installation.
Trademark acknowledgments LC-10, LC-90, LC-100, NX-1000, NX-1010, NX-1040, PT-10Y, SPC-8K: Star Micronics Co. Ltd. EX-800, FX-850, LX-810, LX-850: Seiko Epson Corporation IBM PC, IBM Proprinter, IBM Proprinter2, IBM Proprinter 3: International Business Machines Corporation. TrueType: Apple Computer Inc. MS-DOS, Microsoft Windows, Windows 3.1: Microsoft Corporation Notice • All rights reserved.
About this manual This manual describes how to set up, use, and care for the Star LC-90 and NX1010 monochrome printers. All of the operations contained in this manual apply to all of these models, except where specifically noted otherwise. The following is a list of what you can expect to find in each chapter.
Contents Chapter 1: Printer Setup . . . 1 Choosing a place for the printer . . . 1 Unpacking the printer . . . 2 General guide . . . 3 Opening the front cover . . . 4 Installing the ribbon cartridge . . . 5 Installing the paper support . . . 6 Connecting to your computer . . . 7 Connecting to a power outlet . . . 9 Loading paper . . . 9 Detaching the automatic sheet feeder . . . 12 Re-installing the automatic sheet feeder . . . 14 Chapter 2: User Setup Utility . . . 15 Installing the User Setup Utility . .
Chapter 4: Control Panel Operations . . . 37 To enter the Sleep Mode . . . 37 To restore full power from the Sleep Mode . . . 37 To switch between the Ready and Not-Ready Modes . . . 38 To feed single-sheet paper into the printer . . . 38 To eject single-sheet paper from the printer . . . 38 To advance paper . . . 38 Errors . . . 38 Chapter 5: Paper Handling . . . 39 Selecting paper types . . . 39 Adjusting for paper thickness . . . 40 Automatic sheet feeding . . . 41 Manual sheet feeding . . .
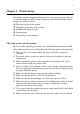
1 Chapter 1: Printer Setup This chapter contains important information on setting up your printer. Be sure to read this chapter carefully before using the printer for the first time.
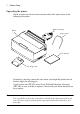
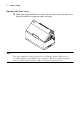
2 Printer Setup Unpacking the printer Check to make sure that the carton contains each of the items shown in the following illustration. Ribbon cartridge Printer Paper support User’s manual 3.5” Floppy disk If anything is missing, contact the store where you bought the printer and ask them to supply the missing part. A push tractor unit (PT-10Y) and a Serial-To-Parallel Interface Converter (SPC-8K) are also available as options. Consult with your dealer for details on these options.
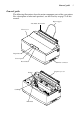
General guide 3 General guide The following illustrations show the major component parts of the your printer. For a description of what each part does, see the Glossary on page 72 of this manual.
4 Printer Setup Opening the front cover ❏ Hook your fingers under the two small tabs on either side of the front cover and pull upwards to swing the front cover open. Note: You can completely remove the front cover from the printer. However, we recommend that you normally leave it in place. The cover protects against objects getting into the printer, and it cuts down on printer noise.
Installing the ribbon cartridge 5 Installing the ribbon cartridge ❏ Rotate the knob on the cartridge clockwise to take up any slack in the ribbon. ❏ Carefully push the cartridge holder by hand all the way to the left side as far as it will go. Important! Never try to move the print head while the printer is plugged in. Doing so can damage the printer. If you have just used the printer, let the print head cool for a few minutes before you touch it.
6 Printer Setup Important! Be sure to double check that the ribbon is properly positioned between the print head and print head shield. If it isn’t, you may get poor print quality or even end up damaging the ribbon. ❏ Replace the front cover of the printer. Press down on the raised parts at the back of the cover until it snaps securely shut. Installing the paper support ❏ Insert the ends of the paper support into the slots on the printer as shown in the following illustration.
Connecting to your computer 7 Connecting to your computer The computer sends data to the printer through a cable. This printer does not come with a cable, so you must purchase one of your own. You will probably want to use a standard parallel cable for connection, but note that you can also use an optional Serial-To-Parallel Interface Converter (SPC-8K). Important! The following instructions apply to the Centronics parallel cable that is used with an IBM-compatible personal computer.
8 Printer Setup Important! Make sure that the printer is unplugged from the AC outlet and that the computer is switched off before connecting them. ❏ Plug one end of the parallel cable into the parallel port of your computer. ❏ The parallel port should be labelled “Printer,” “Parallel,” “PRN,” “LPT1,” or something similar. Plug the other end of the parallel cable into the socket on the side of the printer and secure it in place with the clips.
Connecting to a power outlet 9 Connecting to a power outlet ❏ Plug the power cord of the printer into a standard power outlet whose voltage matches the power rating noted on the label affixed to the bottom of your printer. Note that the printer does not have a power switch to turn power on and off. Instead, its Sleep Mode automatically reduces power consumption whenever you leave the printer unattended. For full details about the Sleep Mode, see “Sleep” on page 21 of this manual.
10 Printer Setup ❏ Pull the paper tray cover of the automatic sheet feeder forward. ❏ Slide the left-hand paper guide all the way to the left.
Loading paper 11 ❏ Pick up the stack of paper with both hands, and fan through the paper with your thumb. This prevents paper from sticking together when it is fed by the automatic feeder. Note: The automatic sheet feeder can hold about 55 sheets of paper at one time. ❏ Make sure that all four edges of the stack are smooth and even. Tap the edges on the top of a table or a desk to even them out. ❏ Carefully place the paper into the paper tray against the right-hand stationary paper guide.
12 Printer Setup ❏ Slide the left-hand paper guide to the right so that the stack of paper now ❏ sits snugly between the two guides. The paper should be able to slide freely into the printer, but it should not be able to move from side to side. Push the paper tray cover of the automatic sheet feeder closed.
Detaching the automatic sheet feeder 13 ❏ Grasp the automatic sheet feeder and pull it gently towards the front of the printer until it stops. ❏ Lift the automatic sheet feeder straight up.
14 Printer Setup Re-installing the automatic sheet feeder ❏ Open the front cover of the printer. ❏ Carefully lower the automatic sheet feeder into the printer, making sure that ❏ the two round tabs on either end of it enter into the corresponding slots inside the printer. You should have the automatic sheet feeder angled towards the front of the printer (at about the same angle that it was when you pulled the feeder forward while detaching it).
15 Chapter 2: User Setup Utility In addition to the Windows 3.1 driver, the 3.5” floppy disk that comes with this printer also contains a User Setup Utility that gives you total control over a variety of printing features and functions.
16 User Setup Utility ❏ Execute the command that installs the User Setup Utility: A:\>SETUP ↵ Star LC-90 / NX-1010 Installation of User Setup Utility Version 1.0 Please select Language English Deutsch Français Italiano = Enter = Scroll up = Scroll down F1 = Help ESC = Abort ❏ Select the language you want to use. and then press Enter. Star LC-90 / NX-1010 Installation of User Setup Utility Version 1.
Starting up the User Setup Utility 17 Starting up the User Setup Utility ❏ To start up the User Setup Utility, move to the directory you specified under ❏ “Installing the User Setup Utility” on page 15. If you want to move to the directory we named “star” in our example in the previous section, you would input the following: C:\>cd star ↵ Next, input the command to launch the User Setup Utility: STARSET ↵ Load Exit Save General Font Paper Adjust.
18 User Setup Utility Important! Your printer cannot read the settings if your computer and printer are connected through an optional Serial-To-Parallel Interface Converter. In such a case, you can still use the User Setup Utility to send settings to the printer, but you cannot read the printer’s current settings. Changing User Setup Utility parameter settings Changing User Setup Utility parameter settings is quite easy, regardless of whether you are using a mouse or the keyboard.
Using the General window 19 The other type of parameter box are “toggle” type, which means that you select one setting or the other. RAM usage (•) Input Buffer ( ) Download * Note that with both types of parameter boxes, the currently selected setting is indicated by a ball inside the parentheses on the left of the setting. Asterisks to the right of the parameters indicate default settings.
20 User Setup Utility Emulation ❏ Select either standard emulation or IBM emulation. Note that the emulation you choose determines the character set and printer control commands that are applied for printing. See “Character Sets” on page 60 for the character sets used by each type of emulation. See “Printer Control Codes” on page 66 for details on printer control commands. Unless you specifically need the IBM character set, we recommend that you normally use Standard emulation.
Using the General window 21 RAM usage ❏ Specify whether RAM should be used as an input buffer or as a download buffer. Selecting Input Buffer tells the printer to use available RAM to store data it receives from the computer. This speeds up the printing operation, but it also means that RAM cannot be used to store character patterns used to define down loaded characters.
22 User Setup Utility Using the Font window ❏ While in the User Setup Utility, select Font from the menu bar. Exit Load Save General Font Paper Adjust.
Using the Font window 23 Font lock ❏ Switch the font lock on (Enabled) or off (Disabled). When font lock is enabled, the printer will not allow the font to be changed by the software application you are using. When disabled, the application software can control the fonts used for printing. Zero style ❏ Select the type of zero you want to use. Selecting Normal prints zeros without lines running through them, while Slashed prints zeros with a diagonal slash running through them.
24 User Setup Utility Using the Paper window While in the User Setup Utility, select Paper from the menu bar. Exit Load Save PageLength (•) 11 inch ( ) 8 inch LineSpacing (•) 1/6 Inch ( ) 1/8 Inch Auto LF with CR (•) Disabled ( ) Enabled TopMargin (•) 1/6" General Font Paper Adjust.
Using the Paper window 25 Top Margin ❏ Select the spacing from the top of the paper to the first line of printing. Paper Out ❏ Switch the paper out detect function on (Enabled) or off (Disabled). When paper out detection is enabled, the printer automatically stops printing whenever it senses there is no more paper. When disabled, the printer continues printing as long as there is data.
26 User Setup Utility Adjusting the printer’s vertical alignment ❏ While in the User Setup Utility, select Adjust. from the menu bar. Exit Load Save General Font Paper Adjust.
Changing the printer port 27 ❏ If you see that your printer requires adjustment, select the box for the mode ❏ ❏ ❏ you want to adjust (by clicking inside it with the mouse or by moving to it by pressing Tab). Next, select a negative value to shift the lower row left, or a positive value to shift the lines right.The extent of the shift is indicated by the size of the value.
28 User Setup Utility Saving setup data as a new configuration file Use the following procedure to save the current User Setup Utility settings as a configuration file. ❏ While in the User Setup Utility, select the Save item from the menu bar. Exit Load Save General Font Paper Adjust. Port Help Enter file name: = Enter = Menu Select ❏ Input the name that you want to assign to the configuration and press Enter.
Importing setup data from a configuration file 29 Importing setup data from a configuration file Use the following procedure to load setup data from a previously saved configuration file. ❏ While in the User Setup Utility, select the Load item from the menu bar. Exit Load Save General Font Paper Adjust. Port Help DEFAULT = Scroll up ❏ = Scroll down = Enter = Menu Select The currently selected configuration file is the one that is highlighted in the list that appears on the display.
30 User Setup Utility Exiting the User Setup Utility ❏ While in the User Setup Utility, select the Exit item from the menu bar. Load Exit Save General Font Paper Adjust. Port Help Exit and send the settings to the printer Exit and do not send the settings to the printer = Scroll up = Scroll down = Enter = Menu Select ❏ Specify whether or not you want to send the settings to the printer by clicking on the corresponding item on the screen.
31 Chapter 3: Using the Printer with Windows 3.1 This chapter contains specific information you need to know when using the printer with Microsoft Windows 3.1. It also tells you how to install the printer driver on your computer so that it can control the printer correctly. In this chapter, you will learn about: ❏ ❏ ❏ ❏ ❏ How to set up for printing with Microsoft Windows 3.
32 Using the Printer with Windows 3.1 You can also accomplish the same result by clicking on Browse… and selecting the drive where the driver floppy is loaded. Next you should select INSTALL.EXE and click OK. ❏ Click on the language that you want to use and then click on Install to start ❏ ❏ the installation. The language we will use here is English. Click the name of your printer in the list that appears on the display to highlight it. If you are using English (UK), choose LC-90.
Getting ready to print 33 Getting ready to print Before printing, there are a number of things you must first do to set up the printer. You must select the printer driver, and the paper source, size, and orientation. Use the following procedure to make these selections. Note: You do not need to perform printer driver and paper selections mentioned above each time you print, but only if there are any changes to the last selections you made.
34 Using the Printer with Windows 3.1 Note: The Paper Source pull down menu in the above window gives lets you choose between Auto Sheet Feeder and Manual Feed. If you are using the optional push tractor unit, you must use the Paper Source menu to specify the push tractor unit as the paper source. To do this, click on the Options button in the above window to display the options window. Next, pull down the Feeder menu and select Tractor. Click on the OK button to complete the operation.
Printing a document 35 Use this window to specify the range of the pages to be printed, the quality of the printing (in dots per inch), and the number of copies you want to print. Note also that there are boxes that you can select to specify printing to a file or collating (printing from back to front). You can change the printer setup by clicking on the Setup button. When you do, the following window for setting up your printer appears on the display.
36 Using the Printer with Windows 3.1 Installing TrueType fonts The TrueType fonts that are supplied on the 3.5” floppy disk that comes with the printer can be used only when you are running Windows 3.1 or later. Use the following procedure to install the fonts. ❏ Launch Windows. ❏ Open the Windows Control Panel. ❏ Double-click the Fonts icon and the Fonts dialog box appears. Click Add and the Add Fonts dialog box appears.
37 Chapter 4: Control Panel Operations The control panel gives you push-button control over the printer’s power and paper feed operations. It also includes an indicator light that tells you the current status of the printer at a glance. Note: For full details on paper handling, see page 39 of this manual. To enter the Sleep Mode ❏ Hold down Power for a few seconds. The printer beeps when it enters the Sleep Mode. ❏ For details about the Sleep Mode, see page 21 of this manual.
38 Control Panel Operations To switch between the Ready and Not-Ready Modes ❏ Press Power to switch the computer between being the Ready and NotReady Modes. ❏ When the printer is in the Ready Mode, the READY indicator is lit and the ❏ printer can receive data from the computer. This means that you should make sure that the printer is in the Ready Mode whenever you are trying to print.
39 Chapter 5: Paper Handling Your printer is designed to print on a variety of different paper types. This chapter tells you everything you need to know about paper, and how to set the printer up for automatic paper feed and manual paper feed. In this chapter, you will learn about: ❏ ❏ ❏ ❏ Selecting the best type of paper to use Adjusting for paper thickness Manual sheet feeding Clearing paper jams Selecting paper types Use the following information when selecting paper.
40 Paper Handling Adjusting for paper thickness Paper comes in different weights, normally expressed as gsm (grams per square meter) or lbs (pounds). Some form paper also has multiple pages that make them quite thick. Use the following procedure to change the gap between the print head and the platen and adjust for paper thickness. ❏ Move the adjustment lever on the right side of the platen to one of its four settings.
Automatic sheet feeding 41 Automatic sheet feeding Your printer comes with a built-in automatic sheet feeder that can hold up to 55 sheets of paper. See page 9 of this manual for details on using the auto sheet feeder. ❏ To feed paper into the printer, press the control panel’s PAPER button twice. Manual sheet feeding You can use the following procedure to manually feed single sheets of paper into the printer, even while different paper is loaded in the automatic sheet feeder.
42 Paper Handling ❏ Lifting up on the two paper release levers on the back of the printer, pull the jammed paper out. Paper release levers ❏ After you clear the jam, replace the automatic sheet feeder (see, “Re❏ ❏ installing the automatic sheet feeder” on page 14). Reload paper into the automatic feeder. Close the front cover of the printer.
43 Chapter 6: Using the Printer with MS-DOS This chapter contains information about how to use the printer with applications software running under MS-DOS. In this chapter, you will learn about: ❏ How to set up for printing with MS-DOS ❏ How to select fonts from within an application Setting up for printing with MS-DOS To print from an application running under MS-DOS, you must first select the printer from within the application.
44 Using the Printer with MS-DOS ❏ If none of the printers listed above is available in the application, choose one of the following. Once again, you should choose the one that is nearest to the top in the following list. Use User Setup Utility to select IBM emulation (page 20). IBM ProPrinter III IBM ProPrinter II IBM ProPrinter ❏ To print, follow the instructions given in the manual of the application you are using.
45 Chapter 7: Other Printing Features This chapter details other features that you are sure to find helpful, no matter what kind of document you are printing. They provide you with the versatility to make your output look exactly as you want it. In this chapter, you will learn about: ❏ How to pause printing ❏ Feeding paper ❏ Form feeding How to pause printing ❏ To temporarily interrupt printing, press the control panel’s Power button to ❏ put the printer into the Not-Ready Mode.
46 Troubleshooting Appendix A: Troubleshooting The appendix tells you what you need to know if you experience problems with your printer. It tells you how to test the printer, how to check system software settings, and how to adjust the vertical alignment. In addition, there is information on actions to take for specific problems, and on the meanings of printer beep tones. Warning! The printer uses high voltage.
47 Short test The short test prints the version number of the software contained in the printer’s ROM, followed by seven lines of text. *** Ver 1.0 *** !"#$%&'()*+,-./0123456789:;<=>?@ACBDEFGHIJKLMNOPQRSTUVWXYZ[\]^_`abcdefghijklmno !"#$%&'()*+,-./0123456789:;<=>?@ACBDEFGHIJKLMNOPQRSTUVWXYZ[\]^_`abcdefghijklmnop "#$%&'()*+,-./0123456789:;<=>?@ACBDEFGHIJKLMNOPQRSTUVWXYZ[\]^_`abcdefghijklmnopq #$%&'()*+,-./0123456789:;<=>?@ACBDEFGHIJKLMNOPQRSTUVWXYZ[\]^_`abcdefghijklmnopqr $%&'()*+,-.
48 Troubleshooting ❏ Begin printing from your computer, Instead of a normal printout, data will be printed in sixteen columns of hexadecimal numbers (two groups of eight numbers each). The equivalent printalble characters (or dots in the case of unprintable codes) are printed to the right of each row of hexadecimal numbers.
49 Troubleshooting guide Use the following table to help track down the causes of problems and to determine the best solution to deal with them. Problem The READY indicator does not light or flash. Possible Cause The printer is not receiving power. Recommended Action Check whether the power cord is correctly plugged into the power outlet. Check whether the power outlet is working by unplugging the printer and plugging in another device. Printer sounds like it is printing, but it is not.
50 Troubleshooting Problem Printer test works, but printer will not print out data from the attached computer. Possible Cause Recommended Action The wrong emulation is selected. Check the emulation selection and change if necessary. See “Emulation” on page 20. Your application program’s or system software’s printer selection is wrong. Check the printer selection of your application software.
51 Problem Line spacing is incorrect. Lines print over each other. Incorrect number of lines are printed on the page. Text and graphics are malformed. Print quality is poor. Possible Cause Recommended Action Jamming paper. Set up the printer for the paper thickness you are using. See “Adjusting for paper thickness” on page 40. The line spacing or leading selected your application program is wrong. Choose a different line spacing or leading setting from your application.
52 Troubleshooting Problem Possible Cause Recommended Action Text and graphics are malformed. Print quality is poor. The print head is damaged. Return the printer to your dealer for repair. Forms are smudged. The printer is not set up correctly for the thickness of paper being used. Set up the printer for the paper thickness you are using. See “Adjusting for paper thickness” on page 40. The ribbon is jammed, twisted, or not set correctly between the print head and the print head shield.
53 Problem Printer prints past the edge of the paper. Possible Cause Recommended Action The paper guide is not positioned correctly. Remove the paper and adjust the position of the paper guide. Reload the paper and try printing again. The ribbon is jammed, causing the print head to jam. Make sure that the ribbon cartridge is installed correctly. See “Installing the ribbon cartridge” on page 5. Paper is jamming, causing the print head to jam. Remove all paper from the printer and reload it.
54 Troubleshooting Problem Possible Cause Recommended Action Left margin moves to the right during printing. Static electricity caused by interference from nearby electrical devices or by lowlevel humidity is affecting printer operation. Make sure that the printer is not too close to any devices with electric motors or that raise the humidity level. Some characters are printed incorrectly. The wrong emulation is selected. Check the emulation selection and change if necessary.
55 Checking system software settings in Windows Whenever you have problems printing from a Windows application, you should check the following three things: ✓ Is the printer you are using set as the default printer? ✓ Is the printer you are using correctly selected in your application? ✓ Is the correct port selected? You should also refer to your Microsoft Windows User’s Guide for other information that might be helpful. If you still experience problems, consult with your software dealer.
56 Troubleshooting Checking system software settings in MS-DOS If you are using a parallel cable and cannot print a text file using the MS-DOS PRINT command, you may have a problem with your AUTOEXEC.BAT file. Open the file and look for the following line: MODE LPT1:=COM1 or MODE LPT1:=COM2 These lines indicate printing you are using a serial cable connection, and so you should delete them, save the AUTOEXEC.BAT file, and try printing again.
57 Appendix B: Specifications Printing System Printing Speed Print Direction Print Head Line Spacing Character Matrix Environment Serial Impact Dot-Matrix Pitch Draft (cps/dpi) NLQ (cps/dpi) Pica (10 cpi) 160/120H 40/240H Elite (12 cpi) 192/120H 48/240H Condensed pica (17 cpi) 136/240H 68/240H Condensed elite (20 cpi) 160/240H 80/240H H: half-dot Draft: Bi-directional logic seeking NLQ: Uni-directional or bi-directional logic seeking (selectable); Default: uni-directional Bit-Image: Uni-directional log
58 Specifications Paper Emulation (AEC) Interface Ribbon Type Ribbon Life Dimensions and Weight Power Supply Power consumption Options Single-sheet (manual feeding) Paper width: 7″ to 10.5″ / 178 to 267 mm Paper length: 5.5″ to 14″ / 140 to 356 mm Paper thickness: 0.00276″ to 0.00472″ / 0.07 to 0.12 mm Paper weight: 52 to 90 g/m2 / 45 to 77 kg / 14 to 24 lbs. Single sheet (automatic sheet feeding) Paper size: A4 and Letter Paper thickness: 0.00315″ to 0.00472″ / 0.08 to 0.
Now preparing the acrobat data Appendix C: Interface Pin Outs Appendix D: Character Sets Appendix E: Printer Control Codes Click here to refer to Multiple Language Manual LC-90.
72 Glossary Appendix F: Glossary A.E.C Automatic Emulation Change feature that allows the printer to automatically select the proper emulation mode (standard or IBM). automatic sheet feeder Device built into the printer that automatically feeds individual sheets for printing. Centronics cable Parallel cable normally used to connect the printer to the computer. configuration file Computer file created by the User Setup Utility to store printer configuration settings.
A A.E.C. 20, 73 adjustment lever 40 application printer selection 55 auto LF with CR 24 AUTOEXEC.BAT 56 Automatic Emulation Change 20, 73 automatic sheet feeder 41, detaching 12 reinstalling 14 73 B bidirectional printing 20 C cable parallel 7, 27, 55, 56 carton contents 2 char.
emulation control RAM usage 21 Sleep Mode 21 20 H Help window 30 hexadecimal dump 47 I input buffer 21 L line spacing 24 M manual sheet feeding 41 Microsoft Windows 31 setting up for 31 MS-DOS 43 selecting a printer 43 selecting fonts with 44 setting up for 43 N NLQ Direction NLQ Font 22 Not-Ready 38 20 O options 2 P page length 24 paper advancing 38 automatic feeding ejecting 38 fanfold 1, 9 feeding 38 41 handling 39 length 24 letterhead 41 loading 9 manual feeding 41 multi-page form 9 selec
S serial-to-parallel converter 7, Z 8, zero style 23 17 Sleep Mode 21 entering 37 precautions 21 system software settings MS-DOS 56 Windows 55 T tear-off 25 test long 47 short 47 timeout printing 25 top margin 25 troubleshooting 49 TrueType fonts installing 36 U unidirectional printing 20 User Setup Utility default settings 29 Exit 30 exiting 30 Font window 22 Importing setup data 29 installing 15 new configuration file 28 saving changes 28 starting up 17 V vertical alignment W Windows 31 26
Customer service information If you experience any technical difficulties with your Star printer, please refer to Appendix A How to deal with printing problems. This chapter describes easy methods to diagnose and resolve some of the problems that you may encounter. For further technical support, you should first contact your Authorized Star Dealer. If you require additional support, Star Micronics offers a wide variety of technical support services.