
Printer User's Manual

8.
9.
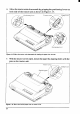
Adjustthespacingofthetractorunitsbyslidingthemalongthebar,using
the clamp lever at the back of each unit to release and lock them in
position.Whentheclampleverisup,theunitis released,andwhenitis
down,the unit is locked.
Nowclosethetractorcovers,againmakingsurethatthepaperholesare
alignedwiththepinsonthetractorunits.Iftheyarenotal;fied properly,
youwillhaveproblemswithpaperfeeding,possiblyresultingintearing
andjammingof the paper.
10.Turnonthepowerusingtheswitchlocatedatthefrontoftheprinter.The
printerwill beep,indicatingthatthepaperis not yet fully loaded.The
orange
POWER indicatorwill also flashto confirmthis.
11.Nowpressthe c
s.pd~c,
>button.Thepaperwillbe fed andadjusted
pastthe printhead to a positionreadyfor printing.
12.If youwantto setthepaperto adifferentposition,settheprinteroff-line
by pressing the<
ON LINE
]
button,then set the paper by using the
micro-feedfunction.(Fordetails,referto Chapter2.)
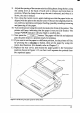
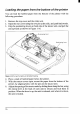
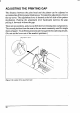
13.Replacethe rear cover, and mount the paper guidein the horizontal
positionshownin Figure 1-15,so that it will separatethe printedfrom
the unprintedpaper.
I
cover
Figure 1-15. Mounting the papar guide for fanfold forms
15