LS- EX LS- TT OPERATION MANUAL 80825800
Safety Notices This printer iscertified w a Class I ImerpmchrctuncfertheU.S.Departmentof Healthand Human Services (DHHS) Radiation Performance Standard according to the Radiation Control fbr Health and Safety Act of 1968.This means that the printer does not emit hazardous laser radiation. Since radiation emitted inside the printer is completely confined within protective housings and external covers, the laser beam cannot escape from the machine during any phase of user operation.
Statement of The Canadian Department of Communications Radio Interference Regulations This digital apparatus does not exceed the Class B limits for radio noise emissions from digital apparatus se[ out in the Radio Interference Regulations of the Canadian Department of Communications. Le present appareil num6riquen’enlenpasde bruits radio~lectriquesdepassant les limites applicablesaux apparei$ num~riquesde la cla;se B prescribesclansIe Reglement sur Ie brouillage raclio.
TABLE OF CONTENTS 1. How to Use This Manual . . .... ......... . .. . . . ..... ...... . ....... ...... ......... ... 1 1.1Lwer Printing . . . . . ,2 ],? printer c~mp~nents . . ..........................4 ].~ Printer Feiltures .. ........... . .... ........... .. ............. ......................6 2. Setting Up the Star LS-5 Series Printer ... ...... ......... .... . ....... .... ..... 9 2,1 Unpacking .. .............10 2. 1.1 Unpacking the Printer . ................10 ~ I .-~ checking the Parts . . .
4.5 Paper Feed .................................................... ...........................59 4.5,1 Feeder Selection ............................................................59 4.5.2 Paper Size .....................................................................60 4.6 Printing in Landscape Orientation ... ................ . ......... .. ........61 4.7 Print Density .................................................. .... ......... .. ... ....62 4.8 Saving the Setting .................................
8. Options ..............................................................................................93 8.1 Feeder Unit and Cassette ............................. ....................,.......93 82 Expansion RAM Board and RAM Module .................... ....... 100 8.2.1 Installing the RAM Module on the Board .................. 100 8.2.2 Installing the RAM Board into the Printer .................. 102 8.3 Font Cartridge ........................................................................ 105 8.
How to Use This Manual m ‘” “ Congratulations on purchasing a Star LS-5 Series Laser Printer. You will be delighted with the quality of the printed images and the ease of operation. With your computer, software and this printer, you can create professionallooking documents. This Operations Manual explores the entire range of printing possibilities of the Star LS-5 Series Printer. This manual is for beginners and for those who plan to concentrate on the basics.
1.1 LASER PRINTING Before you begin learning about your new Star LS-5 Series Laser Printer, you may find it helpful to know something about laser printing itself. A laser is actually abeam of light ofjust one wavelength (Laser is an acronym for Light Amplification by Stimulated Emission of Radiation). This “highly coherent” beam of light can be focused very sharply. Lasers, generated by gases, liquids or semiconductors, are widely used in applications ranging from surgery to the visual arts.
A combination of heat and pressure fuse the image to the paper. The paper is then ejected from the printer. Finally, a cleaning mechanism in the toner cartridge removes excess toner from the drum, and a special light beam neutralizes its entire surface. Then the entire process can begin again.
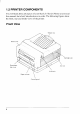
1.2 PRINTER COMPONENTS You will learn about all aspects of your Star LS-5 Series Printer as you read this manual, but a brief introduction is in order. The following figures show the front. rear and inside views of the printer.
Rear View Power receptacle Inside View
I 1.3 PRINTER FEATURES The Star LS-5 Series Laser Printer is a highly compact, fast and highresolution model, equally well-suited to home or office use. Its small footprint consumes significantly less space than many ofother laser printers, making it admirably suited for use in places where space is at a premium. Standar@output resolution is 300 x 300 dots per inch. This can be boosted to 300 x 600 dots per inch, giving the printer a noticeable edge over the competition in clearly and sharpness of output.
There are two emulations provided — Hewlett Packard’s Printer Control Language (PCL), incorporating the GL/2 graphics language, and TrueImage, Microsoft’s PostScript-compatible page description language. (The TrueImage emulation is only available for use with the LS-5TT or the LS-5EX with its optional TrueImage Board installed.) In each emulation there area selection of built-in fonts—22 PCL fonts and 35 TrueType (the name for TrueImage’s font format).
8
Setting Up the Star LS-5 Series Printer E!i ‘” “ The fact that you’re now reading this manual shows that you’ve opened the carton containing your new Star LS-5 Series Printer. This chapter will help you to unpack the printer, set it up, and get it running. First, you should make some preparations. You may already have decided on the printer’s new location.
2.1 UNPACKING The printer comes in two boxes. The large box contains the printer and its accessories, and the smaller one contains the toner cartridge. Follow these instructions when unpacking. 2.1.1 Unpacking the Printer Follow the instructions below to unpack the printer, 1. Open the large box, and remove the power cord and the accessories box. 2. Carefully remove the printer from the box.
3. Remove the packing material from around the printer. 1 4. Open the accessories box. Remove the front paper tray and Operations Manual. NOTE: Save the packing boxes and materials. If you need to move the printer (for relocating or service etc.), use these materials to protect the printer from damage.
5. Open the small box and remove the packing material from the toner cartridge. Do not open the aluminum bag containing the cartridge until you are ready to install it in the printer. .t/ w / @ ,7 ..
2.1.2 Checking the Parts Before setting up the printer, make sure that all standard items shown below are provided and they are free from damage. If any of these items are missing r damaged, contact your supplier. Power cord /’ \ Y (operations manual I 2.1.3 Optional Items Some of the following items may have been ordered. Unpack them. For details, refer to “Chapter 8. Option”.
I 2.1.4 Carrying the Printer Whenever moving the printer from one place to another, always make sure the front cover is closed. and carry the printer with two hands from handles provided on each side of the printer. CAUTION: To avoid damage, always use the handles when attempting to move the printer. NOTE: When moving the printer, remove the toner cartridge.
2.1.5 Opening and Closing the Printer . When opening the printer’s front cover, do not stop it in the half-way. This will open the protective shutter of the drum, and light may permanently damage the drum. . Do not put anything in or on the front paper tray except paper, and do not press the tray downward. CAUTION: The shaded area in the illustration below become extremely hot when the printer is used. To avoid any personal injury, do not touch these parts when the printer is open.
Opening the Cover 1. Remove the front paper tray if it is installed. Failure to do so, may cause damage to the tray. 2. I Side latch The cover opens downward. Do not stop the cover in the half-way. This will open the protective shutter of the drum, and light will permanently damage the drum.
Closing the Cover Using both hands, lift he cover and close it gently until it latches.
2.2 INSTALLING THE TONER CARTRIDGE Important Notice ● Install the toner cartridge immediately after opening the aluminum bag. Permanent damage can be caused by exposing light to the photosensitive drum. NEVER expose the cartridge to the strong light (more than 15000 Iux) or room lighting (1000 IUX)for more than five minutes. Do not open the drum’s protective shutter on the toner cartridge. Keep the cartridge away from CRTs, disk drives, diskettes, etc.
Follow the instructions below to install the toner cartridge for the first time, or when replacing the used one. 1. Open the front cover as described in “2. 1.5 Opening and Closing the Printer”. 2. If you are installing the toner cartridge for the first time, skip to Step 3. If you are replacing the old toner cartridge, pull out the used toner cartridge and dispose it in the proper manner. NOTE; Keep the toner cartridge horizontally to avoid scattering leftover toner. 3.
4. Holding the cartridge with both hands, rock it gently from end to end, 7 or 8 times, to distribute the toner evenly. If the toner is not distributed evenly in the cartridge, it may adversely affect print quality. 5. Place the cartridge on a flat surface. While holding down the cartridge with one hand, use the other hand to pull the tab to remove the seal. Make sure that the tab is pulled smoothly in a direction parallel to the flat surface.
6. Align the guides on the toner cartridge (marked by an orange line) with the guides inside the printer (marked by an orange arrow) and gently slide the cartridge into position. NOTE: Do not touch the rollers and the gears inside the printer. 7, Make sure that the cartridge is securely seated, then close the cover gently.
I 2.3 LOADING PAPER 2.3.1 Selection of Paper Print quality and printer life are greatly affected by the paper used. To optimize print quality, we recommend that you use paper; as well as envelopes, labels and transparencies, that are designed for use in laser printers or copiers. Paper can be fed into the printer either from the front paper tray or paper cassette. Types and sizes of paper can be used are listed below. Type Plainpaper Size A4 (210 mm x 297 mm) Let(er(8.
2.3.2 Loading Paper Into the Front Paper Tray Installing the Front Paper Tray Before loading the paper, install the front paper tray with the following procedure. 1, Open the front paper tray cover. ‘7 -. Insert the metal knob on the left side of the front paper tray into the left hole of paper opening.
L1lG ‘---r L1 cIy LU 3. Insert the right side of the tray while sliding the black lever of ‘hthe left. Then. release the lever. / 4. Flip open the folded tray by pressing down on the tab located on the right side of the tray. CAUTION: Do not push down on the tray or load heavy things to avoid damaging the tray.
Loading Paper Now, you are ready to load paper into the front paper tray. 1. Pull out the extension tray for standard length paper. 2. Adjust the side guide to the desired paper size.
3. Take a small stack of paper and align the edges by tapping it on a flat surface. NOTE: Fan the transparencies or labels before loading them into the paper tray. 4. Insert paper, with the print surface face-down, as far as it will go. CAUTION: Do not stack paper higher than the limit mark.
Removing the Front Paper Tray Remove the front paper tray when you replace the toner cartridge, clear a paper jam, open the front cover, or move the printer. 1. Remove the paper from the front paper tray. 2. Slide the side guide to its widest position. 3. Fold back the extension tray. 4. Detach the right side of the tray by sliding the black lever of the tray to the left. Then, pull forward and release the lever.
5. Detach the left side of the tray. 6. Close the front tray cover.
2.3.3 Loading Paper Into the Paper Cassette 1.Remove the paper cassette from the printer. 2. Pinch the end guide and slide it back as far as it will go.
I .3. Adjust the side guide to the desired paper size. 4. Take a small stack of paper and align the edges by tapping it on a flat surface: NOTE: Fan the transparencies or labels before loading them into the paper cassette.
5 Slide the paper edges under the metal retaining clips with the print surface face-down. CAUTION: Do not stack the paper higher than the limit mark. 6. Align the edges of the paper.
7. Slide the end guide to touch the paper edge. Make sure the paper edge is under the plastic tab of the end guide. 8. Insert the paper cassette into the printer.
9. Adjust: the output tray to the desired paper size.
2.4 CONNECTING THE POWER CORD Make sure that the power switch on the printer is set to OFF, then connect the power cord to the printer and an AC power outlet as shown below: 1. Insert the power cord into the receptacle on the back of the m-inter. . 2. Insert the power cord into a grounded outlet. Only use the power cord supplied with the printer. Note that this power cord is fitted with a ground pin. This grounding is an important safety feature and should not be ignored.
2.5 CONNECTING THE INTERFACE CABLE The host computer transmits information to the printer through an interface cable. The printer is provided up to three types of interface (serial, parallel and AppleTalk). The AppleTalk interface is only available for use with the LS-5TT or the LS-5EX with its optional TrueImage Board installed. An interface cable is not supplied with the printer. Determine the kind of interface cable you want to use, and purchase the appropriate cable from your supplier.
4. Connect the other end of the cable to the appropriate interface on the host computer. m NOTE: The printer’s factory setting is for a parallel interface. If the serial interface is to be used, you need to select the interface on the control panel. See “4.3. 1 Selecting the Serial Interface” for selecting type of interface.
Initial Operation 3.1 FRONT PANEL The front panel of Star LS-5 Series is a combination control board and interactive message center. The panel consists of: . a 2-line, 32 character LCD display screen . 5 LED lights ● 8 momentary contact buttons The momentary contact buttons permit you to perfrom various printer functions. In turn, the printer uses the display screen and the light indicators to convey information to you. The screen display is the primary way the printer communicates with the operator.
3.1.1 Powering Up Please note the following points when turning the printer cmor off. Power on: First turn on the computer, then all other devices, and finally turn on the printer. Power off: First turn off the printer, then all other devices, and finally turn OHthe computer. CAUTION: Always wait at least three seconds between turning off and turning cmagain. Turn cmthe printer by pressing the “I” side of the power switch.
3.1.2 The Buttons This section explains the various meaning and uses of the buttons, including their light indicators, when applicable. Keep in mind that the buttons’ functions depend on the mode the printer is in: the Normal Mode and Program Mode. ON LINE Pressing this button switches the printer from off-line to on-line or vice versa. When the printer is on-line (ON LINE LED is lit), the printer is able to receive information from the computer and print it.
TEST/> Pressing this button when the printer is in Normal Mode will operate in the following sequence: 1. Pressing this button displays “HOLD FOR TEST” on the bottom line of the LCD display screen. If the button is released while this message is displayed, the printer returns to the previous state. 2. If the button is held down for two seconds, the screen will display “STATUS SHEET” on the top line. If the button is released, the printer will print a status sheet (see “3.2.1 Printing Test Sheets”). 3.
P R T s u t P p t b W t p m M a d “ m f t C F M y m f ap s t t n h l R s t p o t p t b tr ro e f t P t “ P d r i P sELEcT T b t p e d p m b o l t p t s p P t t b ( S p T c f l f (ONLINE) T b s o ae p s t t s t a t r i t O L L f ir w d ’ “ r x l . b d t b w s r t c w c C f t t t ( m o t b o b i d l t F s pi o s S C L F M T C t a N d s w i t o a o .
M W t b y c r T c a t C a I T c f o c r s S u t t b t p c T 4 m t t ( o p L buttcm p u n u t a i t O L ( MODE ) button.
3.1.
I 3.2 SELF TEST T S L t I s c o a s T o s i S t i I e i t p p as o t p c q o t p I s t p t a oo m a w f a i nn h t p p w vl w t c p s a p l I t ew t p i a n x n 3.2.1 Printing Test Sheets T B a t H R as t P af . P 4 A r t “ Tv s r ( T >b t b w H t ( T L W y r F d r T H P T a u .
3.2.2 Status Sheet Description Y t p t p I t c k s t a t p o b j l a p p F ( o t p i o S t br i p i t p o T i t t a o t rp r w p a u p h t t a w oW t a i w t i i h t o i r t a l r p i s f l o y p j i p t wr a r T s y p s ( a t a R e T l u p p T s i d b i r o R b p f t t c s T s v o t a o t f y u I y p s i a l h i a s a i m o t s t p f t s Y f p c p i T f . N o t o c T f . C T f . P .
I T ● ● ● ● ● f O M a V c E A p af o t L —p s —l p ( l —V M b m i t v o l —w l f —w b a a f ( a T P . F ● F F —w T S T f . P G o P C o G o T f ● R R T I . I T I T f P m ● T f .
3.3 PROGRAMMING FROM THE CONTROL PANEL v o l p f w s o ah e o T f m t c t a p m a g a a is i a u R y ~ ov ] o e ( pe u ~ al t s t p ( p ~ )o n ( p ) ) i w a g ( < T g i t P M y m p t a . P ( t g o t O L i t o .
ERROR SKIP ( PROGRAM LOAD ) < SET ‘ACTORY USER AUTO PRINT INTER- INPUT PAPER DENSITY FACE PAGE REP PRINTER BUFFER MODE COMMANDS \ ‘ET- / RESET v “F* AUTO APPLE SELECTION TALK DTR +-l SERIAL PARALLEL FULL PAGE PARTIAL PAGE ROBUST PROTOCOL STOP PARITY DATA BIT BIT POLARITY XON BAUD RATE
N @ @ @ @ S i H D m H e m o T m o S w E R B TEST 1 ( > f ‘@ PAPER FEED EMULATION PAGE SIZE CHARACTER NUMBER LAYOUT OF COPIES FRONT FEEDER TRAY SIZE AUTO LINEFEED END OF LINE VMI MANUAL AUTO SET MARGIN ORIENTATION SOURCE DEFAULT NUMBER MARGIN MARGIN ~ POINT I TEXT TOP RIGHT LEFT LENGTH MARGIN MARGIN MARGIN 7 PITCH I I SYMBOL SET 4
MEMO
Am D Quick Start with the Star LS-5 Series: A Tutorial S O aq T b p l r c l t r t p r g i f b o i c b u t d i t t m h A m f u b d o t e a e g I c a as b r a i s w t r o t t h 4.1 PRELIMINARIES Y S . t . t p t W y L S L b p r c a al f o y p b s t o a s m p f f s t u u w o E ( t i t b y u y S L S a t r t s “ I h a i t c t t f u t p I i a aL C p i t b I y a j s p t t t I i v t y T p c c . i s o as s . t i a c .
T f p o t p I a a y t p n T S L S t p i o N P T p i y i f L P n w e r m m b h r d f i e m i N L l ( l ] o i f C p D e [ t D ] w s l I [ P e P m S D c t i p l D w s l w s l i I ] S [ u ( p b [ u P p [ s s f B [ a t p y c i t b m ( w E s p d S p S s D c s p e c f p w s f s f c s R aL ~ 5 Y t s I e ( p t p ( w aG ( p o ( > ( pe ) o n ( ( r p r
T a i l O L ( P ( D ( R ( A ( o t —t p —t p —i —t p —a e f p i r i p h b i r c W l t m n f p i r b n y pn f p o f p e a t p i o g g o 4.2.1 Basic Operation T a f b o p f . O L a O L —T p c c a p i o w i i o t O L l w b l F a o o T i a b p L l w g o t c r i t W f t p p f t io o m b t O p t (ONLINE) p fcb . P e —T p m h u i i i m T i i b t l D i T e i f tn p ( PRINT ). W t r t t p o T p i i p t p w b e n a t D l w g o .
4.3 CONNECTING THE PRINTER TO THE COMPUTER T p T h B s S L L P c e w as C i a A i a a R n s a i S L L P c e w t s i t A i i n a u t o oT p i i T p a s i c nb c t o oi c b a a a o t m U ap i d o f f t as c i l U t s a R 1 f t ( w T i p p c w f Y s ~ INPUT PRINT AUTO 5 l a A rp r f t n o gna i p i nt t f p c t w b l y i p a a m m o n e t C a nt I p G r c o L5-5EX Status and Setup Report 1.
4.3.1 Selecting the Serial Interface p ● o L l i o ● T p ( ● P ( ● P p u < ] u P I M ( N t d R N t s w r N @ Now press ( W t w s ].
I T s f t f f t o a e 8d b N p 1s b D H W y w t c a o t s p f h t s s a f s t b r F e t c et d eb a “ er i ”p ( t ( u D B i d t f o a ( < ) r c o t s P ( V )w d w g t r o t P ( w y c a o t s F p it c (ONLINE) t e t P M a p S L S P f p I y w a p r t . P r D ( “ t ( t X s i f u p t y h ( “ hm s R . Pressing ( V ) displays P D P R @ ( d r F X .
4.3.
4.4 RESOLUTION ENHANCEMENT PROCEDURE T “ R E t f . T t ● T p ● P ( P R . P p s g a o ) u t e t t p q es o t e c (ONLINE) b p d o nc b r m f r m s r M ~ R N t s R o . P t b p (PROGRAM) t < t w r @ < ) t d R O . P ~ t s i T R O .
4.5 PAPER FEED T S L S P c f p c o f t f p t Y c d t s o p f f t f o t ~ b a s e f t f as a P M g t p u et t u 4;5.1 Feeder Selection T P ● f d M P . P ● P p >u ( P P < ( P F v )3a < s w t a r d s w n d w d @ ) d t a o t s o l o t d s S e a C T < a ) t d T ( t s F F I y t c t O ( F F . F t S t (PROGRAM). R w Pressing .
I 4.5.
4.6 PRINTING IN LANDSCAPE ORIENTATION I y p w f t c t p . P . P f p ] u < t l g o a P L M ( w y o a ( P R w d f R @ r ( g r O L ● P R a ( O L . F t S p R O P ● y r (PROGRAM>: g L O .
I 4.7 PRINT DENSITY T c p d . T i ● t p t p l T w i s d t f d [ y w t e e (ONLINE> b T P f r O L t e t p m T s i M O C . F t S ) u R t ( P P < c v ).N P M D P d . P “ r h n d d r M R D t s w r @ ( ) d < t o o t s l r o t i s D S M S L 6 t PROGRAM b p .
4.8 SAVING THE SETTING T n i t s ● ● ● ● s o w r Y s i t p s t s e P (PROGRAfd).
I 4.9 RETURNING TO FACTORY SETTINGS I f f ● s r y s I t f P M P L . P w t t s f t b w p p ( u t s t e o a r r r M R F ~ L E S T s F w d S L F S @ ● P ( < >w ● P c v ).
4.10 SELECTING DISPLAY LANGUAGE T L s F G t p a . H d .t ( L a p .
MEMO 6
F T e S L b T a S T B B S e b S L I L L P S a h f h f i f B f n i a a S m af b f P c f f e 3 b P o r f o t p d s p p a i p s a s a c w t p o a s a p q I v 3p t 9 p i q s c c s n f l a u b c e i u 5.
5.
8 W d p aS p < 9 P o t ( d 1 F S f o p u y p o t r ( s l s o ( o t s s u d o t t c T s e l i p L i s i s ( S P t e f p f t P M a p i t 6
M L T n y r c S S L H p E! t S P S L i i i i g c t t c t p P ‘ ● “a ● d n r m c a m t p af c t t m o T c w e p of h t t c e a p a a l m r r 6.1 REPLACING THE TONER CARTRIDGE R t t .
I 3 O m t 4 O t N S w b f c t a b t m n t c c a y 5 H t c o 8t t d e i t c b 7 t c t t b p t w i m t a y m t a b t h t a r c n t op a a r i f p r e a i g I t t a p t i t i lo c l f f e i n q a t ea 7 o d i a d
I 6 P w t o c h M s u s 7 A g t o af t o u t t t O t s h W h t p t t t r s m b i ad o s m i p t d t t p tt ca s t t uc f w s t t n g i t o t p t c ( ( b a o b a o a a l g 7
8 M 7 s t c i s s t c t c g a h
6.
6.
T r A i k h b h o t p y d w o k t r o o y S L m S P t r w t o S p c t s b t p o O r s T c w e w t d we I w a t p j a o o p i cn b a h r 7.
7.2 SERVICE CALL MESSAGES 7.2.1 Engine Service Call Messages E c r s f c e m ac a r t t f i o ah w e i t oe T r e e n l M M S f A — p b e p s (= r ) p ing s (= r ) e S s m m p b e S i c p b s p r S e e p b r s r e r 7.2.
A M e c p h r p h e p h s s p ‘ p C r“” S e ( r o S rcWW1’ite test error in e E b ( c e n IC e C s i s p a b ICITI; c c } CRC e S E s i s p b ~ c I F S iI read/write test error in p f s s s s b E c g l s
7.3 OPERATOR CALL MESSAGES W t s d o c m t p hg o l a t a s T p i o t t o s b a t r A m a c y s p [ e t o r t s I t e i n d a y m c e p s a ( t e w o o t E P r b t I t e m w o a o t y s p ( b c t p j o i t e 7.3.
7.3.2 Font Cartridge Problems The font cartridge is plugged into the printer. It should not be inserted or withdrawn while the DATA LED is continuously lit. If’someone does this, the screen will indicate “CARTRIDGE ERROR”. The printer must be reinitialized by turning off the power and then on again. If a font cartridge is removed while the DATA LED is blinking, the screen will display “REINSERT CART”. in this case, the operator must insert the If (~) is pressed, the printer will font cartridge or press (-).
7.3.4 Change Paper Size Certain emulations permit page size to be specified by the host computer. Also, page size can be selected from the menu. If a change in page size is required, the screen will display a message to that effect. The alarm will beep and the printer will go off-line. You may have the printer ignore such a message by pressing (-). (In this case, the printer will print the page size image on the different size paper.
I 7.3.5 Manual Paper Feed Certain emulations permit specifying manual paper feed from the host computer. Also. you may select manual feed from the menu. The following message tell you to hand feed paper of a specific size. The alarm beeps and the printer goes off-line. When you feed the appropriate paper into the front paper tray and press (-], the message will be turned off and printing will continue.
7.4 OPERATOR INFORMATION MESSAGES 7.4.1 Host Communication Problem Certain problems with communication with the host computer may be detected. Messages listed below provide information, but do not halt the printing process. The printer uses a default value if necessary. You may remove the message by pressing (=). Note that if there are multiple errors, the last one detected is displayed.
I 7.4.3 Font Cartridge The font cartridge is plugged into the printer. The operator may insert or withdraw a cartridge only when the DATA LED is off or blinking. The following message acknowledges the change. Message Action Meaning ‘CART. CHANGED font cartridge is inserted or removed when DATA LED is off or blinking message will remain for one second REINSERT CART.
7.5 STATUS MESSAGES Status messages are low priority messages that either indicate normal conditions or provide warnings that need not be acted upon immediately. These conditions should not occur when the printer is on-line. If they do, however, the alarm will beep find the printer will go oi’f-line. For some conditions however, there is the possibility ofa condi(ion occurring when the printer is on-line. If it does, the alarm will not sound and the printer will remain on-line.
7.6 PAPER JAMMING As paper travels from the front paper tray or cassette through the printing area and is ejected. it can .jiumat the following locations: .i Paper pick-up area (front paper tray) ,2 Paper pick-up area (cassette paper feeder) @ Paper pick-up area with optional cassette paper feeder 4; Fixing assembly area &Print delivery area ➤ -%’~<”--””””””’”~ ..,6) Common causes ofpaperjarns areas follows. Remove them to prevent paper jams.
Follow the procedures below to clear the paper jam. 1. Remove any paper from the front paper tray, and remove the front paper tray. 2. Pull out the cassette and check the paper pick-up area. If there is a paper jam here, remove the jammed paper before replacing the cassette. NOTE: Remove the wrinkled paper in the paper cassette and make sure that paper is loaded in the paper cassette properly.
3. Release the side latches to open the front cover. 4. Remove the jammed paper carefully so as not to tear it. 1 I CAUTION: . Do not touch the fusing area as shown above, because it gets hot. . Do not throw strong light inside to avoid damaging the toner cartridge. . Do not touch the transfer roller. . Make sure that paper fragments are not left inside. 5. After checking all the areas described here, close the front cover, replace the front paper tray (if it is being used) and refill paper.
7.7 STREAKY 7.7.1 White Streaks White streaks occur if the toner level is low and the toner inside the toner cartridge is not distributed evenly. They can be eliminated by re-distributing the toner. 1. Leave the printer power on to prevent data corruption during a print operation. Remove any paper in the front paper tray and remove it. Release side latches and open the front cover. 2. Remove the toner cartridge from the printer.
3. Holding the cartridge with both hands, rock it gently from end to end, 7 or 8 times, to distribute the toner evenly. , 4. Replace the toner cartridge in the printer, then close the front cover. I I If vertical white streaks still appear after the toner inside the cartridge has been re-distributed, the cartridge needs to be replaced. See “6.1 Replacing the Toner Cartridge” for replacing the cartridge.
I 7.7.2 Stains on Transparency Films Transparency films may sometimes show stains at either the top or bottom of the films. These stains may be caused by a dirty paper path or the flaw on the toner cartridge. . Clean the fixing assembly. The fixing roller inside the fixing assembly may have been stained with toner. Print out several sheets of blank paper. If the stains still appear, use a different type of transparency film. ● 92 Replace the toner cartridge.
m m Am Options ● ● The following optional accessories are available with the Star LS-5 Series. This chapter describes how to install and use these optional accessories. ● ● ● ● ● ● Feeder unit Cassette Expansion RAM board RAM module Font cartridge TrueImage board for LS-5EX 8.1 FEEDER UNIT AND CASSETTE The optional feeder unit is used with one of the optional paper cassettes, to feed paper from the paper cassette into the printer. The feeder unit can be attached easily to the bottom of the printer.
I Types and sizes of paper can be used with the cassettes are listed below.
Setting Up Attaching an optional feeder unit requires a wide space. Choose a wide and flat surface near the installed printer. After attaching a feeder unit to the printer, return the printer to the installation place. 1. Unpack the feeder unit and put it on a wide and flat surface. Remove the paper cassette if it is installed. NOTE: Leave enough space to put your fingers inside both the front and rear of the feeder unit. CAUTION: Do not touch the control unit. It is easy to be broken. ‘7 e.
I 4. Release the side latches and open the front cover. Then remove the toner cartridge from the printer. 5. Replace thetonercartridgein thealuminum bag in which it was originally packed, or cover with a thick cloth to protect it from direct light.
6. Put the printer on the feeder unit by holding the hollows of both sides of the printer. Make sure the corners of the printer are aligned with on those of the feeder unit exactly. 7. Make sure the four projections fit into the four holes.
I 8. Insert four plastic clips securely into the four holes until they click. / ,.’ ,.. --—— ‘\\ “\ ‘ -... .,. ‘.<~ .. .,.>4 ... . ,,, w’ ,.~’ ,/’ 9. Move the printer with a feeder unit to the installation place. Hold the printer with your fingers in the hollows of the feeder unit.
paper. I 1 I Now, you are ready to use the optiona] feeder unit.
8.2 EXPANSION RAM BOARD AND RAM MODULE The Star LS-5EX printer has 1 MB memory and the Star LS-5TT has 2 MB memory as standard. You can expand this memory by installing the optional expansion RAM board. The expansion RAM board has either IMB memory or 2MB memory. You can add the memory size up to 6 MB by installing the RAM module on the board. 8.2.1 Installing the RAM Module on the Board There are two types of RAM module: 1 MB Module and 2 MB Module.
To install the module, align the connectors on both the board and the module, then slide it all the way in. To remove the module, pull the tab on the module to disconnect the connector.
8.2.2 Installing the RAM Board into the Printer When you have finished installing the RAM module on the board, follow the procedures below to fit the RAM board into the printer. 1. Turn the printer power off and remove the power cord from both the printer and the outlet. 2. Remove the interface cable from both the printer and the computer. 3. Open the rear cover as shown below 4 4. Remove the metal plate above the interface connectors using a philipstype screwdriver.
5. Insert the board into the left side, then slide it all the way in. 6. Remount the metal plate in place and secure it with three screws.
I 7. Close the rear cover, and connect the interface cable and the power cord to the printer.
I 8.3 FONT CARTRIDGE Fonts can be added to the printer by installing an optional Font Cartridge. The Font Cartridge is installed in the slot on the right side or the printer. Insert the Font Cartridge with the arrow label facing up. If the Font Cartridge is inserted upside down, the cartridge and/or printer may be damaged.
I 8.4 TRUEIMAGE BOARD You can select the TrueImage mode with the Star LS-5EX printer by installing the optional Page Description Language (PDL) Board, and an optional Expansion RAM Board (at least IMB expansion). Follow the procedures below to install them. 1. Turn’the printer power off and remove the power cord from both the printer and the outlet. 2. Remove the interface cable from both the printer and the computer. 3. Open the rear cover as shown below. 4.
5. Insert the RAM board into the left side and the TrueImage board into the right side, then slide them all the way in. 6. Remount the metal plate in place and secure it with three screws.
7.
Reference 9.1 SPECIFICATIONS . Type Laser beam page printer ● Engine Resolution: Speed: Warm up: . Emulation LS-5EX: LS-5TT: ● 300 x 300 dots per inch 5 pages per minutes for A4 size under I minute (at 20”C or 68”F) Standard: PCL 5 and GL/2 (HP LaserJet HI) Option: TrueImage (with optional PDL board) PCL 5 and GL/2 (HP LaserJet 111) TrueImage (Apple LaserWriter NTX) RAM Resident: Optional: . Host Interface Serial: Parallel: AppleTalk: . Default Settings: 1 megabyte (LS-5EX) 2 megabyte (LS-5TT) Max.
! ● Paper feeding: ● Paper size Plain paper: Envelope: Labels: .Transparency films: Front paper tray Cassette feed . Paper weight (plain paper) Front paper tray: Cassette feed: Letter, A4, Executive, B5 COM- 10, Monarch, DL, C5 A4, Letter A4, Letter 60 g/mz to 135 g/mz 60 g/m’ to 105 g/mz ● Printing area Requires a marign of 4mm from each edge of the paper ● Acoustic noise (in accordance with 1S0 7779) 37 dB or less Stand by: Printing: 45 dB or less .
I 9.2 RELIABILITY ● Suggested monthly print volume 3000 prints . Definition of failure Any loss of operation that requires calling a service person. Operation errors and installation failures are not included. . Product life Five years or 150,000 prints, whichever comes first . MPBF 120,000 pages . Mean time to repair 30 minutes or less . Paper feed reliability . Toner cartridge life 8,000 prints at 2.
9.3 PIN FUNCTIONS ON INTERFACES ● Paralle interface Signal Name Pin No. 1 STROBE IN 2 3 4 5 6 7 8 9 10 DATA1 DATA2 DATA3 DATA4 DATA5 DATA6 DATA7 DATA8 ACK IN IN IN IN IN IN IN IN OUT 11 BUSY OUT 12 18 19-30 PAPER OUT OUT SELECTED OUT N/C SIGNAL GND CHASSIS GND +5VDC OUT GND 31 RESET IN 32 ERROR OUT ?? ?L NT 13 14-15 16 17 112 /fl Function Direction Goes from High to Low (for at least 0.5 microseconds) when data are valid. Eight-bit character data.
● Serial interface Pin No. 1 2 3 4 Signal Name GND TXD Direction OUT RXD IN RTS OUT 5-6 7 8-19 20 N/C GND NIC DTR OUT ~I--25 N/C Function Chassis ground. Carries data from the printer. Carries data to the printer. On when the printer is ready to receive data. Unused. Signal ground. Unused. On when the printer is ready to receive data. Unused.
9.4 COMMAND SUMMARY This section shows the summary of the commands that work with the Star LS-5 Series Printer. For details of those functions, refer to the optional Applications Manual. 9.4.
Positioning the cursor Command & a n C & a n H & a n R & a n V & f ~ZS * p n X * p n Y = Function Backspace Horizontal tab Line feed Form feed Carriage return Space Horizontal cursor position (columns) Horizontal cursor position (decipoints) Vertical cursor position (rows) Vertical cursor position (decipoints) Push/pop cursor position Horizontal cursor position (dots) Vertical cursor position (dots) Half line feed Miscellaneous
(snH (snP (Sn S (Sn T ( S ~~V ) n ) n X j3@ )snB )Sn P ) S t? H ) S ?? S ) S /z T )Sn V Set primary font pitch Select primary font spacing type Select primary font style Select primary font typeface Set primary font point size Select secondary font symbol set Select secondary font by ID number Set secondary font to default values Select secondary font stroke weight Select secondary font spacing type Set secondary font p
I *rnA *rnF *rn S *rnT *tnR *Vn N *V n O * Vn T Start raster transfer Set raster image orientation Set raster area width Set raster area height Set raster resolution Set source transparency Set pattern transparency Set pattern type Macro commands Command & f n X & f n Y Function Macro control Macro ID 117
I 9.4.2 GU2 Commands Set-up commands Command 7Ctz A 5%n B ’* C OT * C n K * C n L * Cn X * c ~?Y Function Enter PCL mode Enter GL/2 mode Set picture frame ancher point Specify horizontal plot size Specify vertical plot size Set picture frame horizontal size Set picture frame vertical size Con.
Polygon group Command EA EP ER EW FP PM RA RR WG Function Edge absolute rectangle Edge polygon Edge relative rectangle Edge wedge Fill polygon Polygon mode Fill absolute rectangle Fill relative rectangle Fill wedge Line andfill attributes group Command AC FT.
I FI FN LB LO SA SB SD S1 SL SR Ss TD 120 Select primary font Select secondary font Define label Label origin Select alternate font Scalable or bitmap fonts Define standard font Set absolute character size Set character slant Set relative character size Select standard font Transparent data
9.4.
Logical operators Operator and bitshift eq false ge gt le It ne not or true xor Function Logical I bitwise and Bitwise shift to hzh (positive is left) Test equal Push boolean valuejtilse Test greater or equal Test greater than Test less or equal Test less than Test not equal Logical Ibitwise not Logical Ibitwise inclusive or Push boolean value true Logical Ibitwise exclusive or Path construction upcrcuur ‘----4--Operator arc arcn arcto charpath clip clippath closepath currentpoint curveto eoclip flattenpa
I Painting operators Operator eofill erasepage fill image imagemask stroke Function Fill using even-odd rule Paint current page white Fill current path with current color Paint monochrome sampled image Paint current color through mask Draw line along current path String operators Operator anchorseach copy eq forall ,ge get getinterval gt le length It ne put putinterval Function Determine if seek is initial substring of string Copy elements of strirzgl to initial substringof stringz Test equal Execute pro
I forall get getinterval length put putinterval Execute proc for each element of arraj Get array element indexed by inde.r Subarray of arraj starting at inde.t for cvantelements Number of elements in arr(i) Put an? into array at ilzde.r Replacesubarrayofarra~’ startingat inde.[by,subarra] Packed array operators Operator aload copy Function Push all elements of packedat-ra? on stack Copy elements c)f~)t~(.
maxlength put store systemdict userdict where Current capacity of diet Associate kc}’ with value in dic~ Replace topmost definition of key System dictionary Writable dictionary in local VM Find dictionary in which key is defined Control operators Operator countexecstack exec execstack exit for if ifelse loop quit repeat start stop stopped Function Count elements on exec stack Execute arbitrary object Copy exec stack into arra}’ Exit innermost active loop Execute proc with values form start by steps of in
I Font operators Operator ashow awidthshow currentfont define font findfont FontDirectory kshow makefont scalefont setfont show StandardEncoding string width widthshow Function Add (x. j) to width of each character while showing ,String Colmbineeffects of ashow and widthshow Return current font dictionary Register,/i~ntas a font dictionary Return font dictionary identified by ke} Dictionary of font dictionaries Execute proc between characters shown from srring T1-ansf-ol-nl,~i~)?ti by ma[ri.
flush tlushfile print prompt pstack read !-eddhexstring reudline readstring resetfile run stack status token write writchexstring writestring Send buffered data to standard output file Send buffered data or read to EOF Write string to standard output file Executed when ready f’orinteractive input Print stack non-destructively using == Read one character fronl,filc Read hex f’rom,~ileinto string Read line fromjile into string Read string fronl,~ile Discard buffered characters Execute contents of’named file
grestore grestoreall gsave initgraphics null setdash setflat setgray sethsbcolor setlinecap setlinejoin setlinewidth setmiterlimit setrgbcolor setscreell settransfer usertime version Pop graphics state Pop to bottommost graphics state Push graphics state Reset graphics state parameters Push null on operand stack Set dash pattern for stroking Set tlatness tolerance Set color to specified gray value Set coior to specified hue, saturation, brightness Set shape of line ends for stroke Set shape of corners for
Device set-up operators Operator copypage frarnedevice nulldevice showpage Function Transmit current page Install frame buffer device Install no-output device Transmit and reset current page Star original operators Operator a4tray b5tray c5envelope c5envelopetray corn 1oenvelope com 1Oenvelopetray dlenvelope dlenvelopetray dojamrecovery dorep executivepage executivetray findtray legaltray lettertray monarcenvelope Inonarcenve]opetray papertray ppapersize setdojamrecovery setdorep setemulation setpapertray
Errors Operator dictfull dictstackoverflow dictstackunderflow execstackoverflow handleerror interrupt invalidaccess invalidexit invalidfileaccess invalidfont invalidrestore ioerror limitcheck nocurrentpoint rangechec~ stackoverflow stackunderflow syntaxerror timeout typecheck undefined undefinedfilename undefinedresult unmatchedmark unregistered VMerror 130 Function No more room in dictionary Too many begins Too many ends Exec nesting too deep Called to report error information External interrupt request
9.
Roman Extension 132
ISO 25: French 133
HP German I 134 I I I I I I I I
ISO 15: Italian .0 1 2 3 4 “5 E 6 7 8 9 I A I E B c D E F 13.
I JIS ASCII 136
ECMA-94 Latin 1 E .
ECMA-94 Latin 1 — 138
ISO 11: Swedish o 2 1 % 5 3 4 5 6 7 5 / c E
US-ASCII 140
ISO 61: Norwegian F .0 1 2 3 4 5 6 7 8 9 A B .
ISO 4: UK 142
ISO 69: French 143
ISO 21: German 144
,0 1 2 3 4 “5 6 7 8 9 A B c D E .
1s0 57: 146
ISO 17: Spanish E ,0 1 2 3 4 -5 6 7 8 9 A B c D E F 147
ISO 2: IRV 148
/S0 10: Swedish ,0 1 2 3 4 5 6 7 8 9 A B c D E F 149
ISO 16: Portuguese 150
I 84: Portuguese 151
ISO 85: Spanish 152
o 1 2 3 4 5 6 7 .0 1 2 3 4 -5 6 7 8 9 E B c D E F 1.
Roman-8 154
IBM-PC(US) 155
IBM-PC(US) 156
IBM-PC(Denmark7Norway) 157
IBM-PC(Denmark7Norway) 158
PC-850 159
c 160 D E F
9.6 RESIDENT FONT SAMPLES 9.6.1 PCL5 Fonts Courier 12-point (10 cpi) !M#$%& f()*+,-./0123456789 : ;<=>?C!M3CDEFGHIJKLMNOPQRSI UVWXYZ [\]‘–‘abcdef ghijklmn opqrstuvwxyz Courier Bold 12-point (10 cpi) { I } -* s CC#$%& t ( ) *+, -. / 0123456789 : ; <=>?@ABc!DEFGHIJKLMNOPQRS!J! UVWXYZ [\]‘–‘abcdef ghi jklmn opqrstuvwxyz { I}+ Courier Italic 12-point (10 cpi) !“#$%& ‘()*+,-./012.3456789: ;<=>?@A.
Univers Medium Italic !“#$ N& ‘()‘ +,../OI2s456789:; < = > ? @ABCDEFGHlJKLA41V0PQR.S TUVWXYZ 111’-’abcdefghijklmnopwstuvvvvz{ 1)a Univers Bold !“#$0A8L’()*+ ,-./01 23456789:; < = > ? @ABCDEFGHIJKLMNOPORSTUVWXYZ [U”-’abcdefghijklmnopqmtuvwxyz{\}B Univers Bold Italic !“#$”A&ro* +,..\Ol2sds67a9:; K = B? @ABCDEFGHIJKLMNOPQRSTUVWXYZ NA-’abcdefgh4klmnopqrstumuxyz{ ~)B CG Times CG Times Italic !“#$z&’()*+ ,_.
9.6.2 TrueImage Fonts I“#$O~&’()*+,./()l 23456789:;<=>~@AB Arial CD EFGHIJKLMNOPQRSTU VWXYZ~]A -’abcdefghijklmnopqrstuvwxyz{l}Arial Bold y’#$YO&’()*+,../CII 23456789:;<=>? B CDEFGHIJKLMNOPQRSTUVWXYY @]A -’abcdefghijklmnopqrstuvwxyz{l}- ArialBoldOblique .I’’#$s&’()*+,-./oIZ345678g:;<=> ?@AB CDEFGHIJKLMNOPQRSTUVWXYZ fl]A – ‘abcdefgh~k/mnopqrstuwxyz{/}- ArialOblique !“#$B&‘()*+,-./o I3456789:;c=>=>?@AB CDEFGHIJKLMNOPQRS TUVVVXY.Zfl]” –’abcdefghijklmnopqrstuvwxyz{/}- A-rialNarrow !“#$Oh&’()”+,.
I Century Schoolbook Italic ,l’’#$~>&’()*+,.,J 0123456789:;<=> ?6M CDEFGHIJKLMNOPQRSTUVWXYZ[ 1]”-?@AB CDEFGHIJKLMNOPQRSTUVWXYZl \] ‘-’abcdefghijklmnopqrstuvwxyz{ I}- Courie; ! “#$%&‘ ( ) *+, -. /0 123456789 : ; < .> z @McDEFGHIJKLMNOpQRsTUvWXY ‘ abcdef ghi j klmnopqrstuv z[\]A Wxyz {T} - Courier Bold I ,,#$%&~( ) *+ , -. / 0123456789 : ;< .
ITC Bookman Demi !“#$’30&’()*+,-./Ol23456789:: <=>? @UICDEFGHIJKLMNOPQRSTUVW XYz[\1A ‘abcdefghijklmnopqrstuv Wxyz{I}: ITC Bookman Demi Italic ,,,//$%&,o*+,-,/ol 23456789:;<=> ? ijM13CDEFGHZJKLMN0pQRSTWW XYZ[\]A_’ubcdefgh~klmnopqrstuu IuxlJz(I}- ITC Bookman Light !“#$Y!&’()*+,-. /O123456789:: <=>?(K ABCDEFGHIJKLMNOPQRSTUVWXY 2[ \ ]A–’abcdefghijkhnnopqrstuvwmyz{ l}- ITC Bookman Light Italic .f’’#$Yi&’()*+, -.
TimesNewRomanItalic (712.$ 4.56 ?89:; -~~~; ?@.WC !“#$%& ‘(j*+,-., DE”FGHIJKL,iLV”OPQl(sS1’ 1~1‘L1’.IJ”Zl\]~‘ah ccicj~h~”k[tl)iT(~~>q)-.~ti(~~~lx~:{ )- Zapf Calligraphic Bold !“#$~O&’()*+,../olzs4 s67s9:;< =>?@ABC DEFGHIJKLMNOPQRSTUVWXYZ [\] ‘–’abcdefghijklmnopqrstuvwxyz{ l}- Zapf Calligraphic Bold Italic ! “#$% c5’()*+,-.I0123456789:;<=> ?(@ABC DEFGHIJKLA4NOPQRSTuvwxYz[\ ]“ –’abcdefghijklmnopqrstuvru.ryz{ I}- Zapf’Calligraphic Italic !“#.$Yo ~+’()*+r-.
Glossary ASCII (as’ kee) — a standardized and commonly accepted numerical code that represents letters, numbers, and symbols, as well as command sets. ASCII stands for American Standard Code for Information Interchange. Baud— a measure of the speed at which information is transmitted. The baud rate, which is set for serial transmissions, is approximately the number of characters transmitted per second multiplied by 10. Bitmap fonts— made of tiny dot-by-dot patterns in pre-defined sizes.
Fixing assembly — The assembly used to fix the toner on to the paper or other material using heat and pressure in printing process. It is located inside the printer and it gets extremely hot during the operation. Font — a set of letters, numbers, and symbols of the same typeface design. Font cartridge — Font cartridges contain fonts which can supplement the ‘available resident fonts of the printer to increase the variety of typefaces.
Portrait — printing on paper across its narrower dimension. such as a letter on paper that is 8.5 in. wide and 11 in. high: portrait pictures are usually taller than they are wide. Proportional type — a typeface in which some letters take up more room on u printed line than others, such as W taking more space than [. The spticingof the letters is also intended to enhance the esthetic quality of the printed page. RAM — Random Access Memory.
170
Index A’ Air vent, 4 ALARM indicator, 43 AppleTalk interface, 6, 35 Applications manual, I Auto selection, 57 B ~ BAD CHAR CODE message, 84 BAD FONT CODE message, 84 BAD FONT DATA message, 84 Basic operation.
I Initial setting, 63 INPUT OVERFLOW message, 84 Inside view, 5 INSUFFICIENT RAM message. 8 I Interface, 54 Interface cable. 35 Iinterfie signals. 112 L Landscape orientation. 6 I Laser printing. 1 LaserJet emulation. 1 LaserWriter emulation, I LCAS CHANGE message. 82 LCAS REFILL massage. 80 Light indicators. 43 LINE ERROR message. 84 LOAD CASS message. 80 LOAD LCAS message, 80 Loading paper. 22 M Maintenance. 7 I-76 Manual paper feed message. 83 MODE button, 42 N NO EMUL.
,. s Scalable font, 109 Self test, 44 Serial interface, 6, 55 Service call message. 78 SET EP CARTRIDGE message, 80 Side latch, 4 Specifications, 109 Stains, 92 Status messages, 86 Status sheet, 44,45 STATUS SHEET message, 86 Streaky prints, 90 ,..— ! ~—T–-~ TEST button, 40 TEST page, 44 TEST PAGE message, 86 Toner cartridge, 5, 9, 18, 71 TRAY CHANGE message. 82 TRAY REFILL message, 80 Troubleshooting, 77-92 TrueImage, 7 TrueImage board, 106 TrueType font, 7 u~ Unpacking, IO-17 w’ –.
Consumer Response Star Micronics Co., Ltd. invites your suggestions and comments on your printer and this manual. Please address your correspondence to: Worldwide Headquarters: STAR MICRONICS CO.. LTD. 20-10 Nakayoshida Shizuoka, JAPAN 422-91 Attn: Product Manager American Market: STAR MICRONICS AMERICA, INC. 420 Lexington Avenue, Suite 2702-25 New York, NY 10170 Attn: Product Manager European Market: STAR-MICRONICS DEUTSCHLAND GMBH Westerbachstra13e59 P.O. Box 940330 D-6000 Frankfurt/Main 90 F.R.
PRINTED IN JAPAN