
Multi-Font User's Manual
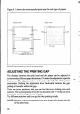
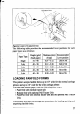
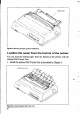
Table Of Contents
- 挀漀瘀攀爀
- 䠀伀圀 吀伀 唀匀䔀 吀䠀䤀匀 䴀䄀一唀䄀䰀
- 吀䄀䈀䰀䔀 伀䘀 䌀伀一吀䔀一吀匀
- 䌀栀愀瀀琀攀爀 䤀一吀刀伀䐀唀䌀吀䤀伀一
- 䌀栀愀瀀琀攀爀 ㈀ 匀䔀吀吀䤀一䜀 唀倀 吀䠀䔀 倀刀䤀一吀䔀刀
- 䌀栀愀瀀琀攀爀 ㌀ 伀倀吀䤀伀一䄀䰀 䄀䌀䌀䔀匀匀伀刀䤀䔀匀
- 䌀栀愀瀀琀攀爀 㐀 倀䄀倀䔀刀 䤀一匀吀䄀䰀䰀䄀吀䤀伀一 䄀一䐀 唀匀䔀
- 䌀栀愀瀀琀攀爀 㔀 䌀伀一吀刀伀䰀 倀䄀一䔀䰀 伀倀䔀刀䄀吀䤀伀一匀
- 䌀栀愀瀀琀攀爀 㘀 匀䔀吀吀䤀一䜀 吀䠀䔀 䴀䔀䴀伀刀夀 匀圀䤀吀䌀䠀䔀匀
- 䌀栀愀瀀琀攀爀 㜀 倀刀䤀一吀䔀刀 䌀伀一吀刀伀䰀 䌀伀䴀䴀䄀一䐀匀
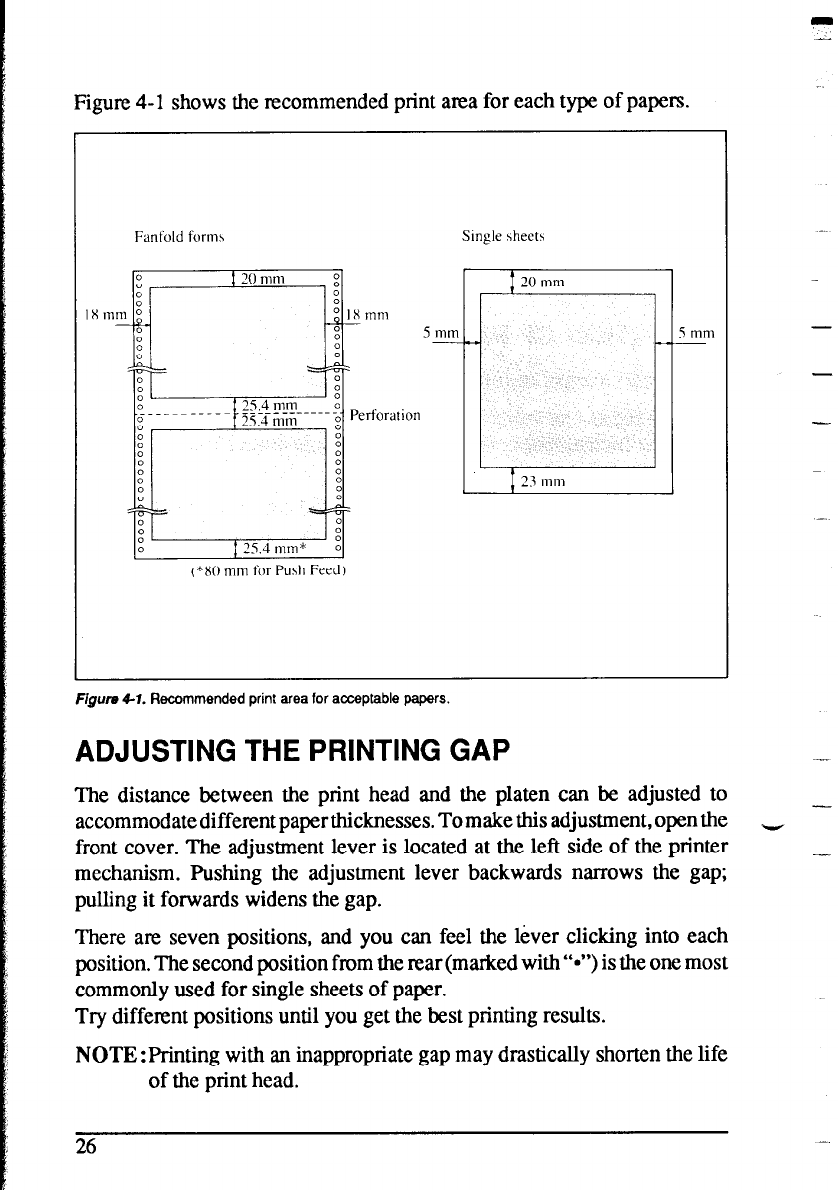
Figure 4-l shows the recommended print area for each type of papers.
IX
Fanfold forms
Single sheets
20 mm
m
5mm Smm
23 mm
c*XO mm for Push Feed)
-
-
Figuru 41. Recommended print area for acceptable papers.
ADJUSTING THE PRINTING GAP
The distance between the print head and the platen can be adjusted to
-
accommodate different paper thicknesses. To make this adjustment, open the
-
front cover. The adjustment lever is located at the left side of the printer
_
mechanism. Pushing the adjustment lever backwards narrows the gap;
pulling it forwards widens the gap.
There are seven positions, and you can feel the l&er clicking into each
position. The second position from the rear (marked with “m”) is the one most
commonly used for single sheets of paper.
Try different positions until you get the best printing results.
NOTE:Printing with an inappropriate gap may drastically shorten the life
of the print head.
26