
Multi-Font User's Manual
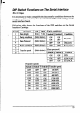

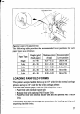
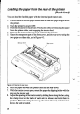
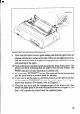
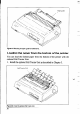
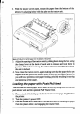
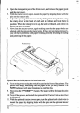
Table Of Contents
- 挀漀瘀攀爀
- 䠀伀圀 吀伀 唀匀䔀 吀䠀䤀匀 䴀䄀一唀䄀䰀
- 吀䄀䈀䰀䔀 伀䘀 䌀伀一吀䔀一吀匀
- 䌀栀愀瀀琀攀爀 䤀一吀刀伀䐀唀䌀吀䤀伀一
- 䌀栀愀瀀琀攀爀 ㈀ 匀䔀吀吀䤀一䜀 唀倀 吀䠀䔀 倀刀䤀一吀䔀刀
- 䌀栀愀瀀琀攀爀 ㌀ 伀倀吀䤀伀一䄀䰀 䄀䌀䌀䔀匀匀伀刀䤀䔀匀
- 䌀栀愀瀀琀攀爀 㐀 倀䄀倀䔀刀 䤀一匀吀䄀䰀䰀䄀吀䤀伀一 䄀一䐀 唀匀䔀
- 䌀栀愀瀀琀攀爀 㔀 䌀伀一吀刀伀䰀 倀䄀一䔀䰀 伀倀䔀刀䄀吀䤀伀一匀
- 䌀栀愀瀀琀攀爀 㘀 匀䔀吀吀䤀一䜀 吀䠀䔀 䴀䔀䴀伀刀夀 匀圀䤀吀䌀䠀䔀匀
- 䌀栀愀瀀琀攀爀 㜀 倀刀䤀一吀䔀刀 䌀伀一吀刀伀䰀 䌀伀䴀䴀䄀一䐀匀

Tractor cover
Clamp lever
Figure 44 Mount the fanfold paper over the tractor units.
9. Now close the tractor covers, again making sure that the paper holes are
aligned with the pins on the tractor units. If they are not aligned properly,
you will have problems with paper feeding, possibly resulting in tearing
and jamming of the paper.
10. Turn on the power using the switch located at the front of the printer. The
printer will beep, indicating that the paper is not yet fully loaded. The
PAPER indicator will also illuminate to confirm this.
11. Now press the 1 St “tJtG ’ I
PARK
button. The paper will be fed and adjusted
past the print head to a position ready for printing.
12. If you want to set the paper to a different position, set the printer off-line
by pressing the 1
ON LINE 1 button, then set the paper by using the
micro-feed function. (For details, refer to Chapter 5.)
13. Close the rear cover and the transparent part of the front cover, then
mount the paper guide in the horizontal position shown in Figure 4-5, so
that it will separate the printed from the unprinted paper.
29