
Multi-Font User's Manual
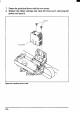


Table Of Contents
- Cover
- TABLE OF CONTENTS
- Chapter 1 INTRODUCTION
- 䌀栀愀瀀琀攀爀 ㈀ 匀䔀吀吀䤀一䜀 唀倀 吀䠀䔀 倀刀䤀一吀䔀刀
- Chapter 3 OPTIONAL ACCESSORIES
- Chapter 4 PAPER INSTALLATION AND USE
- Chapter 5 CONTROL PANEL OFERATIONS
- Chapter 6 SETTING THE MEMORY SWITCHES
- Chapter 7 PRINTER CONTROL COMMANDS
- Chapter 8 DOWNLOAD CHARACTERS
- 䌀栀愀瀀琀攀爀 㤀 䴀匀ⴀ䐀伀匀 䄀一䐀 夀伀唀刀 倀刀䤀一吀䔀刀
- Chapter 10 TROUBLESHOOTING AND MAINTENANCE
- Chapter 11 REFERENCE
- INDEX
- COMMAND SUMMARY
MAINTENANCE ‘
Essentially,yourpcinterisarobustpieceofe@pmen6 butshouldbetreated
witha modicumof camin otderto avoidmalfunctions.For example:
● Keepyourprinterin a“comfortable”environment.Roughlyspeaking,if
youm comfortable,thentheenvironmentissuitableforyourprinter(see
Chapter2).
● Do not subjecttheprinterto physicalshocksor excessivevibration.
● Avoid over-dustyenvironments.Dust is the enemy of all p~cision
mechanicaldevices.
● Tocleantheextenoroftheprinter,useaclothbaselydampenedwitheither
waterwitha littledetergentora littlealcohol,butdonotallowanyliquid
to fallinsidetheprinter.
● Theinterioroftheprintermaybecleanedwithasmallvacuumcleaneror
a compmssed-airaerosol(soldfor thispurpose).Whenperformingthis
operation,be sure not to bend or damage any cable connectionsor
electroniccomponents.
REPLACINGTHE PRINTHEAD
Thisisnotajob whichyouwillneedtodoveryoften.Theprintheadhasbeen
designedto lastfor about100milliondraftcharacters.In nonnideveryday
use,thiswilltmnslateto yeas oflife.However,if theprintqualityis faint,
evenafteryouhavechangedtheribbonoryouhaveadjustedthegapbetween
the print head and the platen (see Chapter4), the print head may need
replacement.
Onlyuse a replacementprintheadas mmmmendedby yoursupplier.
1. Turn OFFtheprinter,andunplugthepowercml.
2. OPenthe frontcover,and~move theribboncartridge.
3. Iftheprinterhasbeeninoperationimmediatelybefomthisoperation,the
print head will be hot. Allow time for the print head to cool before
attemptingto workon it.
4. Unsmw the two scnewsthatholdthe printheadin placeandset them
aside.
5. Disengagetheconnector,thenremovetheprinthead.
6. Placethenewprintheadon its support,seatingitonthe two pins.
135