NP-IO USER’S MANUAL NOT INTENDED FOR SALE [ PN 80820191]
Federal Communications Commission Radio Fre uency Interference s tatement This equipment generates and uses radio frequency energy and if not installed and used properly, that is, in strict accordance with the manufacturer’s instructions, may cause interference to radio and television reception.
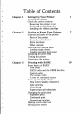
Table of Contents Chapter 1 Setting Up Your Printer Locating the printer Check the carton contents Removing the printer cover Removing the packing tube Installing the ribbon cartridge 1 Chapter 2 Getting to Know Your Printer Controls and parts of the printer Parts of the printer Controls and indicators Extra functions Other controls Selecting and loading paper Loading single sheets Loading sprocket-feed paper Adjusting the print head Testing the printer Connecting the printer 7 Chapter 3 Printing wit
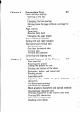
Chapter 4 Formatting Text 37 Lines and line spacing Starting a new line Reverse line feeds Changing the line spacing Moving down the page without a carriage return Page control Form feed Reverse form feed Changing the page length Top and bottom margins Setting left and right margins Horizontal and vertical tabs Horizontal tabs One-time horizontal tabs Vertical tabs Vertical tab channels Centering and aligning text Chapter 5 Special Features of the Printer .
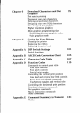
Chapter 6 Download Characters and Dot Graphics Dot matrix printing Designing your own characters Defining proportional characters Designing your own NLQ characters User-designed dot graphics Higher resolution graphics More graphics programming tips Redefining alternate graphics codes g-pin graphics mode 79 Chapter 7 Caring for Your Printer Cleaning the printer Replacing the ribbon Replacing the print head 95 Appendix A DIP Switch Settings Switch functions 101 Appendix B ASCII Code Conversion Chart
--- Appendix F Technical Appendix G The Parallel Functions Index 165 Specifications 169 Interface of the Connector Signals 173
CHAPTER I SETTING UP YOUR PRINTER Subjects covered in Chapter 1 include. Choosing a suitable place for your printer l Unpacking l Setting up LOCATING THE PRINTER Give some thought to the best place to put the printer. Both the printer and computer should be used in normal home surroundings. For best performance, we recommend: l l l l l l Use the printer on a flat surface. Keep it out of direct sunlight and away from heatproducing appliances. Use it only in temperatures where you are comfortable.
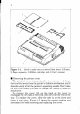
igure l- 1. .._ . _. - Check to make sure you have all tour items: 1) Printer, 2) Paper separator, 3) Ribbon cartridge, and 4) User’s manual. n Removing the printer cover The printer’s cover is important for two reasons - it keeps dust and dirt away from the printer’s delicate mechanism, and it absorbs nearly all of the printer’s operating sounds. Don’t take off the cover unless you have to change the ribbon or make an adjustment.
3 Figure 1-2. W Removing Figure 1-3. Remove the printer cover by lifting carefully. the packing tube Remove the protective tube from the carriage rail.
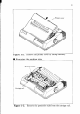
4 The printer is shipped with a protective spiral tube to keep the print head from being damaged during shipping. This tube must be removed before use. First, take off the printer cover. The protective tube is split along its bottom side to allow easy removal. Grasp one end of the spiral tube and firmly pull it upward and away from the carriage rail. n Installing the ribbon cartridge This printer uses a neat, easy-to-change ribbon cartridge with automatic threading.
Print ‘.igure l-5. T. _- - _ __ .__ _._ _ .l’o thread the ribbon, slide the print head carriage manually to the right or left, and the ribbon will slip down by itself into its proper position. 4. With the ribbon facing away from you, use the guide holders as a fulcrum, and lightly press the cartridge down until the two holder springs snap shut to hold the cartridge firmly in place. See Figure l-4. 5.
6 - MEMO -
CHAPTER GETTING 2 TO KNOW YOUR PRINTER Subjects covered in Chapter 2 include* Parts of the printer - what they’re for and how to use them l Paper selection and loading l Adjustment l Testing printer operation CONTROLS AND PARTS OF THE PRINTER n Parts of the printer PRINTER COVER - This protects the ribbon and the print head from dust and dirt, and cuts down the sound of the printer. PAPER SEPARATOR - This metal guide is used with sprocket-feed paper.
8 I Pow\er cord .. Figure 2- 1. . Front and rear views of the prmter. H Controls and indicators Now let’s go over the controls and indicators of the printer, starting with the control panel on the right. There are three indicators and three keys on the control panel.
9 I I Figure 2-2. The control panel. POWER INDICATOR - Glows orange when the power is on. This indicator flickers when the printer runs out of paper and when certain printer malfunctions occur. NLQ KEY and INDICATOR - Changes the character style (draft or NLQ) when the On Line indicator is off, and glows green when the NLQ mode is selected. PAPER FEED KEY - Advances the paper one line at a time when the On Line indicator is off. If you hold the key down, you get consecutive line feeds.
We’ll explain about the “Panel” mode, which is powerful function of the printer. Some commercial software does not support defining your own selections. In this case, use the “Panel” mode. Selection of the Panel Mode at power-on ensures that your choices remain in effect until you turn the power off. This means that the printer will ignore any codes sent by the software that you are using. The Panel Mode allows selection of the character quality (Draft or NLQ).
NLQ key - Reverse micro-feed 3. When you can set the print start position, release the Paper Feed key or the NLQ key first, then release the On Line key. n Other controls There are other controls, not connected Some of the more important ones are: to the control panel. POWER SWITCH - The switch that turns the printer on and off is at the back, on the left side. PLATEN KNOB - This knob is at the middle of the right side and lets you turn the platen by hand, like a typewriter.
12 - .wo 3 - P C 4lU- The top setting is used when you want to load paper in the printer. The second setting is for normal single sheets. The third is for sprocket-feed paper. The bottom one is used when you want to release the paper completely to adjust it. Release lever ‘igure 2-5. . contmuous -I Use friction feed for single sheets and tractor feed for paper. The paper bail holds the paper against the platen according to the setting of the release lever.
13 -.2 Figure 2-6. Move the sprockets on the tracktor feed unit all the way to the ends. 2. 3. Install the printer cover on the printer. Set the release lever for single sheets - the second position from the top. 4. Insert a sheet of paper to the paper chute on the printer cover. 5. Turn on the power switch. (The Power indicator will blink because there is no paper.) 6. Now set the release lever to the auto-feed setting - the top position. The printer will advance the paper automatically. 7.
14 Release lever You can insert a sheet of paper automatically F‘igure 2-7. the release lever. by using n Loading sprocket-feed paper This is standard computer paper, with the holes along the sides and perforations between the sheets, It is also called sprocket, punched, fan-fold, or just plain “computer paper”. It can be as narrow as 4.5 inches, and up to 10 inches wide. 1. Remove the printer cover. Place a stack of fan-fold paper behind the printer.
Figure 2-8. Open the sprocket covers to expose the sprocket teeth. 8. Check that the paper is still positioned correctly, and close the sprocket covers. 9. Set the release lever to the auto-feed setting. The printer will advance the paper automatically. 10. When the paper stops, set the release lever for sprocketfeed paper again. 11. Install the paper separator on the printer, as shown in Figure 2-9. Then, install the printer cover. Figure 2-9.
16 ADJUSTING THE PRINT HEAD The distance between the print head and the platen must be adjusted to accommodate papers of different thicknesses. To make this adjustment, move the adjustment lever, which is under the printer cover and immediately in front of the release lever (Figure 2-10). Pulling the adjustment lever towards you will widen the gap; pushing it away from you will narrow the gap. There are four positions; you can feel the lever clicking into the various notches.
version, and self-test 2 is the short one. You can use either one to show the characters available in the printer, to check the installation of the ribbon and paper, and to check the adjustment of the head-to-platen gap. You can print the self-test without hooking up the printer to your computer. Simply: 1. Plug in the printer (don’t turn it on yet). 2. Insert a sheet of paper (or sprocket paper, either one). 3.
CONNECTING THE PRINTER Now that you’ve assembled and tested your printer, all that remains is to connect it to your computer as follows: Interface ( Interface Figure 2-12. cable Connect the cable like this. 1. Make sure that both your computer and printer are turned off. 2. Connect the printer end of the interface cable to the connector socket at the right rear of the printer as shown in Figure 2-12. 3. Connect the other end of the cable to your computer as described in the computer manual.
CHAPTER 3 PRINTING WITH BASIC Subjects covered in Chapter 3 include.
20 SOME BASICS OF BASIC n First steps The first things that a beginner learns to do are to list a program and to print a character string. Certainly these are the easiest operations one can do, but even they may depend on what computer you have. In Microsoft BASIC, we can list all the steps in a program by entering LIST. This lists them on the CRT screen; if we want to print them on a printer, we prefix the command with an L (enter LLIST). The Microsoft BASIC command for outputting information is PRINT.
n ASCII codes and the CHR$ function You can talk to your computer in BASIC, but your computer and your printer talk to each other in what are known as ASCII codes. In the ASCII code, each number from 0 to 255 has a particular meaning - 36, for example, makes the printer print a dollar sign. Some numbers cause the printer to do other things, too. For instance, sending a 7 sounds the printer’s bell.
22 - the “control” key and one other. The other key determines what code is sent - pressing the control (CTRL) key and A sends ASCII code 1, CTRL B sends ASCII code 2, and so on. Your printer has a lot of control codes to let you do some useful things. Let’s try one that we’ve mentioned several times already: ' Demo of ASCII code :i LPRINT CJlR$(7) 30 END RUN That’s the printer’s bell (we call it that even though it sounds like a buzzer).
23 n The escape codes Back when the ASCII system was set up, computer equipment was relatively simple and thirty-three control codes were considered sufficient at the time. The American Standards people realized that eventually more control codes would be needed, so they included the escape (ESC) code to allow almost any number of additional codes to be defined when they became necessary.
24 So for our example above, any of these BASIC statements have the same result: LPRINT LPRINT LPRINT LPRINT LPRINT will CHR$(27);CHR$(87);CHR$(l) CHR$(27>;CHR$(87);CHR$(49) CHRS(27);"W";CHR$(l) CHR$(27);"W";CHR$(49) CHR$(27);"Wl" Even though there are many commands that require the use of ASCII code 0 (the (NUL) character), the number “0” (zero or ASCII code 48) cannot be substituted. In these cases, instead of an unadorned 0 we will show CHR$(O) each time these commands are referenced.
25 In this program, line 20 selects NLQ characters with (ESC) “x” 1 command. Line 30 prints a sample before line 40 switches printer back to draft printing with an (ESC) “x” 0. When you run the program you should get this: Now turn off the power switch. After you turn on the power switch while holding the NLQ key down on the control panel, set the NLQ mode with the NLQ key while in the Off Line mode. Then run the program again.
Table 3-2 Italic commands Function Control Italic ON Italic OFF (ESC) “4” (ESC) “5” Use this program 10 20 30 43 50 ’ Demo LPRINT LPRINT LPRINT LPRINT code to see italic characters: of italic and roman CHR$(27);"4"; “This line is in ITALIC characters.” CHR$(27);"5"; "This line is in ROMAN characters." In this program, line 20 turns italic on with (ESC) “4”, and line 40 turns italic off with (ESC) “5”.
37 It should come out like this: In this program underline is turned on in line 20 with (ESC) “” 1, and then off in line 40 with (ESC) “ -” 0. There’s a new aspect to this program, though. The semicolons at the end of the first three lines told BASIC that those lines were to be continued. Therefore, BASIC didn’t send a carriage return and line feed at the end of those lines. We just did this to illustrate that all these control codes can be used in the middle of a line.
I 28 90 LPRINT CHR$(27);"T"; 100 LPRINT "on one line." Here line 30 turns on superscripts with (ESC) “S” 0. It’s turned off in line 50 with (ESC) “T”. Then between printing text, subscripts are turned on in line 70 with (ESC) “S” 1, and finally off in line 90. Again, everything prints on one line because of the semicolons. CHANGING THE PRINT PITCH In “printer talk,” the number of characters that can be printed in one inch is called the print pitch or character pitch.
When you run this program you should get this: This line is ELITE pitch. "I'h:j.5 I. ii-162 is F':CCApitch inormal ) . Line 20 turns on elite pitch with (ESC) “M”. Line 30 prints the line at 12 characters per inch. The (ESC) “P” in line 40 resets the printer to pica pitch and line 50 prints the line in pica pitch. r c n Expanded print Each of the print pitches can be enlarged to twice its normal width. This is called expanded print.
30 Sometimes you may wish to stay in expanded than one line. Change your program to this: 10 20 30 40 50 60 70 ' Demo LPRINT LPRINT LPRINT LPRINT LPRINT LPRINT print for more of permanent expanded mode CHR$(27);"Wl"; "Permanent expanded" "mode stays on until" "it is "; CHR$(27);"WO"; "turned off." Now the results look like this: When you turn on expanded print with (ESC) “W” 1 it stays on until you turn it off with (ESC) “W” 0.
31 c. D (<<$ IT)(1;)1-15; .k,r <>,‘b, i [::jr) CL) $ CONDENSEDpr-i nt:1 ng . Condensed print set with CHR$(lS) stays on until you turn it off with CHR$(18). Note that you don’t need to put an (ESC) in front of the CHR$(15), although (ESC) CHR$(15) works just the same.
32 220 LPRINT "This is EXPANDED PICA." 230 LPRINT CHR$(27);"WO" 240 END Here’s what you should get from this program: Thislineis CONDENSED ELITEpitch. This line is CONDENSEDPICA pitch. n Proportional printing Have you ever looked closely at the printing in books and magazines? Doesn’t it look nice? The main reason is that each character is given an amount of space proportional to its actual width.
40 LPRINT 50 LPRINT 60 LPRINT 70 LPRINT 80 LPRINT 90 LPRINT 100 END CHR$(27);"pl"; "This line is PROPORTIONAL ELITE." CHR$(27);"P"; "This line is PROPORTIONAL PICA." CHR$(27);"pO"; "This line is NORMAL PICA printing." When you run this program you should get this: Line 20 selects the elite pitch and line 40 turns on the proportional printing with (ESC) “p” 1. Line 50 prints a line with proportional elite pitch.
34 Table 3-9 Print emphasis commands Function Control Boldface ON Boldface OFF Emphasized ON Emphasized OFF (ESC) (ESC) (ESC) (ESC) code “G” “H” “E” “F” Try them now with this little program: 10 20 30 40 50 60 70 80 90 ' Demo LPRINT LPRINT LPRINT LPRINT LPRINT LPRINT LPRINT LPRINT of boldface and emphasized CHR$(27);"G"; "This line is BOLDFACE printing." CHR$(27);"E"; "This line is BOLDFACE and EMPHASIZED." CHR$(27);"H"; "This line is EMPHASIZED printing.
35 MIXING PRINT MODES We have learned how to use the various print modes individually and together. Now we’ll see how to combine them more efficiently. You have at your disposal a unique command that lets you choose any valid combination of print modes and pitch. This is the Master Print mode command. It looks like this: (ESC) “!” n Here, the value of n defines the print style to be selected. The value of n can range from 0 to 255, which is the range of values that can be stored in one eight-bit byte.
36 The command would look like this: CHR$(27);“!“;CHR$(49) To better understand the way the print modes work, consider that each mode except pica (pica is the default) has a separate switch that can turned on and off via software. Once the switch is on, it stays on until turned off. However, when two modes that conflict are turned on at the same time, the printer must choose which one to use. For example, suppose you turn on both Elite and Emphasized modes.
CHAPTER 4 FORMATTING TEXT Subjects covered in Chapter 4 include* The carriage return and line feed l The amount of space between lines l Moving to the next page l The number of lines on a printed page l Horizontal and vertical tabs l Setting margins - left, right, top and bottom l Centering and aligning Chapter 3 showed us the basic techniques for using the printer. Now we’re ready for the more advanced ones. We’ll concentrate on changing the appearance of the page to suit our needs.
- return. Each time the printer receives a CHR$(13) it returns the print head to the left margin. It does not advance the paper (if DIP switch l-3 is on; see below). Line feed is more complicated. Each time the printer receives a CHR$(lO) it both advances the paper one line and returns the print head to the left margin, ready to start a new line. Now to add a ittle confusion - most (but not all) versions of BASIC add a line feed (CHR$(lO)) to every carriage return (CHR$(13)) they receive.
H Changing the line spacing When you turn your printer on, the line spacing is set to 6 lines per inch. This is fine for most printing applications, but when you want something different, the printer makes it easy to set the line spacing to whatever you want. Try this program to see how easy it is to change the line spacing: ' Demo of line spacing FOR I=1 TO 20 IF I=13 THEN 60 LPRINT CHR$(27);"A";CHR$(I); LPRINT "THIS LINE SPACING IS SET TO";1 NEXT I LPRINT "LINE SPACING IS SET TO l/6 INCH (NORMAL).
40 Line 40 changes the line spacing. The command (ESC) “A” CHR$(n) changes the line spacing to n/72 of an inch. The loop that is started in line 20 increases the value of n (the variable I in this program) each time it is executed. So the line spacing increases as the program continues. Line 30 just shortcuts the loop when I = 13, since BASIC won’t let us send CHR$(13) without adding an unwanted CHR$( 10) to it. Finally, the (ESC) “2” in line 80 resets the line spacing to 6 lines per inch.
The program works just the same as before, but the line spacings are just one-third what they were. This is because (ESC) “3” CHR$(n) sets the line spacing to n/216 inch. Table 4-2 shows all the line spacing commands, including several “shortcut” commands for commonly used line spacings.
30 40 50 60 70 80 LPRINT "LINE NUMBER 2."; ' One-time line feed LPRINT CHR$(27);"J";CHR$(lOO); LPRINT "LINE NUMBER 3." LPRINT "LINE NUMBER 4." END Here is what your printer will produce: The (ESC) “J” CHR$(lOO) in line 50 changes the spacing to 100/216 inches for one line only without moving the printhead. The rest of the lines printed with the normal line spacing. Notice that both line 30 and line 50 end with semicolons. This prevents the normal line feed from occurring.
43 PAGE CONTROL Now that we have seen how to control line spacing, we can go on to page control - positioning the printing on the page and adjusting the paper length. H Form feed The simplest forms control code is the form feed. Form feed (or (FF)) is CHR$(l%) and causes the printer to move the paper to the top of the next sheet.
- n Reverse form feed Just your printer perform a line feed, can do reverse form This code the paper that the head is at the of the page. This be used, example, to text in multi-column magazine mat; print first column, reverse form back to top of page to the second The code reverse form is easy remember: (ESC) Table 4-3 Form feed commands Function Control code Advance paper to top of next page CHR$(12) q, n Changing the page length You may have some computer forms that are not 11 inches high.
45 This program should print “PAY TO THE ORDER OF:” twice, and they should be 7 inches apart. Line 20 sets the form length to 7 inches. After line 30 prints, line 40 sends a form feed advance the paper to the top of the next form. Line 50 then prints its message. After you have run this program, turn off the printer and adjust the top of form position. When you turn the printer back on the page length will reset to its normal setting (usually 11 inches).
46 the printer how many blank lines should be left at the bottom of the page. Let’s try a simple application to see how these margins work. Enter this program, which will print 150 lines without top and bottom margins. 10 ' Demo of top and bottom margins :' Form feed 60 LPRINT CHR$(12); 70 FOR I=1 TO 150 80 LPRINT "THIS IS LINE";1 90 NEXT I : ' Form feed 110 LPRINT CHR$(12) 120 END When you run this program it will print 150 lines right down the page and across the perforations.
47 ” _-. :.
48 SETTING LEFT AND RIGHT MARGINS The left and right margins of this printer work just like a typewriter - once they are set all printing is done between them. You can set margins by escape commands.
49 When you want to reset the margins to the default values, you have two choices. You can either turn the printer off and back on, or you can set margin values equal to the default values. This means that you should set a left margin of 0 and right margin of 80 in pica pitch. If you change the pitch of your printing after you set your margins, the margins will not change. They stay at the same place on the page.
50 Even though the words are different length, they are spaced out evenly by the horizontal tabs. Now add the following line to your program to set different horizontal tabs: 15 LPRINT CHR$(27>;"D";CHR$(7);CHRS(14);CHRS(21); (0) (ESC) is the to begin horizontal tabs. must be by characters the positions you want tabs set. our program are setting in columns 14, and The final ends the of tabs.
51 W One-time horizontal tabs Suppose you need to move to a position across the page, but you only need to do it once. It doesn’t make much sense to set up a tab to use only one time. There is an easier way. The solution is called a one-time tab. Table 4-8 shows the three commands.
The relative horizontal tab command can move the print head right from the current position with NLQ characters. The formula for calculating how much the print head moves is the same as in the absolute horizontal tab command. Try this program to see how this works. 10 ' Demo of relative horizontal tabs 20 LPRINT CHR$(27);"xl"; 30 FOR I=1 TO 3 40 LPRINT "Relative"; 50 LPRINT CHR$(27);"\";CHR$(I*20);CHR$(O); 60 LPRINT "Horizontal"; 70 LPRINT CHR$(27);"\";CHR$(I*lO);CHR$(O); 80 LPRINT "Tab.
I L .._ 53 up tabs, the command advances the paper only one line. Enter this program to see how this works. 10 40 50 60 70 ' Demo LPRINT LPRINT LPRINT LPRINT of vertical tabs CHR$(ll);"FIRST TAB." CHR$(ll);"SECOND TAB." CHR$(ll);"THIRD TAB." CHR$(ll);"FOURTH TAB." Now, let’s set some vertical tabs of our own. Add these lines to the program: 20 LPRINT CHR$(27);"B";CHR$(lO);CHR$(l5); 30 LPRINT CHR$(25);CHR$(30);CHR$(o); (ES0 “B” is the command to set vertical tabs.
54 in ascending order. Our example sets vertical tabs at lines 10, 15,25 and 30. Then the CHR$(ll) in each of the following lines advances the paper to the next vertical tab. Add one more line to the program to demonstrate one more feature of vertical tabs. 80 LPRINT CHR$(ll);"FIFTH TAB." Now when you run the program the first page looks just like before, but line 80 sends one more (VT) than there are tabs.
55 Table 4-9 Vertical tab commands Control code Function Advance paper to next tab position CHR$(ll) (ESC) “B” CHR$(nl) CHR@zZ)..... Set vertical tabs at nl, n2, etc. CHR$,O1 Set vertical tabs every n lines One-time vertical tab (ESC) “e” 1 CHR$(n) (ESC) “f” 1 CHR$(n) n Vertical tab channels Vertical tab channels are especially hefpful in two situations. The first occurs when you are writing a program to accompany a preprinted form that can accommodate verious types of responses.
56 20 LPRINT CHR$(27);"b";CHR$(l);CHR$(lO);CHR$(20); ems (0); 30 LPRINT CHR$(27);"b";CHR$(2);CHR$(15);CHR$(25); CHR$(0); 40 LPRINT CHR$(27);"b";CHR$(3);CHR$(17);CHR$(28); CHR$(0); 50 ' Use vertical tab channels 60 FOR I=1 TO 3 70 LPRINT "TOP OF FORM" 80 LPRINT CHRS(27);"/";CHR$(I); 90 LPRINT CHR$(ll); 100 LPRINT "1ST TAB OF CHANNEL";I 110 LPRINT CHR$(ll); 120 LPRINT "2ND TAB OF CHANNEL";1 130 LPRINT CHR$(12); 140 NEXT I 150 LPRINT CHR$(27);"@" 160 END When you run this program the printout should look like
57 In this program we set tabs at 10 and 20 in channel 1 in line 20. In line 30 we set tabs 15 and 25 in channel 2, and in line 40 we set tabs 17 and 28 in channel 3. Because the channels are stored, you must make the printer to recall one before you use it, so we used (ESC) “/” CHR$(nU) in line 80.
MEMO
CHAPTER 5 SPECIAL FEATURES OF THE PRINTER Subjects covered in Chapter 5 include. Printer’s bell l Master reset l Uni-directional printing l International character sets l Printing BIG characters l The optional sheet feeder l Macro instruction l Reading a hex dump In the previous chapters we have learned about several groups of control codes. In this chapter we will look at more control codes.
60 The code to sound the “bell” is CHR$(7), which is ASCII code 7 or (BEL). Any time your printer receives this code it will sound the bell for a quarter of a second. This can be used to remind the operator to change the paper or to make other adjustments to the printer.
61 ning out of continuous paper. Your printer has the ability to print right to the bottom of the sheet. You can disable the paper-out detector so that it doesn’t stop the printer. This will allow you to print to the end of the sheet, and even beyond if you are not careful. The codes to control the paper-out detector, along with the other codes that we have just looked at are in the following table.
10 20 30 40 50 60 70 80 90 LPRINT LPRINT LPRINT LPRINT LPRINT LPRINT LPRINT LPRINT LPRINT "BACKSPACE DOES NOT"; CHR$(8);CHR$(8);CHR$@); 'I===WORK." "DELETE DOES NOT"; CHR$(127>;CHR$(127);CHR$(l27); "WORK." "CANCEL LINE"; CHR$(24); "DOES NOT WORK." Here is what this program will print: The backspace codes in line 20 move the print head a total of three spaces to the left so that the first part of line 30 will overprint the word “NOT”.
63 But it will also print more slowly at the speed of your typing. In the immediate-print mode, the print head prints one character at a time, as you send it. The printer also moves the paper up so that you can see the current line and then down to continue printing. You can turn the immediate-print mode on with (ESC) “i” 1. Before looking at it, let’s review the normal operation of the print buffer. Enter this program.
64 30 FOR I=10 TO 1 STEP -2 40 LPRINT CHRS(27);" ";CHR$(I); 50 LPRINT "This line is added";I;"spaces." 60 NEXT I 70 LPRINT CHRS(27);" ";CHR$(O); 80 LPRINT "This line is Normal space." 90 END This This This This This This added 10 spaces. line is added 8 spaces. line is line is added 6 spaces. line is added !t spaces. line is added 2 spaces. line is Normal space. This command can be used to produce micro-justification, which is a method of justifying lines by increasing the space between each character.
65 30 FOR I=1 TO 10 40 LPRINT "I" 50 NEXT I 60 LPRINT : LPRINT 70 LPRINT CHR$(27);"Ul"; 80 FOR I=1 TO 10 90 LPRINT "I" 100 NEXT I 110 LPRINT CHR$(12);CHR$(27);"@" Here is what you will get. The top line is printed bi-directionally, and the bottom is printed uni-directionally. You will have to look hard because there isn’t much difference, but the bottom vertical lines are perfectly aligned. Let’s analyze the program.
I 66 H The seven bit dilemma Some computers (not the IBM-PC fortunately!) don’t have the capability to send eight bits on their parallel interface, but can only send seven bits. This would make it impossible for these computers to use this printer’s block graphics characters and special symbols if our engineers hadn’t thought of a solution. (All of these characters have ASCII codes greater than 127 which means that the eighth bit must be on to use them.
67 L L L. 10 LPRINT CHR$(27);"0"; 20 LPRINT CHR$(27);"6"; 30 FOR J=3 TO 6 40 LPRINT w ";J;CHR$(J);CHR$(g); 50 NEXT J 60 LPRINT ' 20 ";CHR$(20) 70 LPRINT 80 LPRINT ' 21 ";CHR$(21);CHR$(9); 90 LPRINT ' 26 "; 100 LPRINT CHR$(26) 120 LPRINT 130 FOR J=128 TO 254 STEP 5 140 FOR I=J TO J+4 150 IF I>254 THEN 170 160 LPRINT I;CHR$(I);CHR$(9); 170 NEXT I 180 LPRINT :LPRINT 190 NEXT J Figure 5-1 shows what this program will print.
69 So how are all of these strange characters used? Here is a short program that demonstrate how the graphics characters can be combined to create a figure: the 5 of clubs. 10 LPRINT CHR$(27);"6"; 20 LPRINT CHR$(218);CHR$(196);CHR$(l96); CHR$(196>;CHR$(196);CHRs(196);CHR$(191) 30 LPRINT CHR$(l79);CHR$(53);CH.
70 W International character sets Your printer changes languages by changing 12 characters that are different in the different languages. These sets of characters are called international character sets - and there are 11 sets in all. The control codes to select the international character sets are given in Table 5-4. Table 5-4 International character set commands - The characters that change are shown beneath code in Table 5-5. their ASCII Table 5-5 International character sets I Countrv 1U.S.A.
71 L n Printing characters in the control code area When you refer the Appendix C, you’ll find many characters are printed in the control code area. (Remember that the loworder control codes are the ASCII codes 0 through 31 plus 127, and the high-order control codes are 128 through 159 plus 255.) These codes don’t normally print characters on paper, rather they cause the printer to change modes. To make them print as normal characters requires an extra command.
72 40 LPRINT CHR$(I); 50 NEXT I 60 LPRINT c~~$(16);CHR$(l7); 70 FOR I=21 TO 31 80 LPRINT CHR$(I); 90 NEXT I 100 LPRINT 110 FOR I=128 TO 134 120 LPRINT CHR$(I); 130 NEXT I 140 LPRINT CHR$(144);CHR$(l45); 150 FOR I=149 TO 159 160 LPRINT CHR$(I); 170 NEXT I 180 LPRINT CHRS(27);"IO" 190 END When you run this program you should get like this: Control Table 5-6 code area commands Function Control Printable code area expansion Control code area expansion Select undefined codes as characters Cancel undefined
! 73 Table 5-7 Big character commands Control code (ESC) “h” CHR$(l) (ESC) “h” CHR$(2) ( ESC > “h,, CHR$.31 Function Double-high enlarged print Quad-high enlarged print Double-high lower-half enlarged nrint Double-high upper-half enlarged print Quad-high lower-half enlarged mint Quad-high upper-half enlarged r- ---- ( ESC > “h,, CHR$(4J (ESC > “h” CHR$(5) (ESC) “h” CHR$(G) mint r---- I Cancel enlarged print I( ESC > “h” CHR$(O) Try this program to see the big characters.
74 As you can see, when the big character command is used, the baseline for each character does not align. If you want to align the baseline, try this program: BIG characters 10 ’ Demo of aligning 20 LPRINT "THIS IS rr; 30 LPRINT CHR$(27);"j";CHR$(21); 40 LPRINT CBR$(27);"h";CHR$(l); 50 LPRINT "DOUBLE"; 60 LPRINT CHR$(27);"h";CHR$(O); 70 LPRINT CHR$(27);"J";CHR$(lB); 80 LPRINT " SIZED PRINTING.
75 Here is how the printer’s macro works. You define a macro by telling the printer what normal control codes are to be included in the macro. Then you can use the macro any time that you want and the printer will do all the things that you included in the macro definition. You can include up to 16 codes in a single macro. You can even use the macro to store a frequently used word or phrase. There are two control codes for the macro: one to define it, and one to use it. They are given in the Table 5-8.
76 Now that you have defined a macro, let’s see how to use it. This program will print one line using several printing features. Then it “calls” the macro in line 60. When line 80 prints the style is “plain vanilla” because the macro has reset it.
77 . . . . . . . . . . . . . . . . . . ..“........... ’ “HOAX.“, (, Ii 0 1 ,( :‘l!r/,/ll’r’: ~~III.I)I , I I,I~I~II ClhI I-’ L 1-t40 t’I1IitiIII’JWX’~‘/l atll-dc?l . / : \ I I& I”,,,0 ~Ir(I’St.LIVW::yI : I : ‘\I. . . . . . . . . . . . . . . . . . . . . . ..“........ . . . . . . . . . . . . . . . . . . . . . . . . . . . . . . . . . . . . . . . . . . . . . . . . . . . . . . . . . . . . . . . . . . . . . . . . . . . . . . . . . . . . . . . . . . . . . . . . . .
78 MEMO
CHAPTER 6 DOWNLOAD CHARACTERS AND DOT GRAPHICS L L.. L- Subjects covered in Chapter 6 include. Designing and printing your own characters l User-designed graphics Using the procedures outlined so far, all of the printer’s standard functions can be utilized. There are two additional user-defined functions available: designing and printing your own characters, and designing and printing your .own dot graphics. These two functions can be used to design and print any symbol, or any graphic shape.
80 fired by a different number. One byte of data (a decimal number from 0 to 255) can thus represent a unique combination of dots. For example, if the data representing “1” was sent to the print head, only the bottom pin would fire; if “2” was sent, only the second pin from the bottom would fire, and if “3” was sent, the two bottom pins would fire, and so on. Columns of these dots side by side make all the characters. 0.0. : . :: 0 0 00 .... :- : 0 0.0. ..a.. 0 l m.0 0 Figure 6- 1.
81 l l l l l six boxes ,wide by nine boxes high. Horizontally, dots may be centered in a box, or may straddle a line, making the actual character grid 11 dots wide by 9 dots high. Vertically, dots can only be centered in a box. See Figure 6-2. The minimum width of a character is five dots. Unlike standard characters that are restricted to a height of seven dots, user-defined characters may use eight dots vertically.
- 82 value is 2. In the next column, there is a dot straddling the vertical line in the “1” box, and another in the “4” box; its value is recorded as 5. , m.m,m,m.m,m,m,m.m,m. m., 128 ASCII Code 64 Descender 32 Start column End column 16 M, = Descender l 126 + (Slarl l 16) + End Total Figure 6-3. Use this grid (or one similar to it) to define your own draft characters. m, m, m, m. m, m. m. m. m, m,, m..
83 You will see the letters ml, m2, m3 etc., are above your values. When you define the character, you will substitute your value for each of these letters. Before you complete the definition, you will need to decide exactly where in the standard ASCII set you want to place your characters. After downloading, you access your new character by sending the code for the character you replaced. For example, we decided to assign our flask to the “(” character.
84 the grid; ml the left-most column value, m2 the next, and so on. You must define eleven data, even if the last few data are 0. For the flask, the complete command will be: CHR$(27);CHR$(38);CHR$(O);CHR$(GO);CHR$(60); CHR$(139);CHR$(2);CHR$(5);CHR$(8);CHR$(24l);CHR$(O); CHR$(O);CHR$(241);CHR$(8);CHR$(5);CHR$(2);CHR$(O) Put this command into the appropriate syntax for the language you are using.
85 l Tell printer to use download character 1 set : (ESC > “%” To demonstrate how to use the download characters, let’s use the “flask” character and some other user-defined characters to print a small graph. This program will do just that: L. L L L i i ‘. i c.
1 86 320 LPRINT 330 LPRINT CHR$(9);+-"; 340 SCALE$="--+--'I 350 FOR I=2 TO 8 STEP 2 360 LPRINT SCALES; 370 NEXT I 380 LPRINT I'--+" 390 LPRINT CHR$(9);" 'I; 400 FOR I=2 TO 8 STEP 2 410 LPRINT " ";I; 420 NEXT I 430 LPRINT CHR$(27);"%0". 440 LPRINT CHRS(27);"SO"; 450 LPRINT CHR$(9);"MILLIONS OF DOLLARS" 460 LPRINT CH.R$(27);"T" 470 END DEFINING PROPORTIONAL CHARACTERS Defining proportional characters uses the same process as above, except that we add additional information.
DESIGNING YOUR OWN NLQ CHARACTERS As you have probably noticed, NLQ characters are printed by two passes of the print head. Half of the character is printed on the first pass, and the remainder on the second pass. The paper is rolled up half a dot height in between passes to let the print head print dots on the second pass that overlap the previous dots, in order to fill in the spaces and produce denser characters.
88 your characters, and the second pass dots on the lines. Remeber that adjacent dots may not overlap on the same pass; in other words, if one dot is in a box, its adjacent dot on the same pass may not be on a line. Therefore, to make smooth characters, put the dots needed to overlap any spaces in a character in the appropriate places in the second pass grid. If we replot our flask for NLQ, the grid data will look like Figure 6-7.
89 10 LPRINT CHR$(27);"xl"; 20 LPRINT CHR$(27);":";CHR$(O);CHR$(O);CHR$(O); 30 LPRINT CHR$(27);"&";CHR$(O);CHR$(60);CHR$(62); 40 FOR N=60 TO 62 50 FOR M=O TO 22 60 READ MM 70 LPRINT CHR$(MM); 80 NEXT M 90 NEXT N 100 LPRINT 110 DATA 139, 2, 5, 8,241, 0, 0,241, 8, 5, 120 DATA 6, 8, 16,224, 0, 0,224, 16, 0 130 DATA 139,124, 0, 66, 4, 64, 36, 16, 12, 0 140 DATA 120, 4, 0, 4, 0, 96, 4, 0, 0 150 DATA 139, 46, 16, 2, 60, 0, 48, 0, 48, 0 160 DATA 92, 32, 4, 60, 0, 48, 0, 48, 0 170 LPRINT CHR$(27);"D";CHR$(1l);CHR$
90 370 380 390 400 410 420 430 440 450 460 470 480 490 500 510 520 LPRINT CHR$(9);"i--'I; SCALE$="--+-'I FOR I=2 TO 8 STEP 2 LPRINT SCALES; NEXT I LPRINT "--+" LPRINT CHRS(9);" "; FOR I=2 TO 8 STEP 2 LPRINT " ";I; NEXT I LPRINT CHR$(27);"%0" LPRINT CHR$(27);"xO"; LPRINT CHR$(27);"SO"; LPRINT CHR$(9);"MILLIONS OF DOLLARS" LPRINT CHR$(27);"T" END USER-DESIGNED DOT GRAPHICS Designing and printing graphics is similar to the procedures for characters, except that the printed width can range from one to 1920
(ESC) “*” specifies the graphics mode, the CHR$(O) specifies normal density. Other densities are described later. Any number of graphics data may follow; the nl and n2 specify the number of bytes. To figure the value of nl and n2, you need to work out how wide your image will be. Because you are limited to the largest number that can be sent in one byte (255), the formula to work out nl and n2 is: if the number of columns is X, then nl =X MOD 256, and nZ=INT(X/256) Table 6-l may make the calculation easier.
HIGHER RESOLUTION GRAPHICS There are seven graphics modes you can use; they are summarized in Table 6-2. Table 6-2 Control code Function (ESC)“*“CHR$(O) nl n2 ml m2 ... Normal density (60 dots/inch) (ESC)“*“CHR$(l) nl vL?ml m2 ... Double densitv (120 dots/inch) 11m2 ... Double der----, dots/inch) (ESC)“z”CHR$(3) :l n2 ml m2 Quadruple dens.-,ifv (240 ,Semi-double density ~~1 (8u aot Plotter graphics (72 dots/i----~, CRT graphics (90 dots/inch) I
MORE GRAPHICS PROGRAMMING TIPS At the end of this chapter, we’ll discuss two modes that the printer offers to help you solve potential graphics problems. A redefining code allows you to change the density for graphics programs that use one of the four alternate codes. The g-pin graphics mode allows you to use all nine pins on each line and thus speed up screen dumps. Table 6-4 More graphics commands Function Redefine the graphics mode g-pin graphics Control code (ESC)“?” 120nl (ESC)“ - ” n0 nl n2 ml m2 .
94 peripheral devices using eight data lines. When the peripheral is a printer, each data line corresponds to one pin on the print head. Thus each byte sent will fire up to eight pins. But the printer has 9 pins available. So how do you fire the ninth pin with only 8 data lines? In fact, do you really want to bother with just one extra pin? Well, for such graphics-intensive applications as screen dumps, printing 9 pins at a time can speed up the process considerably.