NX-10 USER’S MANUAL NOT INTENDED FOR SALE PN 80820128
Federal Communications Commission Radio Frequency Interference Statement Thw rquipment generates and uses radio frequency energy and if not installed and used properly. that is. in strl~“l accordance Lvith the manufacturer’s instructions, may cause interference to radio and [etexxion reception.
I Table of Contents Chapter 1 Setting Up Your Printer Where shall we put it? What have we here? Removing the printer cover Removing the packing tube Installing the ribbon cartridge Chapter 2 Getting to Know Your Printer Controls and parts of the printer Parts of the printer Controls and indicators Extra functions Other controls Selecting and loading paper Loading single sheets Loading sprocket-feed paper Adjusting the print head Connecting the printer Extra functions with the control panel Self-tests
Chapter 3 Basic Printing Some basics of BASIC A new language! First steps ASCII codes and the CHR$ function Control codes The escape codes A note on command syntax Some special kinds of text Near Letter Quality characters Italic printing Underlining Superscripts and subscripts Changing the print pitch Expanded print Condensed print Proportional printing Making words stand out Mixing print modes Chapter 4 41 Formatting Text Lines and line spacing Starting a new line Reverse line feeds Changing the line
Chapter 5 61 Special Features of the Printer Now hear this Resetting the printer Putting your printer to sleep Printing the bottom of the sheet Backspace, delete, and cancel text Printing zeroes Immediate-print Adjusting the width of space between characters Uni-directional printing The seven bit dilemma Block graphics characters and special symbols International character sets Printing characters in the control code area Printing BIG characters The optional sheet feeder The macro control code Reading a h
., Chapter 7 101 Dot Graphics Comparing dot graphics with download characters Using the dot graphics commands Specifying the number of columns of dots Specifying the graphics data Combining text and graphics Printing a design or logo Plotting with your printer How the program works High resolution graphics Compatibility with existing software More graphics programming tips Redefining alternate graphics codes g-pin graphics mode Chapter 8 Caring for Your Printer Cleaning the printer Replacing the ribbo
..
CHAPTER SETTING 1 UP YOUR PRINTER Subjects we’ll cover in Chapter 1 include. Choosing a suitable place for your printer; l Unpacking your new printer; l Setting it up. WHERE SHALL WE PUT IT? Before you do anything else, give some thought to where you’ll be using your printer. Obviously, it will be somewhere near your computer. And both printer and computer will lead longer, healthier lives if they like their surroundings. For instance, we recommend.. .
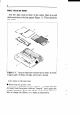
2 WHAT HAVE WE HERE? Now let’s take a look at what’s in the carton. Open it up and check each item in the box against Figure l-l. There should be four items. - .. -- -_ _ F‘igure l- 1. Check to make sure you have all four items: 1) printer, 2) paper guide, 3) ribbon cartridge, and 4) user’s manual. Let’s move on the next step.
lj 3 Removing the printer cover is easy. Lift up the back of the cover to disengage the two tabs at the front and then lift it off the rest of the way. To replace it, just slide the tabs in at the front and lower it into place. Figure 1-2 shows the proper position and movement for both removing and replacing the cover. . . ... _ . .gure 1-2. .I, -. L_ -.. . -- Remove the printer cover by lifting carefully.
Figure 1-3. Remove the protective tube from the carriage rail. Up to this point, we’ve been clearing the decks for action, so to speak. Only one more thing left to do before we can start printing - install the ribbon cartridge. n Installing the ribbon cartridge This printer uses a neat, easy-to-change ribbon cartridge so you don’t have to spend a lot of time threading a ribbon. And getting your hands all dirty to boot.
5 Warning: The print head gets hot during operation, let it cool off before you touch it. so c_ / Figure 1-4. Press the cartridge into place until the holdmg springs snap into place. . 3. Using the guide holders as a fulcrum with the ribbon facing away from you, as shown in Figure 1-4, lightly press the cartridge down until the two holder springs snap shut to hold the cartridge firmly in place. 4. Check that the cartridge fits so that the drive pins engage the cartridge teeth. 5.
6 Print head Figure 1-5. All you have to do is to slide the print head carriage manually to your right or left, then the ribbon slips down by itself into its proper position.
., CHAPTER GETTING 2 TO KNOW YOUR PRINTER Subjects we’ll cover in Chapter 2 include what they’re for and how l Parts of the printer to use them; l Paper selection and loading; l Adjustment; l Connecting your printer to the computer; l Extra functions with the control panel. CONTROLS AND PARTS OF THE PRINTER H Parts of the printer First, we’ll go over the parts of the printer. You saw most of these when you unpacked your printer. Now we’ll give you a brief explanation of what they do.
r Tractor feed unit ’ I nterf \ ’ Power switch Power cord Figure 2- 1. Front and rear views of the printer TRACTOR FEED UNIT - The drive gear and sprockets of the tractor feed unit move sprocket-feed paper through the printer.
I . 9 _ PLATEN - This is the rubber cylinder that carries paper to the print head. INTERFACE CONNECTOR - On the back of the printer, this connector is used to connect your computer to the printer. n Controls and indicators Now let’s take a tour around the controls, starting control panel on the right. There are seven indicators keys on the control panel. I I. Figure . w. L-. . . w.. . . . LI . dI with the and four 2-2. The control panel.
10 n Extra functions There are eleven more functions that are not directly specified on the control panel. You can use six of them by pressing a key (or keys) when you turnon the power; five others are activated by pressing two control keys at once. For details, please refer to the end of this chapter. n Other controls There are other controls, not connected to the control panel board. Some of the more important ones are: POWER SWITCH - The switch to turn the printer on is at the back, on the left side.
11 you’ll be using often. This lever controls the pressure of the paper against the platen. It has four settings: g - The top setting is used when you want to load paper in the printer. c - The second setting is for normal single sheets. fi - The third is for sprocket-feed paper. 4 - The bott om one is used when you want to release the paper completely to adjust it. The paper bail holds the paper against the platen according to the setting of the release lever.
OK? Let’s start. 1. Move the sprockets on the tractor feed unit all the way to the ends. 2. Slide the sheet guide all the way to the right. 3. With the ribs of the paper guide toward you and the sliding adjuster at the bottom left, insert the guide into the slot at the back of the printer cover. Sheet guide / Sprocket ‘igure 2-4. Raise the paper guide for loading single sheets. 4. Insert the guide stand in the notches provided for it and use it to prop up the paper guide. 5.
., L Figure 2-5. .. . . . . .. *. l’rop up the paper guide by inserting me guise stana in the notches provided for it. 1 1 ‘igure lever. 2-6.
14 9. Now set the release lever to the auto-feed setting-the top position. The printer will advance the paper automatically. 10. When the paper stops, set the release lever for single sheets again. To align paper that is not in straight. Set the release lever to the adjustment setting. l Straighten the paper and adjust it for the margins want. l Move the release lever back to its original setting.
II ‘,,, 15 . 5. Flip the clamp levers backward. This allows the two sprocket units to move freely right and left so you can align them with the holes in the paper. 6. Feed the end of the paper into the slot next to the platen cover plate. 7. Fit the holes in the paper over the sprocket pins so the paper is even, and clamp the sprocket units in place. 8. Check that the paper is still positioned correctly, and close the sprocket covers (Figure 2-8). 9. The Power indicator should be blinking.
ADJUSTING THE PRINT HEAD The distance between the print head and the platen must-be adjusted to accommodate papers of different thicknesses. To make this adjustment, move the adjustment lever, which is under the printer cover and immediately in front of the release lever (Figure 2-9). Pulling the adjustment lever towards you will widen the gap; pushing it away from you will narrow the gap. Figure 2-9. The adjustment lever allows for different thicknesses of paper.
17 1. Make sure both your computer and printer are turned off. 2. Connect one end of the interface cable to the connector socket at the right rear of the printer as shown in Figure 2-10. 3. Connect the other end of the cable to your computer as described in the computer manual. *_ . /Figure 2-10. This is how you connect the cable. ‘EXTRA FUNCTIONS WITH THE CONTROL PANEL There are many functions that are not directly specified on the control panel. In this section, we’ll show you these extra functions.
18 n Self-tests Your printer has two built-in programs that print out sample lines of letters, numbers, and other characters-to show you that everything’s in good working order. Self-test 1 is the long version, and self-test 2 is the short one. You can use either one to show the characters available in the printer, to check the installation of the ribbon and paper, and to check the adjustment of the head-to-platen gap.
n Hex dump Can you guess what a “hex dump” is? No, it’s not where witches throw away useless spells. A hex dump is an advanced ability of your printer that you can use, in certain cases, to find a problem with your system. Fortunately, such problems rarely arise but the hex dump is available if one does. We’ll go over hex dump in Chapter 4. Right now, we’ll just tell you how to make a hex dump: 1. Plug in the printer (don’t turn it on yet). 2. Insert a sheet of paper, as you did for the self-tests. 3.
1. Plug in the printer (don’t turn it on yet). 2. While holding both the Mode and Bold keys, turn on the power switch. Right margin set **: Hold down Figure 2-13. the control panel L- Left margin set ~---____ You can set many functions by the combinations keys while in the Off Line mode. of n Setting print start position When you want to align the print start position, you can set it by the micro-feed operation with the control panel, instead of turning the platen knob manually.
Mode key - Left margin set Paper Feed key - Right margin set 3. While holding the two keys, the print head moves across the page step-by-step. 4. When the print head goes to the position where you want to set margin, release the two keys. So the printer acknowledges the margin with the sound of beep.
22 MEMO
CHAPTER 3 BASIC PRINTING Subjects we’ll cover in Chapter 3 include* Listing BASIC programs on the printer; l How a program prints things; l Control codes, escape codes, and command syntax; l Near letter quality (NLQ) characters; l Fixed and proportional character spacing; l Special printing Printing in italics, Underlining, Superscripts and subscripts, Boldface and emphasized text, Mixing print modes.
. ; 24 language, perhaps recalling the rigors of high-school Latin. Others are unnerved by anything having to do with computers. Well don’t be! In the first place, BASIC may well be the easiest language you could learn: it has a vary limited vocabulary, a simple but precise grammar, and its dialects unlike those of English - usually different from each other only in minor detail.
25 output to the screen. Other computers, notably the Commodore C-64, require you to open the printer as a numbered device then to direct output to that device. For example, you might type the following to print “Hello!” or to list a program in the C-64’s memory. OPEN4,4 CMD4 LIST CLOSE 4 OPEN4,4 CMD4 PRINT "Hello! 'I CLOSE4 Here, the first line says that the printer is device number 4, the second directs output to it, the third does the printing, and the last line closes down device number 4.
would enter LPRINT CHR$(65). To make the printer’s bell sound, we would LPRINT CHR$(7). In general, we print a character by entering LPRINT CHR$(ASCII code) to the printer. We can also use hex ASCII codes. Although we use only decimal ASCII codes in this manual, you should understand at least what a hex code is. “Hex” is short for hexadecimal and refers to a base-16 number (the numbers we use in everyday life are base 10).
27 line feed UJ’) ASCII 10 ASCII &HOA CHR$(lO) CTRL- J -the name of the code -its abbreviation -its decimal value -its hexadecimal value (the &H signifies hex) -the way it’s used in BASIC -the way you send it from a keyboard Of course, most of the time we don’t need to bother with these. Our computers are smart enough to know that when we press the “A” key we want to print the letter “A” - they take care of all the intermediate steps.
28 This command that turns on expanded printing. (ESC), as we mentioned earlier, is the escape code (which is ASCII code 27). A letter or number in quotes (such as the “W” above) means that the character should be sent to the printer (without the quotes). In our example, you should send a capital W following the escape code. In BASIC, you could do this in a couple of ways: by sending the character itself (e,g, LPRINT “W”;), or by using the CHR$ function to send the ASCII code for the character (e.g.
29 But for the final printout, how. 10 20 30 40 50 1 Demo LPRINT LPRINT LPRINT LPRINT try NLQ. The program below shows of NLQ character set CHR$(27);"xl"; "This line shows NEAR LETTER QUALITY! CHR$(27);"xO"; "This line shows standard print." In this program, line 20 selects NLQ characters with (ESC) “~“1 command. Line 30 prints a sample before line 40 switches printer back to draft printing with an (ESC) “~“0. When you run the program you should get this: This line -)_1-7j. ::i :I.
f Demo :; LPRINT 30 LPRINT 40 LPRINT 50 LPRINT of italic and roman CHR$(27)*"4"* "This li;e ii in ITALIC characters." CHR$( 27);"5y "This line is in ROMAN characters." Here is what you should get: In this program, line 20 turns italic on with (ESC) line 40 turns italic off with (ESC) “5”. “4”, and W Underlining Not only can your printer print all styles of printing in both roman and italic, but it can underline them too. The control codes are shown in Table 3-3.
31 In this program underline is turned on in line 20 with (ESC) -“l, and then off in line 40 with (ESC) “-“O. There’s a new little wrinkle in this program, though. The semicolons at the end of the first three lines told BASIC that those lines were to be continued. Therefore, BASIC didn’t send a carriage return and line feed at the end of those lines. We just did this to illustrate that all these control codes can be used in the middle of a line. It’s easy to underline or italicize only part of a line.
32 Here line 30 turns on superscripts with (ESC) “SO. It’s turned off in line 50 with (ESC) “T”. Then between printing text, subscripts are turned on in line 70 with (ESC) “S’l, and finally off in line 90. Again, everything prints on one line because of the semicolons. CHANGING THE PRINT PITCH In “printer talk,” the number of characters that can be printed in one inch is called the print pitch or character pitch.
33 Line 20 turns on elite pitch with (ESC) “M”. Line 30 prints a line at 12 characters per inch. The (ESC) “P” in line 40 resets the printer to pica pitch and line 50 prints a line in pica pitch. W Expanded print Each of the print pitches can be enlarged to twice its normal width. This is called expanded print. Try this program to see how it works: 10 ’ Demo of expanded print 20 LPRINT "Demonstration of 'I; 30 LPRINT CHR$(14); 40 LPRINT "EXPANDED"; 50 LPRINT CHR$(20); 60 LPRINT " printing.
34 Now the results look like this: When you turn on expanded print with (ESC) “W”l it stays on until you turn it off with (ESC) “W”0. Table 3-6 Expanded print commands n Condensed print Each of the print pitches also can be condensed to its normal width. This is called condensed print. Try this program to see how it works: 10 20 30 40 50 60 f Demo LPRINT LPRINT LPRINT LPRINT LPRINT Ihwmstt-at:i of condensed print "Demonstration of "; CHR$(15); "CONDENSED"; CHR$(18); Ifprinting.
Table 3-7 Condensed print commands Function Condensed ON Condensed OFF Control code CHR$(15) 01 (ESC) CHR$(15) CHR$(18) By combining expanded print and condensed print with the two pitches, this printer has eight different character widths available. Enter this program to see how the print pitches, expanded print and condensed print can be combined: ' Demo of various print pitches LPRINT CHR$(15); LPRINT CHR$( 27);wy LPRINT "This line is CONDENSED ELITE pitch.
This line is CONDENSED ELITE pitch, This line is CONDENSED PICA pitch. This line is NORMRL ELITE pitch. l-l-1 :i, vii :I. :i n e :i, 5; 111 IX? Pi u I,,., P 1: c:: (4 fl:, i t c3 t-l n This line is EXPANDED CONDENSED ELITE. This line is EXPANDED CONDENSED PICA. l-h i .!sii?z EXF'ANDED ELI-i-E, :,I;: g.3&'::, 11"*,[ :J-J, E; :/j-J1':" '-'["" #--r -j. K;.
When you run this program This line is you should get this: NORMAL ELITE printing. This line is F’ROF’ORTIONAL ELITE. “r1.7j.:~ :/.j.I-\e j.!ii; r~~I::;(:)~::~(::)~~1-~Ol\lnj... p:I:C::A. T l-1i 5; 1. :i.r1e i 5 NC:)R PICiL.. F’ I: CA 1:)r i n .t i ri g y Line 20 selects the elite pitch and line 40 turns on the proportional printing with (ESC)“p”l. Line 50 prints a line with proportional elite pitch.
- 38 Try them now with this little program: f boldface and emphasized 2': ~PEE EHR$(~~) ;"G"; 30 LPRINT "This iine is BOLDFACE printing." 40 LPRINT CHR$(27);"E"; and 50 LPRINT "This line is BOLDFACE EMPHASIZED." 60 LPRINT CHR$(27);"H"; printing.'* 70 LPRINT "This line is EMPHASIZED 80 LPRINT CHR$(~~);"F"; 90 LPRINT "This line is normal printing." 100 END Run this program. The results will look like this: This This line line line is BCLUFUCE printing. is BOLDFACE and EMPHASIZED. is EMPHASIZED printing.
39 more efficiently. You have at your disposal a unique command that lets you choose any valid combination of print modes and pitch. This is the Master Print mode command. It looks like this: (ESC) “!” n Here, the value of n defines the print style to be selected. The value of n can range from 0 to 255, which is the range of values that can be stored in one eight-bit byte. If you look at each bit in this byte, you’ll find that each one represents a printing style variation.
To better understand the way the print modes work, consider that each mode except pica (pica is the default) has a separate switch that can turned on and off via software. Once the switch is on, it stays on until turned off. When two modes that conflict are turned on at the same time, the printer must choose which one to use. For example, suppose you turn on both Elite and Emphasized modes. Since these cannot combine the printer must make a choice; in this case, the printer chooses Elite.
CHAPTER FORMATTING 4 TEXT Subjects we’ll cover in Chapter 4 include* The carriage return and line feed; l The amount of space between lines; l Moving to the next page; l The number of lines on a printed page; l Horizontal and vertical tabs; left, right, top and bottom; l Setting marginsl Centering and aligning. Chapter 3 showed us all the basic techniques of using the printer. Now we’re ready for the more advanced ones. We’ll concentrate on changing the appearance of the page to suit our needs.
42 Line feed is more complicated. Each time the printer receives a CHR$(lO) it both advances the paper one line and returns the print head to the left margin, ready to start a new line. Now to add a little confusion-most (but not all) versions of BASIC add a line feed (CHR$(lO)) to every carriage return (CHR$(13)) that they send. If your version of BASIC doesn’t do this, then you should turn DIP switch l-8 off so that your printer will add the line feed for you.
43 NEW 10 ( Demo of line spacing 20 FOR I=1 TO 25 IF 1=13 THEN 60 LPRINT CHR$(27);"A";CHR$(I); 2 LPRINT "THIS LINE SPACING IS SET TO";1 2: NEXT I 70 LPRINT "LINE SPACING IS SET TO 1/6 INCH (NORMAL) .I! 80 LPRINT CHR$(27);"2" 90 END This is what you will get: l-l-l I s T 1-lI: S ! ‘f .J!! ,’ : I .!i ...,.II \ IIn IIMF \ .:L L I NE SfYl” I- I lIEi: S Et:: “II- :I:NE I.._I tw SF AC 1:NC< I 5 SET I_ :I:i’.lE SI:-’A[:: :CN[17 :I:S S Et:T 1-C:) ‘Tel 1-a ‘1” cl :LiI 1I 112 1.4. T t.41:S I....
Line 40 changes the line spacing. The command (ESC)“A” CHR$(n) changes the line spacing to n/72 of an inch. The loop that is started in line 20 increases the value of n (the variable I in this program) each time it is executed. So the line spacing increases as the program continues. Line 30 just shortcuts the loop when I= 13, since BASIC won’t let us send CHR$(13) without adding an unwanted CHR$(lO) to it. Finally, the (ESC) “2” in line 80 resets the line spacing to 6 lines per inch.
45 The program works just the same as before, but the line spacing are just one-third what they were. This is because (ESC j“3” CHR$(n) sets the line spacing to n/216 inch. Table 4-2 shows all the line spacing commands, including several “shortcut” commands for commonly used line spacings. Table 4-2 Line spacing commands n Moving down the page without a carriage return So far, all the commands that move the paper also move the print head to the left margin. And normally this is what you want.
46 NEW 10 ' Demo of'one-time line feeds 20 LPRINT "LINE NUMBER 1." ;; LPRINT "LINE NUMBER 2."; ' One-time line feed 50 60 70 80 LPRINT LPRINT LPRINT END CHR$(27>;"J";CHR$(loO); "LINE NUMBER 3." "LINE NUMBER 4." Here is what your printer will produce: i-:1:IW I\Il.JMEE:FII. I I__I Ntx I’dJMBER 2 n I....I NE L.:I:NE: NCJMBER 4 ,s NIJMBEH 3. The (ESC)“J”CHR$(lOO) in line 50 changes the spacing to 100/216 inches for one line only without moving the printhead.
47 PAGE CONTROL Now that we have seen how to control line spacing, we can go on to page control - positioning the printing on the page and adjusting the paper length. n Form feed The simplest forms control code is the form feed. Form feed (or < FF > ) is CHR$(12) and causes the printer to move the paper to the top of the next sheet.
ed, for example, to print text in a multi-column magazine format; print the first column, then reverse form feed back to.the top of the page to start the second column. The code for reverse form feed is easy to remember: < ESC > < FF > .
49 advance the paper to the top of the next form. Line 50 then prints its message. After you have run this program, turn off the printer and adjust the top of form position. When you turn the printer back on the page length will reset to its normal setting (usually 11 inches). TOP AND BOTTOM MARGINS Many programs that you use a printer don’t keep track of where they are printing on the page.
10 ' Demo of top and bottom margins :' form feed 60 LPRINT CHR$(12); 70 FOR I=1 TO 150 80 LPRINT "THIS IS LINE";1 90 NEXT I :' form feed 110 LPRINT CHR$(12) 120 END When you run this program it will print 150 lines right down the page and across the perforations. When it’s done line 110 sends a form feed to advance to the top of the next page. Look at the lines that have printed near the perforations. Separate the sheets and see if any of the lines have been torn in half.
THIS THIS THIS THIS THIS THIS THIS THIS THIS ; I ’ ; , I IS IS IS IS I5 IS IS IS IS LINE ILINE LINE ILINE LINE ILINE LINE LINE LINE 1 2 : 4 5 6 7 R 9 LINE LINE LINE LINE LINE LINE 50 51 52 53 54 55 IS LINE 56 THIS THIS THIS THIS THIS THIS THIS IS IS IS IS IS IS IS LINE LINE LINE LINE LINE LINE LINE 164 105 106 107 108 109 116 THIS THIS THIS THIS THIS THIS THIS THIS THIS THIS IS IS IS IS IS IS IS IS IS IS LINE LINE LINE LINE LINE LINE LINE LINE LINE LINE 111 112 113 114 115 lib 117 118 119 1
SETTING LEFT AND RIGHT MARGINS The left and right margins of this printer work just like a typewriter - once they are set all the printing is done between them.
53 When you want to reset the margins to the default values, you have two choices. You can either turn the printer off and back on, or you can set margin values equal to the default values. This means that you should set a left margin of 0 and right margin of 80 in pica pitch. If you change the pitch of your printing after you set your margins, the margins will not change. They stay at the same place on the page.
15 LPRINT CHR$(27);"D";CHR$(7);CHR$(l4);CHR$(21); CHR$(O) (ESC)“D” is the command to begin setting horizontal tabs. It must be followed by characters representing the positions that you want the tabs set. In our program we are setting tabs in columns 7, 14, and 21. The CHR$(O) at the end ends the string of tabs. In fact, any character that is not greater than the previous one will stop setting tabs.
,. 55 The aboslute horizontal tab command moves the print head to a specified position on the page. The position that you want the print head to move to (meaured from the left margin) is specified by the values of $21and n2 in l/60-inch units using the formula nl + n2 x 256. Try this program to see how this works. 10 20 30 40 50 1 Demo of absolute horizontal tabs FOR I=60 TO 70 STEP 2 LPRINT I;'+++++'; LPRINT CHR$(27);"$";CHR$(I);CHR$(O); LPRINT 'Horizontal tab.
80 LPRINT 90 END W Vertical tabs Vertical tabs have the same kinds of uses that horizontal tabs do - they just work in the other direction. Horizontal tabs allow you to reach a specific column on the page no matter where you start from. Vertical tabs are the same. If you have a vertical tab set at line 20, a vertical tab (or ) will move you to line 20 whether you start from line 5 or line 19. The vertical tab is not set at the power-on default.
j . 1-I-i I HC) TAM I wx.m-1-i-4 -rAb.
., Add one more line to the program feature of vertical tabs. to demonstrate one more 80 LPRINT CHR$(ll);"FIFTH TAB." Now when you run the program the first page looks just like before, but line 80 sends one more than there are tabs. This doesn’t confuse your printer - it advances the paper to the next tab position which happens to be the first tab position on the next page.
10 1 Demo of vertical tab channels 20 LPRINT CHR$(27>;"b';CHR$(l>;CHR$(lO);CHR$(2O); CHR$(O) ; 30 CLHPRHl~oT)CHR$(27);"b";CHR$(2);CHR$(15);CHR$(25); .
f-w In this program we set tabs at 10 and 20 in channel 1 in line 20. In line 30 we set tabs 15 and 25 in channel 2, and in line 40 we set tabs 17 and 28 in channel 3. Because the channels are stored, you must make the printer to recall one before you use it, so we used (ESC)“I”CHR$(nU) in line 80. CENTERING AND ALIGNING TEXT Text can be arranged in any of three formats: left aligned (normal printing with “ragged” right margin), centered between the margins, or right aligned.
CHAPTER 5 SPECIAL FEATURES OF THE PRINTER Subjects we’ll cover in Chapter 5 include* Printer’s bell; l Master reset; l Uni-directional printing; l International character sets; l Printing BIG characters; l The optional sheet feeder; l Macro instruction; l Reading a hex dump. In the previous chapters we have learned about several groups of control codes. In this chapter we will look at more control codes.
62 sound the bell for a quarter of a second. This can be used to remind an operator to change the paper or to make another adjustment to the printer. You can try this by typing: LPRINT CHR$(7) n Resetting the printer Up to now when we wanted to reset the printer to the power on condition we have had to either turn the printer off and then on again, or to send the specific codes that reset the particular features. There is an easier way.
stop the printer. This will allow you to print to the end of the sheet, and even beyond if you are not careful. The codes to control the paper-out detector, along with the other codes that we have just learned are in the following table.
60 LPRINT "WORK" 70 LPRINT "CANCEL LINE"; 80 LPRINT CHR$(24); 90 LPRINT "DOES NOT WORK" Here is what this program will print: The backspace codes in line 20 move the printhead a total of three spaces to the left so that the first part of line 30 will overprint the word “NOT”. The delete codes in line 50 “erase” the three letters in the word “NOT” so that it doesn’t even print. In line 80, CHR$(24) deletes the words in line 70.
65 You can turn immediate-print mode on with (ESC) “i” 1. But before looking at it, let’s review the normal operation of the print buffer. Enter this program. 20 A$="" : INPUT " TYPE A CHARACTER 30 IF A$="" THEN 50 40 LPRINT A$; : GOT0 20 50 LPRINT : LPRINT CHR$(27);"@" ",A$ Now type several characters, and after each press the RETURN key. True to form, the printer just stuffs the characters into its buffer while it waits for a carriage return code.
This This This This This This line is added 10 spaces. added 8 spaces. line is added 6 spaces. line is added 4 spaces. line is line is added 2 spaces. line is Normal space, This command can be used to produce micro-justification, which is a method of justifying lines by incresing the space between each character. n Uni-derectional printing Uni-directional printing is a big word that means printing in one direction only. Your printer normally prints when the printhead is moving in both directions.
67 Here is what you will get. The top line is printed bi-directionally, and the bottom is printed uni-directionally. You will have to look hard because there isn’t much difference. Let’s analyze the program. Line 20 sets the line spacing to 7/72 of an inch so that the characters that we print will touch top to bottom. Lines 30 - 50 print 10 vertical line characters. Then line 70 sets one-direction printing and the vertical lines are printed again.
Table 5-3 Eighth bit controls Function Control code Turn the eighth bit ON Turn the eighth bit OFF (ESC) (ESC) ~ec~~~~;t~ “>” “=” bit “as is” from ( ESC > ,,#,, n Block graphics characters and special symbols Besides the upper and lower case letters and symbols that we are by now familiar with, your printer has a whole different set of characters that are for special uses.
I;:::> 69 Figure 5- 1.
70 Figure 5-l shows what this program will print. If your chart doesn’t 1001like this because it has regular letters and numbers instead of the special symbols, then your computer is only using seven bits. You can get the correct printout by changing line 160 to this: 160 LPRINT I;CHR$(27);">";CHR$(I);CHR$(27);"="; CHR$(9); A note for the IBM-PC users. When you run this program, you cannot get the right-pointed arrow (CHR$(26)) with the IBM-PC computers.
71 If you have a 7-bit interface, add the following lines to the program given above: 15 LPRINT CHR$(27);">"; 95 LPRINT CHR$(27);"=" In this program line 10 selects character set #2 so that all the graphics characters can be used (including the “club” symbol). Then lines 20-80 print the 5 of clubs figure. Line 90 cancels character set #2 (which is the same as selecting character set #l).
72 Table 5-4 International character set commands I Countrv The characters that change are shown beneath code in Table 5-5. their ASCII Table 5-5 International character sets Country ~35~36~64~91~92~93~94~96~123~124~125~12 U.S.A IFrance IGermany England Demarktype I Sweden Italy I#lsl@lcl\lll*l’lcl:l,l~ l#l$lsl~l~lul^l’l~lal~lR - al~lrl~lil~l~l~l~l~l.I. G I. f #$@E~L-zi;;#rl~At5AUBZ~Bi.
73 command to “normalize” the high-order control codes is (ESC) “6”. Try this program with the DIP switch 1-6 on. 10 ’ Demo of characters area 20 LPRINT CHR$(27);"6"; 30 FOR I=128 TO i59 40 LPRINT CHR$(I); 50 NEXT I 60 LPRINT CHR$(27);"7" 70 END When you run this program in the high-control code you’ll get like this: That’s where the italic international characters have been stored. So the (ESC)“G” command without the (ESC)“R” gives you access to the international characters.
74 130 140 150 160 170 180 190 NEXT I LPRINT CHR$(144);CHR$(145); FOR I=149 TO 159 LPRINT CiSS(I); NEXT I LPRINT CH?.$(27);"10" END When you run this program you should get like this: Table 5-6 Control code area colmmands Function Printable code area expansion Control code area expansion C kkct undefinedcodesas characters (Cancelundefinedcodesas characters Control c (ESC)“G” ..
I ;.” 75 10 ' Demo of BIG characters 20 LPRINT "THIS IS I'; 30 LPRINT CHR$(27);"h";CHR$(l); 40 LPRINT "DOUBLE"; 50 LPRINT CHR$(27);"h";CHR$(O); 60 LPRINT " SIZED PRINTING." 70 LPRINT 80 LPRINT "THIS IS I'; 90 LPRINT CHR$(27);"h";CHR$(2); 100 LPRINT "QUAD"; 110 LPRINT CHR$(27>;"h";CHR$(O); 120 LPRINT " SIZED PRINTING." 130 END When you run this program, you will get like this: As you can see, when the big character command is used, the baseline for each character does not align.
When you run this program, you will get like this: n The optional sheet feeder The automatic sheet feeder is a handy option that feeds single cut sheets automatically. Work done on cut sheets looks better that done on computer paper, and you don’t have to tear the “ears” off each sheet as you must with fan-fold paper. The automatic sheet feeder feeds a new sheet automatically every time the printer receives or generates a form feed.
77 which refers to an instruction that “calls,” or uses a group of normal instructions. In computer programming macro-instructions (which are similar to subroutines) save programmers a lot of time and effort. Your printer’s macro can save you a lot of time and effort also. Here is how the printer’s macro works. You define macro by telling the printer what normal control codes are to be included in the macro.
78 tional pitch, condensed print, expanded print, boldface, emphasized, and the underlining. Line 40 cancels the superscripts and the subscripts. Line 50 sets the line spacing to l/6 inch, and line 60 sets the left-aligned printing. Then, line 70 ends the macro definition. This printer will remember this macro until the power is turned off or until a new macro is defined. A macro can hold up to 16 bytes (characters) of information. The one that we defined contains thirteen.
79 If your system passes the codes directly to the printer without changing them, you will get like this. (You can print out the last remaining line in the print buffer by putting the printer off line with the On Line key.) a:,,:,01 02 I:)? 04 05 06 07 If.1 11 20 21 70 ?I 1.
80 dumps the characters to the paper. To debug a program quickly, just use the hex dump capability. Appendix B will help you translate the hex codes to ASCII equivalents.
CHAPTER 6 CREATING YOUR OWN CHARACTERS Subjects we’ll cover in Chapter 6 include l Designing and printing your own characters; l Designing proportional characters ; l Designing your own characters with NLQ. In the previous chapters of this manual you’ve learned how to control the printer to give dozens of different typefaces. By using various combinations of pitches, character weights, and font selections, you can create nearly any effect you want to in text.
see, the capital letters use the top seven wires of the printhead, and the descenders (such as the lower case “p” shown) use the bottom seven pins. As the printhead moves across the page (in either direction - that’s what is meant by bi-directional printing) it prints one column of dots at a time. Each time a dot is supposed to print an electromagnet inside the printhead causes the appropriate wire to strike the ribbon (making this printer an impact printer). 1 I Figure 6- 1.
83 character sets, and the NLQ characters. But there is another area of memory in this printer reserved for user-defzked characters. These are characters that you can design and download into the printer. When download characters are defined they are stored in RAM (random access memory), which allows you to define or modify them at any time. Each of these characters, whether it is from the standard character ROM or in download RAM, is constructed on a grid which is six “boxes” by nine “boxes” high.
download character. You can see how we’ve laid it out in Figure 6-5. Later in this chapter we’ll use this character to create a small graph.) m,m,m,m.m,m,m,m,m,m,,m,, ASCII Code Descender 32 Start column End column 16 M, = Descender l 128 + (Start * 161 + End Total i ETigure 6-4. Use this grid (or one similar to it) to define your owr 1 draft characters. You’ll notice that Figure 6-4 includes a lot of informatior 1 around the grid.
I. 85 One bit in the download character definition command is to be treated as a descender or not. We’ll get to the command in due time. For now, if your character uses the top eight dots, write in a one next to the word “Descender” on the layout grid; if it uses the bottom eight dots, write in a zero. In our example, we’ll want to the bottom of the flask to line up with the baseline of the other characters, so it will not be a descender. As shown in Figure 6-5, we’ve written in a “1” on out grid.
1 m m, m, m, m. m. m m, m. m m ASCII Code 64 Descender 32 Start column End column WRONG! 16 M, = Descender l 128 + (Slat1 * 16) + End 4 2 1 Tolal i Figure 6-6. cots cannot overlap; those in immediately adjacent “half columns” will be ignored when the character is printed. W Add up each column of dots Now it’s time to give our creative side a break and get down to some basic arithmetic. That’s where the numbers down the left side of the grid come in.
87 So add up the values of the dots in each column using this system. In Figure 6-8 we’ve shown our grid with the sums of the columns filled in across the bottom (see if these agree with your answers!). Across the top of the grid you’ve probably noticed the cryptic labeling of each column: ml, m2, m3, etc. These labels correspond to the labels in the command syntax statement, which we’ll get to shortly. I m. m, m, m. m, m, m, mR mp m,,.
also access the character from a BASIC program with the CHR$ function. There are no rules or restrictions on the use of numbers. This means you can use whatever is most convenient for you perhaps seldom-used keys can be replaced by more useful characters. In our example, we’ll assign the flask a value of 60, which is the code for the character “(” in the ASCII characters.
I1. : : 89 n Download character definition command You’ve read through a long explanation of download characters and we haven’t even told you the command syntax yet! Now the wait is over. This is the most complex command in your printer repertoire and now you’ve got the necessary knowledge to implement it. Here it is: (ESC)“&“CHR$(O) ml0 ml1 nl n2 m0 ml m.2 m3 m4 m5 m6 m7 m8 m9 Like the other printer’s commands, it starts with an (ESC) (CHR$(27)).
L 0 Descender date Figure 000 1011 Starting print column Ending print column 6-10. The attribute byte-(M) = ll(decimal) for our flask character. You’ll probably recognize ml . ..mll from the top of our layout grid. That’s right, each column is described by one byte. Now we’ve got everything we need to download one character to the printer.
I PRINTING DOWNLOAD CHARACTERS You’ve now defined and sent three characters to your printer. But how do you know that? If you try printing those characters now you don’t get a flask, car and gun. Instead you get . . ( = ). That’s because the download characters are stored in a different part of the printer’s memory.
92 Nope! Just three characters in the download set. This is inconvenient for a couple of reasons. First, every time you wanted to use a download character you would have to switch back and forth between character sets. Knowing that you wouldn’t want to do that, your printer won’t even allow it. So we have made it an easy task to use mostly standard characters with just a few special characters thrown in.
93 70 NEXT M 80 NEXT N 90 LPRINT 100 DATA 139, 8, 5, 2, 110 DATA 139,124, 16 120 DA% 5, 2, 8,241, 0, 0 0, 66, 4, 64, 36, 16, 0, 48, 0, 12 139: 46: 160, 2, 60, 270 280 290 300 310 320 330 L%NT"~H~~~27;~"D"-cHR$(ll)CHR$(0) LPRINT CHR$(27)f"h";CHR$(l);' U.S. EXPORTS" LPRINT " LPRINT cHR$(27>;"h";c~~$(o); LPRINT CHR$(27);"~l";CHR$(O); LPRINT "AUTOS";CHR$(9); FOR I=.4 TO 9.3 STEP .4 LPRINT CHR$(61); NEXT I LPRINT LPRINT "CHEMICALS";CHR$(g); FOR I=.4 TO 8.7 STEP .
94 Note that we didn’t have to re-enter the download characters, since they were already sent to the printer with the first program. They will stay with the printer until you download new characters to replace them or turn the printer off. Even the (ESC) “a” command, which initializes the printer, does not destroy the contents of download RAM.
95 character width is five dots (so you could not, for instance, specify a starting column of 6 and an ending column of 8, even though those are both within the acceptable range). If you inadvertantly give an incorrect width value, however, your printer is forgiving: it will automatically revert to the default width of eleven dot columns. Just as there was an easy trick for figuring the attribute byte earlier, you still don’t need to know a thing about binary arithmetic.
96 Because the NLQ characters can use as many as 16 dots vertically and 11 dots horizontally, you plan your designs on a different grid than the one you used for draft characters. Make up some grids (photocopy Figure 6-12 if you wish) and get ready to be creative! 128 128 84 ASCII Code: 64 32 Descender: 32 16 Start column: 16 8 End column: 8 4 4 II MO = Descender * 128 + (Start * 16 ) + End 2 2 1 1 TOtd 1st 2nd Figure 6-12.
97 ASCII Code: ($0 Descender: 2. Start column: End column: MO = Descender* 128 + (Start * 16 ) + End Figure 6- 13. Add the values of the dots in each box and line column and write the sum of each column at the bottom. Now enter the following program and run it. It has the data numbers for the NLQ flask character. For a character of your own, change the DATA numbers and the character definition $osition.
140 DATA 139, 46, 16, 2, 60, 0, 48, 0, 48, o, 48, o 150 DATA 92, 32, 4, 60, 0, 48, 0, 48, 0, 48, 0 When you want to print the defined character, you must select the NLQ mode first, then select the download characters. If you don’t select the NLQ mode, the download characters are not printed even you selected the download character set. To demonstrate how to use the NLQ download characters, let’s use this character set to print a small graph. Try this program.
99 240 LPRINT CHR$(61); 250 NEXT I 260 LPRINT 270 LPRINT "CHEMICALS";CHR$(g); 280 FOR I=.4 TO 8.7 STEP .4 290 LPRINT CHR$(60) 300 NEXT I 310 LPRINT 320 LPRINT "GUNS";CHR$(g); 330 FOR I=.4 TO 1.4 STEP .
100 MEMO -
CHAPTER 7 DOT GRAPHICS Subjects we’ll cover in Chapter 7 include. This printer’s bit image graphics capabilities; l Printing a pre-defined shape; l Plotting a calcurated shape; l High-resolution graphics. In Chapter 6 you were introduced to a form of computer graphics; you were able to actually define characters dot by dot.
So when do you use graphics and when do you use download characters? Practically anything you can do with graphics you can do with download characters, and vice versa. A clever programmer could actually plot a mathematical curve using download characters or use strings of graphics data as userdefined characters.
largest number we can send in one byte (that’s what the BASIC CHR$( ) function sends: one byte) is 255. And with the normal density graphics it’s possible to have a graphics image as wide as 480 dots. So to figure out how many columns of graphics data to expect, your printer multiplies n2 by 256 and adds the value of nl to the product.
1 Figure 7- 1. Starting with the most significant bit at the top, each pin of the print head is assigned a value which is a power of two. J A short program should demonstrate how to implement the graphics command. The program below gave us this printout: ___““““--....” __----._._ -- ______._ _-_, --. 10 i Demo of dot graphics 20 PI=3.
105 mathematical function (a sine wave) to create a design. Later in this chapter we’ll show something more complex. The mathematical concepts (such as sine and pi) demonstrated here are not important; you don’t have to be a math whiz to use this printer’s graphics. n Combining text and graphics It’s also possible to mix text and graphics in one line. This can be useful for labeling charts or graphs, or even inserting fancy graphics in text.
106 PRINTING A DESIGN OR LOGO Since you control the firing of every pin, you can print nearly anything with your printer that can draw (and probably better, if you’re like most computer users!). You can be used for creating “computer art” or drawing maps. Or, as we’ll show you here, you can use dot graphics to print your logo at the top of each letter you print. Designing an image to print with dot graphics is much like designing download characters.
107 In the program below, we’ve taken the logo graphics information and put it into BASIC DATA statements. The program itself is short and simple. The loop starting at line 100 reads the data statements into a string array variable called LOGO$. In line 170 we change the line spacing to 8/72 inch so that the lines of graphics data will connect vertically.
340 350 360 370 ' Row 2 DATA DATA DATA 0, 60,255,255,255,255,255,143, 15 400 DATA 31, 31, 15, 7, 3, o, o, o, ;, ; 410 DATA 0, 0, 0, 0, 0, 0, 0, c, 420 DATA 0, 0, 60,255,255,255,255,255,143: 15 430 DATA 24;;24;: 7, 7, 3, 3, 3,131,193,241 440 DATA 0, 0, 0, 0, 0, 0, 0, 0 450 ' Row 460 DATA 3 0, 31, 31, 3,12g,128,1g2,192,1g2,lg2 470 DATA 192,224,224,224,224,240,255,255,255,255 480 DATA 255,127, o, o, 0, 0, 63,127,255,255 490 DATA 255,255,193,128,128,128,128,lg2,224,24o 500 510 520 530 DATA 252,255,255,25
109 20 LINE.8$=CHR$(27)+CHR$(65)+CHR$(8)+CHR$(27)+ CHR$(5Oj 40 LINE.l2$=CHR$(27>+CHR$(65)+CHR$(l2)tCHR$(27)t CHEI$(50) PLOTTING WITH YOUR PRINTER This section of the manual gets into more serious BASIC programming just because it’s required in order to have the computer act as a plotter driver. Don’t be intimidated; while it’s beyond the scope of this manual to teach BASIC, if you try the examples and take it slowly you should be doing some fancy plotting of your own before you know it.
80 LX=~O : LY=20 : LYFAC=~'~'/LY 90 LXFAC=72/LX 100 1 Plot curve 110 GOSUB 600 120 1 130 1 Send bit image map to printer 140 LPRINT CHR$(27);"A";CHR$(6); 150 FOR ROW%=0 TO MAXROW% 160 A$="" 170 LPRINT CHR$(27) ;"*";CHR$(O);CHR$(MAXCOL%); CHR$(O) ; 180 FOR COL%=l TO MAXCOL% 190 A$=A$+CHR$(BIT%(COL%,ROW%)) 200 NEXT COL% 210 LPRINT A$;" It 220 NEXT ROW% 230 LPRINT CHR$(27>;"A";CHR$(l2); 240 END 250 260 1 2: 410 ) Subroutine to draw a line from Xl,Yl to X2,Y2 I : YL=Y2-Yl XL=X2-Xl : NY=ABS(YL*LYFAC) NX=ABS
660 670 RANG=ANG%*6 28/360 X2=RAD"COS(iANG)tlO 680 GOSUB 250 690 NEXT ANG% 700 RETURN : Y2=RADSSIN(RANG)tlO If you are using with the IBM mode (DIP switch 1-6 off), change the following lines to the program given above. 140 LPRINT 230 LPRINT CHR$(27>;"A";CHR$(6);CHR$(27);"2" CHR$(27);"A";CHR$(l2);CHR$(27);"2'+ n How the program works In the program above, we’ve created an array called BIT%, which is dimensioned in line 40.
112 tocalculate starting and ending points for a line (in our circle the “lines” are very short - sometimes the starting and ending points are the same). The coordinates of the starting point of the line are assigned to variables Xl and Y 1. The line ends at point X2, Y2. When these coordinates have been calculated, a subroutine call is made to line 250. This subroutine calculates the coordinates of individual points along that line.
I 113 600 610 620 630 640 650 650 670 680 6go 700 710 720 ’ ) Subroutine to plot a sine wave ) x1=0 : Yl=lo : x2=20 : Y2=10 GOSUB 250 x1=10 : Y~=O : x2=10 : Y2=20 GOSUB 250 X1=0 : Yl=lO FOR X2=0 TO 20 STEP .2 Y2=lO-g"SIN(3.ltil59~X2/10) GOSUB 250 NEXT X2 RETURN HIGH RESOLUTION GRAPHICS Up until now all of the dot graphics printing we have done has been with your printer’s normal density mode. This can give you some pretty sharp images at great speed.
. .. 114 Table 7-2 Dot graphics commands I Control code 1 (ESC)“*“CI HR$(O) nl nl 1(:ESC)“*“CfiR$(l) Double densit; (120 \_-_ dotdinch~ --_- ._.. -.., 1, (ESC )“*“CHR$(2) nl ,/double weed Doubledensity.---.--.
, 115 Double density graphics I.
So if quadruple density looks so great, why not use it all the time? Let’s try an experiment on your printer which will show just how the different modes work. Using the first program in this chapter, change line 50 to try each of the different modes. Just change the “0” to “l”, “2”, “3”, etc. in turn. Your printouts should look something like this: ---Z-. =----., .---; “*” CHR$( 1) (ESC) ,,, - -.... _ .. ,, . ..., ‘. (ESC) “*” CHR$(2) ,-...,.n (ESC) I‘*” CHR$(3) _-------. -- ---- ----....
119 - puting time as double density, it prints at the same speed as normal density graphics. Amazing, you say? Well, it is - until you know the secret. Every other column of dots is ignored, so the output is actually the same as normal density graphics. The advantage is that you can write and debug your programs at double speed, then change to double density graphics for terrific output.
, 120 graphics densities. These commands, which are shown in Table 7-3, can be used interchangeably with the corresponding (ESC) “*” command. Like the commands you are already familiar with, these new commands are followed by two bytes to specify the number of graphics data bytes to print and then the data. MORE GRAPHICS PROGRAMMING 1 IPS At the end of this chapter, we’ll discuss two modes that the printer offers to help you solve potential graphics problems.
121 n g-pin graphics mode In the early part of this chapter, we said that the bottom pin of the print head is not normally used in the graphics modes. That’s because most computers communicate with parallel-type peripheral devices using eight data lines. When the peripheral is a printer, each data line corresponds to one pin on the print head. Thus each byte sent will fire up to eight pins. But the printer has 9 pins available.
122 MEMO