USERS MANUAL
FederalCommunicationsCommission RadioFr uencyInterference %tatement This equipment generates and uses radio frequency energy and if not installed and used properly, that is, in strict accordance with the manufacturer’s instructions, may cause interference to radio and television reception.
Table of Contents Chapter1 Setting Up Your Printer Locating the printer Check the carton contents Removing the printer cover Removing the packing tube Installing the ribbon cartridge Installing the interface board 1 Chapter2 Gettingto Know Your Printer Controls and parts of the printer Parts of the printer Controls and indicators Extra functions Other controls Selecting and loading paper Loading single sheets Loading sprocket-feed paper Adjusting the print head Testing the printer Connecting the printer
— Chapter3 Using the Printerwith Commercial 21 Software Using commercial software Word processing with the printer General concepts The escape code The master reset code Using Near Letter Quality (NLQ) Getting the most from your print choices Using the printer with EasyWriter II Redefining pitch settings and print control codes A sample printout with EasyWriter II Redefining your own print pitches Redefining your own print control keys Using the printer with WordStar User-defind print commands Using the p
Chapter5 Chapter6 55 FormattingText Lines and line spacing Starting a new line Reverse line feeds Changing the line spacing Moving down the page without a carriage return Page control Form feed Reverse form feed Changing the page length Top and bottom margins Setting left and right margins Horizontal and vertical tabs Horizontal tabs One-time horizontal tabs Vertical tabs Vertical tab channels Centering and aligning text SpecialFeaturesof the Printer 77 Nowhear this Resetting the printer Taking the printe
I Chapter7 DownloadCharactersand Dot Graphics Dot matrix printing Designing your own characters Defining proportional characters Designing your own NLQ characters User-designed Dot Graphics Higher resolution graphics More graphics programming tips Redefining alternate graphics codes 9-pin graphics mode Caringfor Your Printer Cleaning the printer Replacing the ribbon Replacing the print head Appendix A DIP Switch Settings Switch functions Appendix B ASCII Codes and Conversion Chart Chapter8 97 115 121 1
AppendixG Serial InterfaceSpecifications Configuring the serial interface The serial protocols Serial busy protocols XON/XOFF protocol ACK protocol Index 191 196
CHAPTER 1 SETTING UP YOUR PRINTER Subjectscoveredin Chapter 1 include– ● Choosinga suitableplace for your printer ● Unpacking . Settingup LOCATING THE PRINTER Give some thought to the best place to put the printer. Both the printer and computer should be used in normal office surroundings. For best performance, we recommend: ● ● ● ● ● ● Use the printer on a flat surface. Keep it out of direct sunlight and away from heatproducing appliances. Use it only in temperatures where you are comfortable.
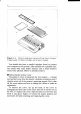
-–— 1 Figure 1-1. Checkto make sure you haveall four items: 1)printer, 2) paper guide, 3) ribbon cartridge, and 4) User’smanual. You should also have a parallel interface board to connect your computer to the printer. Also available are a parallel interface board with extra buffer memory and a serial interface board, both optional. (More on interfaces later.
I— 3 -1 r —~ I Figure 1-2. Remo;e the printer cover by lifting carefully. ■ Removing the packing tube The printer is shipped with a protective spiral tube to keep the print head from being damaged during shipping. This tube must be removed before use. First, take off the printer cover. The protective tube is split along its bottom side to allow easy removal. Grasp one end of the spiral tube and firmly pull it upward and away from the carriage rail. ~igure 1-3.
4 ■ Installing the ribbon cartridge This printer uses a neat, easy-to-change ribbon cartridge with automatic threading. To fit or change the ribbon cartridge: 1. 2. 3. 4. Turn o~~the power and remove the printer cover. Slide the print head gently to the center of the printer. Warning:The print head gets hot during operation, so let it cool off before you touch it. Set the release lever to either single sheet (~) or sprocket-feed paper (h).
!3 ~—-..-.–. ] , guide head print ibbon 1 L———....—. Figure 1-5. J To thread the ribbon, slide the print head carriage manually to the right or left, and the ribbon will slip down by itself into its proper position. 7. Replace the printer cover. (A switch on the printer prevents the printer from operating when the cover is off.) 9 Installing the interface board A parallel interface board comes standard with your printer.
6 I terface board ~ ~igure 1-6. Slidethe I/F board into the slot.
CHAPTER 2 GETTING TO KNOW YOUR PRINTER Subjects coveredin Chapter2 include– ● Partsof the printer —whatthey’re for andhow to use them . Paper selectionand loading . Adjustment ● Testing printeroperation CONTROLS AND PARTS OF THE PRINTER H Parts of the printer PRINTERCOVER – This protects the ribbon and the print head from dust and dirt, and cuts down the sound of the printer. ‘PAPER GUIDE – This flat plastic molding guide has two functions, depending on what kind of paper you are using.
8 1 I ! I Power switch Figu;e2-1. Front and rear views of the printer. _.J INTERFACE COVER – On the back of the printer, this cover conceals and protects the interface board. The cover is cut away to expose the external connector to which you attach your computer cable.
19 —— 9 Controls and indicators Now let’s go over the controls and indicators of the printer, starting with the control panel on the right. There are nine indicators and five keys on the control panel. ,,------ ! I I L.. . .—.–- Figure 2-2. .. .. The control .. .. ---- .. . .---- ..4 panel. POWER INDICATOR – Glows green when the power is on. PE INDICATOR – Stands for “Paper Empty”, and glows red when the printer runs out of paper and when certain printer malfunctions occur.
I 10 ■ Extra functions There are eleven more functions that are not directly specified on the control panel. You can access six of them by pressing one particular key when you turn on the power; five others are activated by pressing two control keys at once. For details, please refer to the end of next chapter. ■ Other controls There are other controls, not connected to the control panel.
11 h – The second setting is for normal single sheets. & – The third is for sprocket-feed paper. # – The bottom one is used when you want to release the paper completely to adjust it. The paper bail holds the paper against the platen according to ‘the setting of the release lever. The bail is opened when the release lever is in the top position, closed when the lever is in the second or third positions, and opened by the printer when the lever is in the bottom position. —. —.
1 ,> ‘1 Sliding adjuster Paper guide Sheet guide J Figure 2-4. Raise the paper guide for load~ngsin~lesheets. 3. Insert the guide stand in the notches provided for it and prop up the paper guide. 4. Position the adjuster at the triangle marked on the guide for standard margins, or set it according to your own requirements. 5. Set the release lever for single sheets – the second position from the top. 1 L Figure 2-5. the notches Prop up the paper guide by inserting provided for it.
13 6. 7. 8. 9. Align a sheet of paper on the guide along the adjuster. Turn on the power switch. (The Paper Empty indicator will glow because there is no paper.) Now set the release lever to the auto-feed setting – the top position. The printer will advance the paper automatically. When the paper stops, set the release lever for single sheets again. ~---- ! ~ Figure 2-6. Youcan insert a sheet of paper automaticallyby using the release lever.
— 14 1. 2. 3. 4. Turn on the printer and set the release lever for sprocket-feed paper. If the paper guide is installed, remove it, and put it aside for a moment. Place a stack of fan-fold paper behind the printer. Open the sprocket covers, on the right and left sprocket units, as shown in Figure 2-7. r- 1 L. Figure 2-7. Openthe sprocketcoversto exposethe sprocketteeth. Flip the clamp levers backward.
I— 15 ~–—- L “--““1 ——... —-—– Figure 2-8. Closethe sprocketcoverswhenthe paper is positioned correctly. L.—— —--- Figure 2-91 Readyto loadthe sprocket-feedpaper. Notethe rever~ ed positionof the paper guide.
16 ADJUSTING THE PRINT HEAD The distance between the print head and the platen must be adjusted to accommodate papers of different thicknesses. To make this adjustment, move the adjustment lever, which is under the printer cover and immediately in front of the release Release lever \ $ Adjustment lever \4 0 -“ -— Figure 2-10. & F — —. . . The adjustment lever allows for different The self-tests show you what the printer thicknesses of paper. Figure 2-11. can print.
17 lever (Figure 2-10). Pulling the adjustment lever towards you will. wicle~ tkie gap; pushing it away from you will narrow the ,--.--,$l. ,%a. ‘~~ere are four positions; you can feel the lever clicking into the various notches. The first step (shown) is the one most com- mordy used for single sheets of paper. Try different positions until you get the best printing results.
18 You can print the self-test without hooking up the printer to your computer. Simply: 1. Plug in the printer (don’t turn it on yet). 2. Insert a sheet of paper (or sprocket paper, either one). ‘3. While holding down one of the following keys, turn on the power switch: Paper Feed key – Self-test 1 (long) On Line key – Self-test 2 (short) When you want to terminate the long self-test function, turn off the power switch.
19 1. 2. 3. Make sure that both your computer and printer are turned off. Connect the printer end of the interface cable to the connector socket at the right rear of the printer as shown in Figure 2-12. Connect the other end of the cable to your computer as described in the computer manual.
I — 20 MEMO
CHAPTER 3 USING THE PRINTER WITH COMMERCIAL SOFTWARE Subjects covered in Chapter3 include– ● Using commercialsoftware ● Controllingthe printer with the Panel mode USING COMMERCIAL SOFTWARE Many of you purchased this printer to use with commercial software. You made a good choice because this printer is compatible with most commercial programs, from word processing programs to spreadsheet programs to accounting programs. Many of these programs have a routine for describing your printer.
22 With these questions answered, you are ready to start printing. Read the manual that came with your commercial software and the next Chapter to see how to make it send information for this printer to print. This is all you need to know to use this printer as a regular printer. But this printer isn’t just a regular printer. This printer has many capabilities that your commercial software isn’t aware of.
23 standard text entry mode in order to accept the special printer function codes. WordStar uses the CONTROL key in different ways to define the print function codes. EasyWriter II has a system function which allows you to define print pitches and special print functions for use with the ALT key. Your word processing User Manual (if it supports this process)will have a section describing how to get out of the standard program. You will probably have to figure out on your own which codes are used.
24 values defined by their respective DIP switch settings. We suggest you get in the habit of using the master reset code in any document where you use function codes. If you do not, the printer will keep the most recently defined characteristics, and print any following documents the same way. YOUcould turn your printer off each time (which also resets the default settings) but that would be hard on the printer circuits.
25 USING THE PRINTER WITH EASYWRITER II (Note: If you have not read the “General Concepts” section in this chapter, you should do so before continuing.) This printer can be used with most of the standard print functions available with your EasyWriter II word processing program. These functions require no special adjustments to the printer or your program. They include: 1. Printing from the Print List Form screen. 2. Setting margins, tabs and lines per inch in the ruler line of your document.
EasyWriter II program. Before making any changes in the printer driver, you should first check to be sure the printer selection is set for printer Type B (Option 7 on the System Functions menu.) Then follow the instructions in Appendix B of your EasyWriter II User’s Manual to reconfigure Type B printers. To become more familiar with the reconfiguration process and its terms and to make the instructions in this section easier to understand, we suggest you read through Appendix B first.
27 17. 18. 19. 20. 21. 22. 23. 24. 25. 26. [10 ] [10] [12 ] (17 ] [1 ] [2 ] [3 ] [120] [120] [120] [12 ] [17 ] [1 ] [10 ] [3 ] [120] [120] [120] [120] [120] [ [ [ [ [ [ 18 27 18 27 15 27 120 27 120 27 64 80 77 1 0 [ [ [ Thecodes 120inlines 23through 26canbe changedtoreflect more pitch settings. We recommend that until you are more familiar with using special function codes, you usejust the six we have defined. When you have finished, press RETURN.
— 28 print function assigned to each control key. Table 3-1 shows the current control function, the print function we will assign to it and the keyboard keys used.
129 ample below shows the use of expanded and italic prints used in combination with condensed and pica pitch settings. Use your EasyWriter II program hands-on and type the example below. ‘SUBJECT : ORDERING STATIONERYSUPPLIES I would like to place an order for stationery supplies from your mail order catalog.Enclosed is my order form and a check for $247.67.Please process this order as soon as possible.Thank you.
I 30 example; you should be able to apply most of the function codes to the setup used here. ■ Redefining your own print pitches If you want to define a new print pitch (Edit Pitch Table), enter your function code to choose the print you want. For example, if you find yourself frequently using italic print for large blocks of text in pica pitch, you can combine italic and pica pitch to define italic pica and use it in the ruler line of your document.
31 4. Select and print variable information for merge letters, etc. ■ User-defined print commands There are several CONTROL-P (-P) commands that ‘automatically work with this printer and require no changes. They include: ‘PB Boldface ‘PS Underscore ‘PX Strikeout ‘PD Double-strike ‘PV Subscript IPT Superscript PC Print Pause It is also possible to define the ‘PA (alternate pitch) command to change the print pitch of your document. The WordStar User’s Manual fully describes the use of these ‘P functions.
I If you do change several of the things listed in the /Print menu, Lotus 1-2-3 will remember the selections that you have made and use them each time you print the spreadsheet. They are even saved with the spreadsheet so that they will be the same the next time that you use the spreadsheet. You can specify the range to print in all the normal ways: by pointing, by typing the cell addresses of the endpoints, by entering a range name, or by using the F3 key to point to a range name.
33 with the date to the left, a title in the center, and a page number to the right, the header might look like this: And, on August 12, 1986, the results might look like this: 12-.41J13-86 Spreadsheet. Tit le Page 1 Another of the selections under options is Setup. This selection allows you to create a setup string that will be sent to the printer before each section of the spreadsheet is printed.
— 34 Selection of any of the Panel Modes at power-on ensures that your choices remain in effect until you turn the power off. This means that the printer will ignore any codes sent by the software that you are using. The Panel Modes allow selection of the following printing attributes: Key Mode Print pitch TOF Type Print Print Italic I I L=-..-...
I— 35 More than one attribute may be set in this way. For example, if you wish to set both print pitch and print quality, press BOTH the PRINT PITCH and MODE keys when turning on the power, and after the ON LINE indicator glows, make further selections as necessary. ADVANCED PANEL FUNCTIONS The printer has the capability to do some basic formatting from the control panel, as well as move the platen by precise amounts. The following formatting and platen movements may be performed from the control panel.
1. 2. 3. Set the Off Line mode by pressing the On Line key. While holding down the On Line key, press oneof the following keys. Paper Feed key – Forward micro-feed TOF key – Reverse micro-feed When you can set the print start position, release the Paper Feed key or the TOF key first, then release the On Line key. ■ Setting the top of form When you turn on the printer, the top of form is automatically set to the current position.
CHAPTER 4 PRINTINGWITH BASIC Subjects covered in Chapter4 include– ● Listing BASIC programs on the printer ● How a program prints things ● Controlcodes, escapecodes,andcommandsyntax ● Selectingthe right software mode ● Near letter quality (NLQ) characters ● Fixed and proportionalcharacterspacing ● Specialprinting– Printingin italics Underlining Superscriptsand subscripts Boldface and emphasizedtext Mixing print modes To show you how to control your printer from a program, we have chosen BASIC because it is
38 easiest operations one can do, but even they may depend on what computer you have. In Microsoft BASIC, we can list all the steps in a program by entering LIST. This lists them on the CRT screen; if we want to print them on a printer, we prefix the command with an L (enter LLIST). Th’eMicrosoft BASIC command for outputting information is PRINT. Like the LIST command, this displays the information on the CRT screen so we have to add an L (+ LPRINT) if we want to use the printer.
39 Taken together, these numbers and their meanings make up the ASCII code (pronounced ask-key), which stands for the American Standard Codefor Information Interchange. There are ASCII codes for all the letters of the alphabet (upper case and lower case), Oto 9, most punctuation marks, and some (but not all) of the functions of the printer. There are a number of different ways to represent an ASCII code, depending on how you are using it.
40 That’s the printer’s bell (we call it that even though it sounds like a buzzer). We’ll learn more about it in later – we just wanted to show you a control code that would get your attention right away! There are four common ways of referring to a control code: the name of the code or its abbreviation, the decimal ASCII value, the hexadecimal ASCII value, and the “CTRL-” value. For example, the ASCII code that causes the printer to advance the paper one line is decimal 10.
141 numbers is called an escape sequence. ■ A note on command syntax Because the readers of this manual will be running such a wide variety of applications on so many different computers, we can’t show the exact way of sending codes to the printer for each one of them. Instead, as we introduce you to each new command, we will show the commands as in this example: (ESC) “W” 1 This command turns on expanded printing. (ESC), as we mentioned earlier, is the escape code (which is ASCII code 27).
42 must make sure that you’ve set the DIP switches properly. The rest of this manual discuss the various control codes to control this printer. You’ll find that many features have different codes for either the Standard mode or the IBM mode. The Standard Mode emulates the Epson FX-85 printer. The IBM’Mode emulates the IBM Graphics printer. You can select one of these modes by setting DIP switch 2-5. (For details, please refer to Appendix A.
switch while holding the Mode key down on the control panel, set the NLQ mode with the Mode key while in the Off Line mode. Then run the program again. You should get like this: This This 1 i ne shows 1ine shows NEAR LETTER QUALITY! standard print . As you can see, now the printout only contains NLQ characters. This is because we set the printer to the “Print Quality Panel” mode at power on, so the printer ignored the control codes to set or cancel NLQ characters.
AA Here is what you should get: In this program, line 20 turns italic on with (ESC) “4”, and line 40 turns italic off with (ESC) “5”. Now, set the “Italic Panel” mode, as described in Chapter 3, then run the program again. You should get like this: As you can see, this time the printer ignored the control codes to set or cancel italic characters. H Underlining Not only can your printer print all styles of printing in both reman and italic, but it can underline them too.
45 In this program underline is turned on in line 20 with (ESC) << –“ 1, and then off in line 40 with (ESC) “-” O.There’s a new aspect to this program, though. The semicolons at the end of the first three lines told BASIC that those lines were to be continued. Therefore, BASIC didn’t send a carriage return and line feed at the end of those lines. We just did this to illustrate that all these control codes can be used in the middle of a line. It’s easy to underline or italicize only part of a line.
— 46 Here line 30 turns on superscripts with (ESC) “S” O.It’s turned off in line 50 with (ESC) “T”. Then between printing text, subscripts are turned on in line 70 with (ESC) “S” 1, and finally off in line 90. Again, everything prints on one line because of the semicolons. CHANGING THE PRINT PITCH In “printer talk,” the number of characters that can be printed in one inch is called the print pitch or character pitch.
147 the line at 12 characters per inch. The (ESC) “P” in line 40 resets the printer to pica pitch and line 50 prints the line in pica pitch. ~ Expanded print Each of the print pitches can be enlarged to twice its normal width. This is called expanded print. Try this program to see how it works: 10 ‘ Demo of expanded print. 20 LPRINT “DemorIstrat ion of “; 30 LPRINTCHR$(14) ; 40 LPRINT “EXPANDED”; 50 LFRINTCHR$(20) ; 60 LPRINT “ print ing.
48 Now the results look like this: When you turn on expanded print with (ESC) “W” 1 it stays on until you turn it off with (ESC) “W” O. Table 4-6 Expanded print commands Function Control code Oneline expandedON Oneline expandedOFF ExpandedON ExpandedOFF CHR$(14)or (ESC)CHR$(14) CHR$(20) (ESC) “W” 1 (ESC) “W” O ■ Condensed print Each of the print pitches also can be condensed to its normal width. This is called condensed print.
49 Table 4-7 Condensed print commands Function Control code CondensedON CondensedOFF CHR$(15)or (ESC) CHR$(15) CHR$(18) By combining expanded print and condensed print with the two pitches, this printer has eight different character widths available. Enter this program to see how the print pitches, expanded print and condensed print can be combined: 10 ‘ Demo of various print pitches CHR$(15); 20 LPRINT 30 LPRINT CHR$(27);’’MW; 40 LPRINT “This line is CONDENSED ELITE pitch.
50 ■ Proportional printing Have you ever looked closely at the printingin books and magazines? Doesn’t it look nice? The main reason is that each character is givenan amount of space proportional to its actual width. A typewriter (and most printers), on the other hand, give every character the same amount of space, no matter how wide it is. (Pica pitch, for example, gives a “w” and an “i” 1/10 of an inch each. Looking at these letters you see that a “w” is two or three times as wide as an “i”.
51 When you run this program you should get this: Line 20 selects the elite pitch and line 40 turns on the proportional printing with (ESC) “p” 1. Line 50 prints a line with proportional elite pitch. Then, line 60 selects the pica pitch, so that line 70 prints a line with proportional pica pitch. Finally, line 80 resets the proportional printing and line 90 prints a line in normal pica pitch.
— 52 10 ‘ Demoof boldface and emphasized 20 LPRINTCHR$(27);’’G”; 30 LPRINT“This line is BOLDFACE printing.” 40 LPRINTCHR$(27);’’E”; 50 LPRINT “This line is BOLDFACE and EMPHASIZED.” 60 LPRINTCHR$(27);’’H”; 70 LPRINT “This line is EMPHASIZED printing.” 80 LPRINTCHR$(27);’’F”; 90 LPRINT “This line is normal printing.” 100 END Run this program. The results will look like this: Line 20 turns onboldfacewith (ESC)’’G’’ and line 3Oprints a line oftext. In line40emphasized is turned onwith(ESC) ’’E”.
I— Here, the value of n defines the print style to be selected. The value of n can range from Oto 255, which is the range of values that can be stored in one eight-bit byte. If you look at each bit in this byte, you’ll find that each one represents a printing style variation. Adding the binary values of the selected bits gives the value of n for a particular combination of print styles. Table 4-10 shows the decimal values of the bits in the Master Print byte.
Summa-y notes 1) Pica is the default pitch and is active when Elite is turned off. 2) When two modes conflict, the one of lesser priority bitwise is cancelled. For example, Condensed and Emphasized can not be printed at the same time, printing is Emphasized. 3) Elite cancels Emphasized. 4) Underline, Expanded and Italics modes combine with any print modes. 5) Emphasized will not mix with Elite or Condensed.
CHAPTER 5 FORMATTING TEXT Subjects coveredin Chapter5 include– ● Q c . . ● ● The carriage return and line feed The amount of space between lines Moving to the next page The number of lines on a printed page Horizontal and vertical tabs Setting margins — left, right, top and bottom Centering and aligning Chapter 4 showed us the basic techniques for using the printer. Now we’re ready for the more advanced ones. We’ll concentrate on changing the appearance of the page to suit our needs.
56 Line feed is more complicated. Each time the printer receives a CHR$(1O)it both advances the paper one line and returns the print head to the left margin, ready to start a new line. Now to add a ittle confusion – most (but not all) versions of BASIC add a line feed (CHR$(1O))to every carriage return ‘(CHR$(13))they receive. If your version of BASIC doesn’t do this, then you should turn DIP switch 1-8 off so that your printer will add the line feed for you.
1 57 NEW 10 ‘ Demo of line spacing 20 30 40 50 60 70 FOR 1=1 TO 25 IF 1=13 THEN 60 LPRINT CHR$(27);’’A’’;CHR$(I) ; LPRINT “THIS LINE SPACING IS SET TO”;I NEXT I LPRINT “LINE SPACING IS SET TO 1/6 INCH (NORMAL).” 80 LPRINT CHR$(27);”2” 90 END This is whatyouwill.
Line 40 changes the line spacing. The command (ESC) “A” CHR$(n) changes the line spacing to n/72 of an inch. The loop that is started in line 20 increases the value of n (the variable I in this program) each time it is executed. So the line spacing increases as the program continues. Line 30 just shortcuts the loop’when I = 13, since BASIC won’t let us send CHR$(13) without adding an unwanted CHR$(1O)to it. Finally, the (ESC) “2” in line 80 resets the line spacing to 6 lines per inch.
.:,. II 59 +m . ..;. -,.+ , ..; . “,. : :?. .:..., ,. ,.::! -. .,” ,,, ..,, . . ,. ,,, ., ..- , “’\ .., “. ,,2 .,., w: ..,7 ..., . ! L,.:[ I’dli. 1..., :[ i.1~ $[::,(+(: ( INLIFIPIAL...) . The program works just the same as before, but the line spacings are just one-third what they were. This is because (ESC) “3” CHR$(n) sets the line spacing to n/216 inch. Table 5-2 shows all the line spacing commands, including several “shortcut” commands for commonly used line spacings.
60 30 LPRINT “LINE NUMBER 2.“; 40 ‘ One-time line feed !50LPRINT CHR$(27);“J”;CHR$(1O(J ); 60 LPRlNT “LINE NUMBER s .“ 70 LPRINT “L1NE NUMBER 4.“ 80 END Here is what your printer will produce: The (ESC) “J”CHR$(1OO)in line 50 changes the spacing to 100/216 inches for one line only without moving the printhead. The rest of the lines printed with the normal line spacing. Notice that both line 30 and line 50 end with semicolons. This prevents the normal line feed from occurring.
61 ■ Form feed The simplest forms control code is the@wz feed. Form feed (or (FF)) is CHR$(12) and causes the printer to move the paper to the top of the next sheet. Try it by changing lines 40 and 50 to this: ‘ form feed 50 LPRINT (;HR$ (Iz); 40 Before you run the program, turn your printer off and adjust the paper so that the top of the sheet is even with the top of the ribbon guide on the print head, then turn the printer back on. If you don’t remember how to do this, review Chapter 2.
62 Table 5-3 Form feed commands Function Control code AdvancepapertotopofnextpageCHR$(12) Reverse paper totopofcurrent page(ESC)CHR$(12) ■ Changing the page length You may have some computer forms that are not 11 inches high. That’s no problem, because you can tell your printer how high the forms are that you are using. There are two commands for doing this, shown in this table.
63 TOP AND BOTTOM MARGINS Some programs don’t keep track of where they are printing on the page. This causes problems when you get to the bottom of a page because these programs just keep on printing, right ‘over the perforation. This makes it very hard to read, especially if a line happens to fall right on the perforation. The printer has a solution to this predicament. This printer can keep track of the position on the page, and advance the paper so that you won’t print too near the perforation.
I 64 When you run this program it will print 150 lines right down the page and across the perforations. When it’s done line 110 sends a form feed to advance to the top of the next page. Now add the following lines to your program. (Don’t forget the semicolons or you won’t get quite the same results that we did.
I— 65 o —- -------0 —------ 0 TH19 THIS THIS Tkl 1S THIS THIS LINE LINE LINE 1.I NE L [NE 1-INE THIS IS LINE 1141S 1S LINE TFI1s IS L 1NE T 0 0 0 [ 1S IS 1S 1S IS IS 1 2 7 ‘1 5 6 7 8 7 0 ; THIS [ ;:;: IS ;: L I NE 50 ::;: :: . .
66 SETTING LEFT AND RIGHT MARGINS The left and right margins of this printer work just like a typewriter – once they are set all printing is done between them. You can set margins either by using the keys on the control panel, as described in Chapter 3, or by escape commands.
I 67 When you want to reset the margins to the default values, you have two choices. You can either turn the printer off and back on, or you can set margin values equal to the default values. This means that you should set a left margin of O and right margin of 136 in pica pitch. If you change the pitch of your printing after you set your margins, the margins will not change. They stay at the same place on the page.
68 15 LPRINT CHR$(27);“D”;CHR$(7);CHR$(14);CHR$(21): CHR$(O) (ESC) “D” is the command to begin setting horizontal tabs. It must be followed by characters representing the positions where you want the tabs set. In our program we are setting tabs in columns 7, 14, and 21. The final CHR$(0) ends the string of tabs. In fact, any character that is not greater than the previous one will stop setting tabs.
69 Table 5-8 one-time horzontal tabs Control code Function One-time horizontaltab of n (ESC) “f” OCHR$(n) spaces Absolutehorizontaltab Relativehorizontaltab (ESC) “$” CHR$(nl)CIIIl$(@ (ESC) “\” CHR$(nl)CHR$(n2) The first command in Table 5-8 moves the print head n columns to the right. It has the same effect as sending n spaces to the printer. The absolute horizontal tab command moves the print head to a specified position on the page.
Table 5-9 Units of motion for the absolute and relative horizontal tab commands Unit of motion AbsolutetabcommandRelativetabcommand 1/120inch 1/60inch Picapitch 1/144inch 1/72inch Elitepitch 1/204inch Condensedpicapitch 1/102inch 1/240inch Condensedelitepitch 1/120inch Print pitch Try this program to see how this works. 10 ‘ Demo of relative horizontal tabs 20 FOR 1=1 TO 3 30 LPRINT “Relative”; 40 LPRINT CHR$(27) ; “\”; CHR.$ ( I *20) ; CHR.$(0) : 50 J.
71 !j(’)LP~I.x’rCHR$(n); ’’SFXNND TAJ3.” (>ol.[)[
LPRINTCHR$(ll) ; “F’IFTHTAB.” Now when you run the program the first page looks just like before, but line 80 sends one more (VT) than there are tabs. This doesn’t confuse the printer – it advances the paper to the next tab position, which happens to be the first tab position on the next page. There’s a one-time vertical tab command that works just like the one-time horizontal tab command. Try this program to see how these commands work. 10 ‘ ~~~~ of p]”i I-it })(-).S it. i(Jrl::i NT “ * 1st Lin~.
73 Table 5-10 Vertical tab commands Function Control code Advancepaperto nexttab position CHR$(ll) (ESC) “B”CHR$(nl)CHR$(n2) ..... Set verticaltabs at nl, n2, etc. CHR$(0) Set verticaltabs every n lines (ESC) “e” 1 CHR$(n) (ESC) ‘’ 1 CHR$(n) One-timeverticaltab H Vertical tab channels Vertical tab channels are especially hefpful in two situations. The first occurs when you are writing a program to accompany a preprinted form that can accommodate verious types of responses.
74 130 140 150 160 LPRINTCHR$(12); NEXTI LPRINTCHR$(27);”@” END When you run this program the printout should look like this. rDF OF FORM 1ST T613 OF CH6NNEL TOF OF FIIFOI OF CHANNEL OF FOWI 1ST T(W3 OF CHGNNEL 3 2ND TAR 3 1 1ST T(AB OF CHANNEL 2ND TRB TOF 2 1 2ND TAB OF CH6NNEL I 2 OF CHANNEL Inthisprogram wesettabs atlOand 20inchannellin line 20. In line 30 we set tabs 15 and 25 in channel 2, and in line 40 we set tabs 17 and 28 in channel 3.
75 lm_- _.: -- Table 5-12 Alignment commands 1(=-- 4-.1 .--1 - . ....... 1 ,---, Try this program to see how easy it is. 10 ‘ Demo of a I igrl ing and centering 20 I.,PRINT CHR$(27) ; “1“ ;~:HR$ (20) ; 30 I,PRINT CHR.$ (27) ; “Q”;CHR$(60 ) ; 40 1.*PRI ?ir CHR.$ (27) ; “a”; CHW(0 ) ; 50 1.,PRINT “THIS LI NE IS LEF’T-–AL IGN~D.“ 60 LPRINT CHR$(2?) ; “A”;CHR$( ? ) : 70 LJ’RINT“TFiIS L,I NE I S CENTERED. “ 80 LPR1NT CilR.$(27) ; “A”;CHR$(2 ) ; !?(.)LIWINV“TH1S LINE I S RIGHT-.41. ICNED.
76 MEMO
CHAPTER 6 SPECIAL FEATURES OF THE PRINTER Subjects covered in Chapter6 inckde● Printer’s bell ● Master reset ● Uni-directionalprinting ● Internationalcharactersets ● PrintingBIG characters ● The optionalsheet feeder ● Macro instruction ● Readinga hex dump In the previous chapters we have learned about several groups of control codes. In this chapter we will look at more control codes.
i 78 mind the operator to change the paper or to make other adjustments to the printer. You can try this by typing: LPRINTCHR$(7) ■ Resetting the printer Up to now when we wanted to reset the printer to the power on condition we have had to either turn the printer off and on again, or to send the specific codes that reset the particular features. There is an easier way.
79 trol the paper-out detector, along with the other codes that we have just looked at are in the following table.
I 80 Here is what this program will print: The backspace codes in line 20 move the print head a total of three spaces to the left so that the first part of line 30 will overprint the word “NOT”. The delete codes in line 50 “erase” the three letters in the word “NOT” so that it doesn’t even print. In lrne 80, CHR$(24) deletes the words in line 70. The semicolon at the end of line 70 prevents a line feed from causing that line to print before the printer receives the CHR$(24) code.
81 20 A.$=’’”: INPIJT “ TYPEA CHARACTER “ ,A$ :~o IF A$=”” THENso 40 LPRINTA$; : GOTO20 50 LPRINT : LPRINTCHR$(27); “@” Now type several characters, and after each press the RETURN key. The printer simply puts the characters into its buffer while it waits for a carriage return code. (In this program the RETURN key doesn’t send a carriage return code.) To end this program and print the contents of the buffer, press RETURN alone. Now add this line: 10 LF’RINTCHR$(27); “ il” ; And RUN the program.
Th i This This This This This S added 10 spaces. line is added 8 spaces. line is line is added 6 spaces. line is added 4 spaces. line is added 2 spaces. line is Normal space. This command can be used to produce micro-justification, which is amethod ofjustifying linesby increasing the space between each character. ■ Uni-directional printing Uni-directional printing means printing inone direction on~. Your printer normally prints when the print head is movingin bothdirections.
83 Here is what you will get. The top line is printed bi-directionally, and the bottom is printed uni-directionally. You will have to look hard because there isn’t much difference, but the bottom vertical lines are perfectly aligned. I I 1 Let’s analyze the program. Line 20 defines the line spacing to 7/72 of an inch so that the characters that we print will touch top to bottom. Lines 30- 50 print 10 vertical line characters.
I 84 Table 6-3 Eighth bit controls Function Control code (ESC) “)” Turn the eighth bit ON (ESC) “=” Turn the eighth bit OFF Acceptthe eighth bit “as is” from ~Esc) “#,, the comrmter ■ Block graphics characters and special symbols Besides the upper and lower case letters and symbols that we are by now familiar with, your printer has a whole different set of characters that are for special uses.
1 85 Figure 6-1 shows what this program will print. If your chart doesn’t look like this because it has regular letters and numbers instead of the special symbols, then your computer is only using seven bits (unless you have set DIP switch 2-5 on by mistake). You can get the correct printout by changing line 100 to this: 1()(-ILPRINT I ; CHR$(27) ; “ >“ ; CHR$( I ) ;CHR$(27) ; “=”; (:;HR$(!)) ; r I I 1’ I I Figure 6-1.
86 So how are all of these characters used? Here is a program that demonstrate how the graphics characters can be combined to create a figure: the 5 of clubs.
187 Here is what this program prints: ............................. ~::. .-J +y+$ i’ $+ ,::,. ! .,.. ........... .................. ■ International character sets Your printer changes languages by changing 12 characters that are different in the different languages. These sets of characters are called internationalcharactersets —and there are 11 sets in all. The control codes to select the international character sets are given in Table 6-4. Table 6-4 International character set commands Country U.S.A.
88 Table 6-5 International character sets Country U.S.
89 That’s where the italic international characters have been stored. So the (ESC) “6” command without the (ESC) “R” gives you access to the international characters. The (ESC) “7” turns these characters back into control codes. The low-order control codes can also be defined, but not all of ‘them can be printed easily. The (ESC) “I” 1 command makes them printable, and the (ESC) “I” Oreturns them to normal.
90 Table 6-6 Control code area commands Function Control code Printablecode area expansion Controlcode area exDansion (ESC) “6” (ESC) “7” ■ Printing BIG characters You can even enlarge your character sets for attention-grabbing headings or special effects. There are six commands you can use. Everything following any of them will be enlarged as shown below, until the cancel code is entered.
91 90 LPRINT CHR$(27) ; “h” ;cHR$(2) ; 100 LPRIN’1’ “QUAD”; 110 LPRINT CHR$(27) ; “h” ;CHR$(0) ; 120 LPRINT “ SIZED PRINTING.V 130 END When you run this program, you will get like this: As you can see, when the big character command is used, the baseline for each character does not align.
H The optional sheet feeder The automatic sheet feeder is a handy option that feeds single cut sheets automatically. Work done on cut sheets looks better that done on computer paper, and you don’t have to tear the “perforations” off each sheet as you must with fan-fold paper. The automatic sheet feeder feeds a new sheet automatically every time the printer receives or generates a form feed. Any time you wish, you can turn the auto-feed unit on and off by using control codes.
93 Here is how the printer’s macro works. You dejlne a macro by telling the printer what normal control codes are to be included in the macro. Then you can use the macro any time that you want and the printer will do all the things that you included in the macro definition. You can include up to 16 codes in a single ‘macro. You can even use the macro to store a frequently used word or phrase. There are two control codes for the macro: one to define it, and one to use it. They are given in the Table 6-9.
I This program will print one line using several printing features. Then it “calls” the macro in line 60. When line 80 prints the style is “plain vanilla” because the macro has reset it.
95 m 01 (02 03 04 05 (06 07 10 11 12 13 14 15 16 17 20 21 21 23 24 25 26 27 .130 31 40 41 50 51 .50 b 1 32 42 52 42 x 43 53 6; :4 44 54 64 3s 45 55 b~ 56 46 36 6.$ 37 47 57 67 70 so 90 71 El ?1 ~~ 82 72 75 85 ?3 74 84 94 75 as ?s 76 77 66 S7 ’96 97 ‘ !40 Bu co DO EO Fu OD 61 B1 c1 D1 El F1 OA (+2 B2 C2 D2 E: F2 /4? BZ C3 DZ E3 F3 134 B4 C4 D4 E4 F4 (as B5 C5 D5 E5 F5 Ab B6 C.6 D6 E6 F6 67 B7 C7 D7 E7 F7 OR 18 28 3E 48 5B 60 09 19 29 39 49 59 b9 OA 1.4 29 3.
96 MEMO
CHAPTER 7 DOWNLOAD CHARACTERS AND DOT GRAPHICS Subjects coveredin Chapter7 include– ● Designingand printingyour own characters ● User-designedgraphics Using the procedures outlined so far, all of the printer’s standard functions can be utilized. There are two additional user-defined functions available: designing and printing your own characters, and designing and printing your own dot graphics. These two functions can be used to design and print any symbol, or any graphic shape.
98 For example, if the data representing “l” was sent to the print head, only the bottom pin would fire; if “2” was sent, only the second pin from the bottom would fire, and if “3” was sent, the two bottom pins would fire, and so on. Columns of these dots side by side make all the characters. o 0 0 0 0 0 ~ ●000 ● 0 ● ●000 ● ● ● ● ● 0 ● ● 0 ● :000 ●000 ●000 * ‘0000 ●00, ● ● Figure 7-1. As the print head moves across the page, each of the pin~prints a row of dots.
99 ● ● ● The minimum width of a character is five dots. Unlike standard characters that are restricted to a height of seven dots, user-defined characters may use eight dots vertically. Dots cannot overlap – that is, you may not have a dot inside a box next to one that is on a line. You may define any position in the ASCII table, except the block graphics area when you are downloading in the IBM mode. — r ● 1. !—— Figure 7-2. of the grid.
100 128 ASCII Code 64 Descent~er 32 Start column End column I 16 M 8 = Descender ● 128 + (Slarl , 161 L End 4 2 1 I ~ Total m, m,, m, m, m. m. m. m. m, m, m I Figure 7-3. Use this grid (or one similar to it) to define your own draft characters. —._.––——---1?8 ●l 64 ●1 . ASCII CC& Descender 32 , , 1 Slarl columr) End column I 16 8 M I 1 T = Descender . 128 * (Starl ● 161 + End 1 4 2 .1 ~ , I Total ?i+i@& m, m, m, m. m. m.
101 You will see the letters ml, m2, nz3 etc., are above your values. When you define the character, you will substitute your value for each of these letters. Before you complete the definition, you will need to decide exactly where in the standard ASCII set you want to place your ‘characters. After downloading, you access your new character by sending the code for the character you replaced. For example, we decided to assign our flask to the “(” character.
I 102 CHR$(27);CHR$(38);CHR$(0);CHR$(60);CHR$(6O);CHR$(139) ;CHR$(2);CHR$(5);CHR$(8);CHR$(24l); CHR$(O);CHR$(O) ;CHR$(241);CHR$(8);CHR$(5);CHR$(2);CHR$(0) Put this command into the appropriate syntax for the language you are using. Before you run the program and send the data to the printer, remember to check that DIP switch 2-1 is set to off. The last requirement is the command to make the printer use the downloaded characters stored in RAM instead of the standard character set stored in ROM.
I 103 10 LPRINT CHR$(27) ; “ : “’; CHR$(O) ; CHR$(O) ; CHR$(O) ; 20 LPRINT CHR$(27) ; “&”; CHR$(O) ; CHR$(60) ; CHR.$(6Z ) ; 30 40 50 60 FOR N=60 TO 62 FOR M=OTO 11 READMM LPRINT CHRS(MM); 70 NEXT M 80 NEXT ?-i 90 LPRINT 2, 5, 100 DATA 139, 8, 8,241, 0, 0,241, 2, 0 2, 4, 64, 36, 16, 0, 66, 11.() DATA 139,124, 12, 0 0, 48, 0, 48, 2, 60, 12[1 DATA 139, 46, 16, 48, 0 130 LPRINT CHR$(27) ;’’D’’;CHR$(11) ;CHR$(0) ; 140 LPRINT CHR$(27) ;’’h’’;CHR$(l) U.S.
., 104 430 LPR1NT CHii$(27) ; “%0” 440 I-,FRIN’r (;tih+$(27); “so’”; 4!50 LPRINr CHR.$ (9) ; “MILLIONS OF DOLLARS” 460 LPRINT CHR$(27) ; “T’” 470 END DEFINING PROPORTIONAL CHARACTERS Defining proportional characters uses the same process as above, except that we add additional information. Being able to specify the width of the character allows you to specify the precise area inside the grid that the character will occupy, so that narrow characters will look attractive next to wide ones.
1. 105 reason, NLQ characters can contain up to 23 dots in the horizon- tal direction. Fundamentally, the process to define and print downloaded NLQ characters is the same as for draft characters, except that you must supply about four times as much character data, and ‘you must design the character with the two passes of the print head in mind. There are small differences in the way the attribute information is processed also.
I 106 To make the character data easier to calculate, put the first pass dots inside the boxes on the grid when you are designing your characters, and the second pass dots on the lines. Remember that adjacent dots may not overlap on the same pass; in other words, if one dot is in a box, its adjacent dot on the same pass’ may not be on a line. Therefore, to make smooth characters, put the dots needed to overlap any spaces in a character in the appropriate places in the second pass grid.
I 107 To demonstrate how to use the NLQ download characters, try this program. 1.0 LPR1NT CHR$(27) ; “xl”; 20 LF’RINT CHR$(27) ; “ : “ ; (;HR$( o ) ; CHR$(O) ; CHR$(0) ; 30 LPRINT CHR$(27);“&”:CHR$(0);CHR$(60) ;CHR$(62) ; 40 FOR N=60 TO 62 50 FOR M=OTO 46 60 READ MM 70 LPRINT CHR$(MM); 80 NEXT M 90 NEXT N 100 LPRINT 1,240, 1, 110 DATA 128, 0, 0, 2, 4, 1, 8, 0, 1 1~0 DATA 0, 1, 0, 1.240, 1, 8, 1, 4, 2, 0, 0 0, 16,224, 0, 0, 130 DATA O, 0, 4, 2. 8, 0, 0 2, 4, 0, 140 D.4TA 0, 0, 0,224. 16, 0.
310 NEXT I 320 LPRINT 330 LPR1NT “CHEMICALS”;CHR$(9 ) ; 34~ FOR 1=.4 T() 8.7 STEP .4 350 LPRINT CHR$(60) ; 360 .NEXTI 370 380 390 400 410 420 430 440 450 460 470 480 490 500 510 520 530 540 550 560 570 LPRINT LPRINT “GUNS’ ’; CHR$(9) ; FOR 1=.4 TO 1.4 STEP .
109 with the standard resolution of 60 dots per inch (dpi). The command to print normal density (60 dpi horizontally, 72 dpi vertically) uses this format: (ESC) “*” CHR$(0) YZ~7z2ml mz ..... (ESC) “*” specifies the graphics mode, the CHR$(0) specifies normal density. Other densities are described later. Any number of graphics data may follow; the nl and n2 specify the number of bytes. To figure the value of nl and n2, you need to work out how wide your image will be.
110 eight rows. Draw your graphics shape, and then calculate the values of each vertical column of eight dots; each value becomes one data byte. When drawing large shapes, the data byte CHR$(255) (all pins firing, or a solid block of dots) is common. A line spacing of 8/72 inch (using the (ESC) “A” CHR$(n), where n=8), will ensure that successive rows of dots will join perfectly. HIGHER RESOLUTION GRAPHICS There are seven graphics modes you can use; they are summarized in Table 7-2.
111 Table 7-3 Alternative graphics commands Density Noraml Individual command Single command (ESC)”*” CHR$(0)nl n2 (E7CJC)<’K” Z1n2 ml m2 ... ml m2 ... Double (ESC)”*” CHR$(l) %1nz (ESC)< nl YZ2 ml WZ2 ... ml m2 ... Doublewith (ESC)”*” CHR$(2)nl n2 (ESC>’’~,,~~ ~z m] mz ... double-speedml m2 ... Quadruple ::s:;’:” CHR$(3)nl %2 (ESC)’”Z”nl nz ml mz ... CRT (ESC)’’~;’CHR$(4)nl n2 none ml m2 ... Plotter (ESC)”*” CHR$(5)nl n2 *one ml m2 ... CRT type II ”*”CHR$(6)nl n.2 none ml m2 ...
112 The first occurs if you have written a program to be printed in one graphics mode and now want to print it in another. If you have used concatenation to store your graphics command in one short character string, that will not be difficult. You can simply change the mode number or alternate code in the definition of the character string. A second time you can make good use of the redefining code occurs when you want to change a program in which you have not concatenated the graphics codes.
113 In addition, you can select the print density by the value of nO. When nOis Othe normal density is selcted, and when nOis 1 the double density is selected. Since computers are faster than printers, there is no significant time loss in printing a single line of graphics with 9 pins. You get 9 dots per line in about the same time as you get 8 dots in the other graphics modes.
114 MEMO
CHAPTER 8 CARING FOR YOUR PRINTER Subjectscovered in Chapter8 include– . Cleaningthe printer . Changingthe ribbon c Replacingthe print head Dust and heat will make any mechanism wear more quickly. so the first step in any The best maintenance is preventive, maintenance program is correct location of the printer. This is covered in greater detail in Chapter 1, but in general a normal office environment is best for both the computer and the printer.
116 Changing the whole cartridge is the simplest method, and because you don’t need to touch the ribbon itself, it is the cleanest way too. To remove the old cartridge, remove the printer cover, grasp the ribbon cartridge with both hands, and pull straight up gently until the holder springs release. To fit the new cartridge, refer to Chapter 1, Installing the ribbon cartridge. A more economical method is to only replace the ribbon itself.
117 — r Idler I I —. Figure 8-2. 4. 5. 6. 7. 8. Replacethe ribbon sub-cassette. Take the new ribbon and holder out of the wrapper, remove the adhesive tape on the joint on the holder, and place it into the cassette as shown in Figure 8-2. Pull sufficient ribbon out of the holder, and thread it as shown in Figure 8-3. Be careful that the half-twist in the ribbon is positioned in the right-hand section of the ribbon cartridge, between the two guide posts.
L Figure 8-3. Make sure that the ribbon is not twisted when you thread it through its path. REPLACINGTHE PRINT HEAD The dot matrix print head has an extremely long life, around 100,000,000 characters, or years of normal use. However, when printing is too light even after replacing the ribbon, you’ll know that the print head has reached the end of its service life. Turn off the power, unplug the power cord, and use the following procedure to replace the print head.
119 Pri able orcover Figure 8-4. 3. 4. 5. 6. Replacementof the print head. 1 Hold back the tab that locks the print head into place, and remove the print head. Making sure that the new print head is facing the correct direction, carefully plug the cable into the connector on the head cable board. Make sure that this connection is secure, and that the cable is inserted far enough into the connector. Replace the connector cover, and feed the cable under the support tab on the top of the cover.
120 MEMO
APPENDIX A DIP SWITCH SETTINGS The DIP (Dual In-line Package) switches control many of the functions of the printer. A DIP switch contains a number of small switches, and in this printer, one DIP switch has 10 individual switches and the another has 6 individual switches. Both DIP switches are easily accessible from the top of the printer. Remove the ribbon cartridge, and you will see the two DIP switches underneath a sheet of protective plastic film, which you fold back for access.
122 CAUTION: Never change the setting of any of the DIP switches when the power is on. The printer only reads the DIP switch settings at the moment the power is turned on. Turn off power to both the computer and the printer when changing settings, and turn on again to use the new settings. Table A-1 shows a summary of DIP switch functions.
123 1-2 1-3 1-4 1-5 1-6 1-7 1-8 2-1 This switch selects the default character style. If this switch is on the default character style is normal draft characters. If this switch is off the default character style is Near Letter Quality (NLQ) characters. This switch is set on at the factory. This switch selects the print style of zeroes. If this switch is on, normal zeroes are printed. If this switch is off, slashed zeroes are printed. This switch is set on at the factory.
124 enable and the print buffer is set to a one line buffer. This switch is set on at the factory. 2-2--2-4 These switches determine the default international character set, as shown in Table A-2. These switches are all set on at the factory. Table A-2 International character sets England Denmark SwedenItaly Spain SwitchU.S.A. France Germany 2-2 OFF ON OFF ON OFF ON OFF ON 2-3 2-4 2-5 ON ON ON ON OFF ON OFF ON ON OFF ON OFF OFF OFF OFF OFF This switch selects the active control codes.
APPENDIX B ASCII CODESAND CONVERSIONCHART StandardASCII Codes Control DecimalHex.
126 Standard ASCII Codes Decimal Hexadecimal Binary 0010 0001 21 33 0010 0010 22 34 35 23 36, 37 24 0010 0011 0010 0100 25 0010 0101 38 26 0010 0110 39 40 41 27 29 0010 0111 0010 1000 0010 1001 42 2A 0010 1010 43 2B 44 45 2C 0010 loll 0010 1100 0010 1101 46 47 48 49 50 51 52 53 54 55 56 57 58 59 60 61 62 28 2D 2E 2F 30 31 32 33 34 35 0010 1110 0010 1111 0011 0000 0011 0001 0011 0010 0011 0011 0011 0100 0011 0101 36 0011 0110 37 38 0011 0111 0011 1000 0011 1001 39 3A 3B 3C 3D 3E
127 Standard ASCII Codes Decimal Hexadecimal Binary 77 4D 78 4E 0100 1110 79 4F 50 0100 1111 0101 0000 80 81 0100 1101 51 0101 0001 82 52 0101 0010 83 84 53 54 0101 0011 0101 0100 85 86 55 56 0101 0101 0101 0110 87 57 88 89 58 59 0101 0111 0101 1000 0101 1001 90 5A 0101 1010 91 92 5B 5C 0101 loll 0101 1100 93 5D 94 5E 5F 60 61 62 63 0101 1101 0101 1110 95 96 97 98 99 100 64 101 102 65 66 103 67 104 105 68 69 106 6A 107 6B 108 109 6C 6D 110 6E 111 112
I 128 Decimal 121 79 0111 1001 122 123 7A 7B 0111 1010 0111 loll 124 7C 0111 1100 125 7D 0111 1101 126 7E 0111 1110 127 128 7F 0111 1111 1000 0000 129 130 80 81 82 83 133 85 1000 0101 134 86 87 1000 0110 88 YYY z :“ 1’ { “~ “~ 1! , ~ ) ,,,, q, DEL 1000 0111 1000 1000 BEL BS 137 89 1000 1001 HT 138 139 8A 8B 1000 1010 LF VT 140 8C 8D 141 142 143 144 145 ! 146 147 148 149 150 151 152 153 154 155 156 157 158 159 8E 8F 90 91 92 93 94 1000 loll 1000 1100 CR 1000 1
129 Standard ASCII Codes Decimal Hexadecimal Binary 165 A5 1010 0101 166 A6 1010 0110 167 A7 A8 1010 0111 1010 1000 A9 168 169 170 AA 1010 1001 1010 1010 171 AB AC 1010 loll 1010 1100 AD 172 173 174 AE 1010 1101 1010 1110 175 176 AF BO 1010 1111 1o11 0000 177 B1 1o11 0001 178 B2 1o11 0010 179 B3 1o11 0011 180 B4 1o11 0100 181 B5 1011 0101 182 B6 1o11 0110 183 137 1o11 0111 184 B8 1o11 1000 185 B9 1o11 1001 186 BA 1o11 1010 187 BB 1o11 loll 188 BC
I 130 StandardASCII Codes Decimal Hexadecimal Binary 203 CB 1100 loll 204 cc 1100 1100 205 CD 1100 1101 206 CE 1100 1110 207 CF 1100 1111 208 DO 1101 0000 209 D1 1101 0001 210 D2 1101 0010 211 D3 1101 0011 212 D4 1101 0100 213 D5 1101 0101 214 D6 1101 0110 215 D7 1101 0111 216 D8 1101 1000 217 D9 1101 1001 218 DA 1101 1010 ~lg DB 1101 loll 220 DC 1101 1100 221 DD 1101 1101 222 DE 1101 1110 223 DF 1101 1111 224 Eo 1110 0000 225 EI 1110 00
131 Standard ASCIICodes Decimal Hexadecimal Binary 1111 0010 F2 242 F3 1111 0011 243 F4 1111 0100 24J 1111 0101 F5 24S F6 1111 0110 246 F7 1111 0111 24T F8 1111 1000 248 F9 1111 1001 249 FA 1111 1010 250 FB 1111 loll 251 FC 1111 1100 252 FD 1111 1101 253 FE 1111 1110 254 1111 1111 FF 255 . . ■ m.- . . . ● m’- .
132 MEMO
APPENDIX C FUNCTIONCODES The purpose of this Appendix is to provide a quick reference for the various functions available on this printer. Codes are described in the following format. PURPOSE CODE (decimal ASCII) (hex ASCII) REMARKS SEE Tells what the function code does. Control code mnemonic ASCII decimal equivalent Hexadecimal equivalent Briefly describes how the command is used. Tells where any additional details of the command may be found. Several commands require you to specify a value or values.
134 PURPOSE CODE (decimal ASCII) (hex ASCII) Cancels italic characters. (ESC) 27 IB “5” 53 35 REMARKS This command causes the printer to cancel italic printing and select the standard reman characters. This command is ignored when the “Italic Panel” mode is selected at power-on. SEE Chapter 4 PURPOSE Selects an international character set.
135 PURPOSE CODE (decimal ASCII) (hex ASCII) Selects character set #2. (ESC) 27 IB “6” 54 36 REMARKS This command selects character set #2 when the DIP switch 2-5 is set off. You can select character set #2 as the power-on default by turning DIP switch l-7 offwhile the DIPswitch2-5 issetoff. SEE Chapter6 PURPOSE Selects character set#l.
— 136 PURPOSE Selects NLQ characters. CODE (decimal ASCII) (hex ASCII) (ESC) 27 IB “ “ 1;0 78 1 1 01 REMARKS This command causes the printer to print near letter quality (NLQ) characters until the NLQ mode is cancelled. You can select NLQ characters as the power-on default by turning DIP switch 1-2 off. This command is ignored when the “Print Quality Panel” mode is selected at power-on. NOTE: The character “l” (decimal code 49, hexadecimal code 31) can be used instead of ASCII 1.
I .137 ■ Font Ditch controls PURPOSE Sets the print pitch to pica. CODE (decimal ASCII) (hex ASCII) (ESC) 27 IB “P” 80 50 REMARKS This command causes printing to be done in pica pitch, with 136 characters per line. You can select the pica pitch as the power-on default by turning DIP switch 1-1 on. This command is ignored when the “Print Pitch Panel” mode is selected at power-on. SEE Chapter 4 PURPOSE Sets the print pitch to elite.
138 p~TRposE CODE (decimal ASCII) (hex .ASCII) Sets the printer print. to condensed (S1) 15 OF REMARKS This command causes printing to be done in condensed pitch, with 233 characters per line for pica condensed, and 272 characters per line for elite condensed (NLQ characters are not printed in condensed pitch). You can select the pica condensed pitch with the control panel, but you cannot select the elite condensed pitch manually.
I 139 PURPOSE CODE (decimal ASCII) (hex ASCII) Sets the printer to proportional print. (ESC) 27 IB “ “ 1;2 70 1 1 01 REMARKS This command causes all subsequent characters to be printed with proportional spacing until proportional printing is cancelled. This command is ignored when the “Print Pitch Panel” mode is selected at power-on. NOTE: The character “l” (decimal code 49, hexadecimal code 31) can be used instead of ASCII 1. SEE Chapter 4 PURPOSE Cancels proportional print.
140 PURPOSE CODE (decimal ASCII) (hex ASCII) Sets the printer to expanded print. (ESC) 27 IB “w” 87 57 1 1 01 RENfARKS This command causes characters to be printed twice as wide as normal (half the current pitch) until expanded printing is cancelled. NOTE: The character “l” (decimal code 49, hexadecimal code 31) can be used instead of ASCII 1. SEE Chapter 4 PURPOSE Cancels expanded print.
141 PURPOSE CODE (decimal ASCII) (hex ASCII) Sets the printer to expanded print for the remainder of the current line. (ESC) 27 IB (so) 14 OE REMARKS Same as (SO), above. SEE Chapter 4 PURPOSE Cancels one line expanded print. CODE (decimal ASCII) (hex ASCII) (DC4) 20 14 REMARKS This command cancels one line exanded print set with (SO) or (ESC) (SO). SEE Chapter 4 9 Special print modes PURPOSE Sets the master print mode.
.— 142 PURPOSE CODE (decimal ASCII) (hex ASCII) Selects emphasized printing. (ESC) “E” 27 69 IB 45 REMARKS This command causes characters to be printed in emphasized until cancelled. SEE Chapter 4 PURPOSE Cancels emphasized printing. CODE (decimal ASCII) (hex ASCII) (ESC) 27 IB “F” 70 46 REMARKS This command cancels emphasized printing and returns the printer to normal printing. SEE Chapter 4 PURPOSE Selects boldface printing.
I .143 PURPOSE CODE (decimal ASCII) (hex ASCII) Selects underlining. (ESC) “-” 1 27 45 1 IB 2D 01 REMARKS This command underlines the following characters until cancelled. NOTE: The character “l” (decimal code 49, hexadecimal code 31) can be used instead of ASCII 1. SEE Chapter 4 PURPOSE Cancels underlining. CODE (decimal ASCII) (hex ASCII) (ESC) 27 IB “-” 45 2D O 0 00 REMARKS This command stops underlining.
I 144 PURPOSE CODE (decimal ASCII) (hex ASCII) Selects subscripts. (ESC) 27 IB “s” 83 53 1 1 01 REMARKS This command lowers the following characters and prints them as subscripts until cancelled. All conditions appliable to superscripts also apply to subscripts. NOTE: The character “l” (decimal code 49, hexadecimal code 31) can be used instead of ASCII 1. SEE Chapter 4 PURPOSE Cancels subscript.
145 CONTROLLING THE VERTICAL PRINT POSITION These commands are used to move the paper relative to the print head. By moving the paper up or down, the print head, in effect, moves the opposite direction (down or up) on the page. ■ Line feed and reverse line feed controls Advances the paper one line (line PURPOSE feed). CODE (decimal ASCII) (hex ASCII) (LF) 10 OA REMARKS The actual distance advanced of the line feed is set through various codes (see below).
146 PURPOSE CODE (decimal ASCII) (hex ASCII) Sets line spacing to 1/8 inch. (ESC) “O” 27 48 IB 30 REMARKS This command sets the actual distance the paper advances or reverses during all subsequent line feeds tol/8 inch. SEE Chapter 5 PURPOSE Sets line spacing to 7/72 inch. CODE (decimal ASCII) (hex ASCII) (ESC) 27 IB “l” 49 31 REMARKS This command sets the actual distance the paper advances or reverses during all subsequent line feeds to 7/72 inch.
147 PURPOSE CODE (decimal ASCII) .(hex ASCII) Sets or Defines line spacing to n172inch. (ESC) 27 IB “A” 65 41 n n n REMARKS This command works in two different functions depending on the setting of DIP switch 2-5. When the DIP switch 2-5 is set on, this command sets the actual distance the paper advances or reverses during all subsequent line feeds to n/72 inch immediately.
— PURPOSE CODE (decimal ASCII) (hex ASCII) Sets line spacing to 1/6 inch, or Uses (ESC) “A” definition. (ESC) 27 IB “2” 50 32 REMARKS This command works in two different functions depending on the setting of DIP switch 2-5. When the DIP switch 2-5 is set on, this command sets the actual distance the paper advances or reverses during all subsequent line feeds to 1/6 inch. When the DIP switch 2-5 is set off, this command activates the line spacing defined in the (ESC) “A” command.
1149 PURPOSE CODE (decimal ASCII) (hex ASCII) Sends a one-time reverse feed of n/216 inch. (ESC) 27 IB <<.9> n n n 1;6 6A REMARKS This command causes the printer to reverse the paper n/216 inch. It does not change the current value of line spacing and it does not cause a carriage return. The value of n must be between O and 255. SEE Chapter 5 PURPOSE Sets print position to n lines.
150 PURPOSE CODE (decimal ASCII) (hex ASCII) Reverses the paper to the top of the current page. (ESC) 27 IB (FF) 12 Oc REMARKS This command causes the printer to reverse the paper to the top of the current printing page (or form). This command is ignored when the optional automatic sheet feeder is installed. SEE Chapter 5 PURPOSE Sets page length to n inches.
151 9 Top/Bottom margins and vertical tabs PURPOSE CODE (decimal ASCII) ~(hex ASCII) Sets the top margin. (ESC) 27 IB “r” 114 72 n n n RE.MARKS This command sets the top margin to n lines. Printing begins on the (n + l)th line on the page. This command is ignored when the optional automatic sheet feeder is installed. The value of n must be between 1 and 255. SEE Chapter 5 PURPOSE Sets the bottom margin.
152 PURPOSE CODE (decimal ASCII) (hex .ASCII) Advances paper to the next vertical tab position. (VT) 11 OB REMARKS This command causes the paper to be advanced to the next vertical tab position, or the top of the next page, whichever is first. If the vertical tab positions are not set, this command works as a line feed command. SEE Chapter 5 PURPOSE Sets vertical tab positions. CODE (decimal ASCII) (hex ASCII) (ESC) “B” nl n2 n3 ... 27 66 nl n2 n3 ... IB 42 nl n2 n3 ...
153 PURPOSE Sets vertical tab positions in a channel. CODE (decimal ASCII) (hex ASCII) (ESC) REMARKS This command cancels all current vertical tab positions in channel nO and sets those defined at lines nl, n2, n3, etc. The maximum number of vertical tab positions for each channel allowed is 16. The ASCII Ocharacter is used as a command terminator. Each vertical tab position must be specified in ascending order. The vertical channel nO must be between Oand 7.
I 154 CONTROLLING THE HORIZONTAL PRINT POSITION This section described commands that move the print head and restrict its printing range (such as setting margins and tabs). PURPOSE CODE (decimal ASCII) (hex ASCII) Returns print head to the left margin (carriage return). (CR) 13 OD REMARKS This command returns the print head to the left margin.
1155 PURPOSE CODE (decimal ASCII) (hex ASCII) Sets the left margin. (ESC) 27 IB “l” 108 6C n n n REMARKS This command sets the left margin to n characters. Each line will begin in the (n + l)th character position from the left edge. The value of n must be between O and 255. You can set the left margin manually on the control panel. NOTE: Changing the print pitch after the left margin has been set does not change the margin — it stays in exactly the same place on the page.
PURPOSE CODE (decimal ASCII) (hex .ASCII) Moves the print head to the next horizontal tab position. (HT) 9 09 REMARKS This command causes the print head to advance to the next horizontal tab position. The horizontal tab positions are set at power-on to print positions 8, 16, 24, etc. (to the maximum print position). SEE Chapter 5 PURPOSE Sets horizontal tab positions. CODE (decimal ASCII) (hex ASCII) (ESC) 27 IB “D” 68 44 nln2n3... nln2n3... nln.Zz3...
157 PURPOSE CODE (decimal ASCII) (hex ASCII) Moves the print head to an absolute horizontal position. (ESC) 27 IB “$” 36 24 nl nl nl n2 n2 n2 REMARKS This command causes the printer to move the print head to an absolute horizontal position. The position, in inches, is determined by the formula (nl + n2 x 256)/60. The maximum distance is 13.6 inches. SEE Chapter 5 PURPOSE Moves the print head to a specified horizontal position.
158 PURPOSE CODE (decimal ASCII) (hex ,ASCII) Adds n dot characters. (ESC) 27 IB spaces “space” 32 20 between n n n REMARKS This command increases the space between characters by n dots when the DIP switch 2-5 is set on. SEE Chapter 6 PURPOSE Sets the print characters. CODE (decimal ASCII) (hex ASCII) (ESC) 27 IB “f” 102 66 position On 0 00 to n n n REMARKS This command sets the next print position to n columns from the left margin. The value of n must be between O and 127.
159 DOWNLOAD CHARACTER COMMANDS PURPOSE Defines download characters into RAM. .CODE (ESC) “&” (decimal ASCII) 27 38 (hex ASCII) IB 26 REMARKS O nl n2 mO ml ... mll [m12 ... m46] 0 nl n2 mO ml ... mll [m12 ... m46] 00 nl n2 mOml ... mll [m12 ... m46] This command is used to define one or more user-defined characters and to store them into RAM for later use. RAM is cleared when the power is turned off.
I — 160 PURPOSE CODE (decimal ASCII) (hexASCII) Copies standard character ROM font into RAM. (ESC) 27 “:” 58 O 0 IB 3A 00 0 0 0 00 0 00 REMARKS This command copies all the standard characters to the corresponding download character RAM area. This destroys any existing user-defined characters in that range. NOTE: This command is ignored when the DIP switch 2-1 is set on. SEE Chapter 7 PURPOSE Selects download character set.
161 DOT GRAPHICS COMMANDS PURPOSE CODE (decimal ASCII) (hex ASCII) Prints normal-density graphics. (ESC) 27 IB “K” 7.5 4B nl n2 ml m2 ..... nl n2 ml m2 ..... nl n2 ml m2 ..... REMARKS This command selects 60 dots-per-inch, column-scan, bit-image graphics mode. The values of nl and n2 represent the number of graphics characters to be printed, where the total number of characters = n2 times 256 + nl. The correct number of graphics data bytes (ml, m2, etc.) must follow n2.
PURPOSE CODE (decimal ASCII) (hex ASCII) Prints double-density graphics at double-speed. (ESC) 27 IB “Y” 89 59 nl n2 ml m2 ..... nl n2 ml m2 ..... nl n2 ml m2 ..... REMARKS This command selects 120 dots-per-inch, column-scan, bit-image graphics mode at double-speed. The values of nl and n2 are the same as in normal-density graphics. The correct number of graphics data bytes (ml, m2, etc.) must follow n2. The ASCII values of these bytes determine which pins are fired for each character.
163 PURPOSE CODE (decimal ASCII) (hex ASCII) REMARKS Selects graphics modes. (ESC) “*” 27 IB 42 2A nOnl n2 ml m2 ..... nO nl n2 ml m2 ..... nO nl n2 ml m2 ..... This command selects one seven possible graphics modes, depending on the value of nO.The values of nl and n2 are the same as normal-density graphics mode. The correct number of graphics data bytes (ml, m2, etc.) must follow n2. The ASCII values of these bytes determine which pins are fired for each character.
— 164 PURPOSE CODE (decimal ASCII) (hex ASCII) Selects 9-pin graphics. (ESC) “-“ 27 IB 94 5E nO nl n2 ml m2 ..... nOnl n2 ml m2 ..... nOnl n2 ml m2 ..... REMARKS This command selects column-scan, 9pin bit-image graphics mode. The value of nO determines the print density. The values of nl and n2 are the same as normal-density graphics mode. The correct number of graphics data bytes (ml, m2, etc.) must follow n2. The ASCII values of these bytes determine which pins are fired for each character.
165 MACRO INSTRUCTION COMMANDS PURPOSE CODE (decimal ASCII) (hex ASCII) Defines macro instruction. (ESC) 27 “+” 43 ..... ..... (RS) 30 IB 2B ..... IE REMARKS This command cancels any existing macro instruction, and replace it with the defined instruction. The maximum number of characters allowed in the macro instruction is 16. The (RS) character marks the end of the macro definition. SEE Chapter 6 PURPOSE Executes macro instruction.
166 OTHER COMMANDS PURPOSE CODE (decimal ASCII) (hex ASCII) Sets the value of the eighth data bit to logical 1. (ESC) “)” 27 IB 62 3E REMARKS This command forces the eighth data bit of each subsequent character sent to the printer to logical 1. This code allows users with a 7-bit interface to access those characters whose ASCII code is greater than 127. This code should not be used to transmit printer control codes. SEE Chapter 6 PURPOSE Sets the value of the eighth data bit to logical O.
167 PURPOSE CODE (decimal ASCII) (hex ASCII) Accepts the value of the eighth data bit as is. (ESC) 27 “#” 35 IB 23 REMARKS This command cancels either setting of the eighth data bit. The printer will use the value of the eighth data bit that is sent from the computer. This code allows users with a 7-bit interface to resume normal functions after accessing those characters whose ASCII code is greater than 127. SEE Chapter 6 PURPOSE Prints “slash zero”.
PURPOSE CODE (decimal ASCII) (hex ASCII) Moves the print head back one print position (backspace). (BS) 8 08 REMARKS This command shifts the print head one column to the left. If the print head is at the left margin, the command is ignored. This command can be used to overstrike or combine characters. SEE Chapter 6 PURPOSE Deletes the last character sent. CODE (DEL) 127 7F (decimal ASCII) (hex ASCII) REMARKS This command deletes the last character received.
169 PURPOSE CODE (decimal ASCII) (hex ASCII) Sets printer off line.
— 170 PURPOSE CODE (decimal ASCII) (hex ASCII) Disables paper-out detector. (ESC) “8” 27 IB 56 38 REMARKS This command causes the printer to disregard the signal sent by the paperout detector. The paper-out signal normally sounds the printer bell and stops printing until paper is inserted and the printer is reset. DIP switch 1-5 can also set to disable the paper-out detector. SEE Chapter 6 PURPOSE Enables paper-out detector.
I .171 PURPOSE CODE (decimal ASCII) (hex ASCII) Cancels uni-directional printing. (ESC) “u” 27 IB 85 55 o 0 00 REMARKS This command cancels uni-directional printing and returns to the standard bidirectional printing, which is considerably faster. NOTE: The character “O”(decimal code 48, hexadecimal code 30) can be used instead of ASCII O. SEE Chapter 6 PURPOSE Selects one-line printing.
I 172 PURPOSE CODE (decimal ASCII) (hex ASCII) Enlarges characters in whole or in part; cancels same. (ESC) 27 IB “h” 104 68 n n n REMARKS This special command enlarges characters following the command until the enlargement is cancelled. The values of n have the following effects.
173 PURPOSE CODE (decimal ASCII) (hex ASCII) Cancels the expansion of printable area. (ESC) 27 “7” 55 IB 37 REMARKS This command cancels the expansion of the printable character area and restores the high-order control code area when the DIP switch 2-5 is set on. SEE Chapter 6 PURPOSE Prints characters in the undefined control code area.
174 PURPOSE CODE (decimal ASCII) (hex ASCII) Sets immediate print mode. 6C.>9 1 (ESC) 27 IB 1;5 69 1 01 REMARKS This command selects the immediate print mode. In the immediate print mode the print head prints one character at a time, as you send it. The printer also moves the paper up so that you can see the current line and then down to continue printing. This kind of instant feedback can be especially helpful in telecommunications.
175 PURPOSE CODE (decimal ASCII) (hex ASCII) Resets the printer. (ESC) 27 “@” 64 IB 40 REMARKS This command reinitializes the printer. The print buffer is cleared, and the form length, character set, bottom margin, and international character set are all reset to the values defined by their respective DIP switches. The main difference between the (ESC) “@” command and turning the printer off and back on again is that download characters and macro instructions are presemed with this command.
176 PURPOSE CODE (decimal ASCII) (hex ASCII) Cancels auto feed mode. (ESC) 27 (EM) 25 O IB 19 00 0 REMARKS This command causes the printer to cancel the auto sheet feeding mode. This command is ignored when the optional automatic sheet feeder is not mounted on the printer. SEE Chapter 6 PURPOSE CODE (decimal ASCII) (hex ASCII) Cancels 6< 99 (( 40 28 REMARKS Same as (ESC) (EM) O,above. SEE Chapter 6 PURPOSE Supplies paper . CODE (decimal ASCII) (hex ASCII) auto feed mode.
L 177 PURPOSE CODE (decimal ASCII) (hex ASCII) Ejects paper. (ESC) 27 IB (EM) 25 19 “R” 82 52 REMARKS This command causes the printer to eject paper. This command is ignored when the optional automatic sheet feeder is not mounted on the printer. SEE Chapter 6 PURPOSE CODE (decimal ASCII) (hex ASCII) Ejects paper. 6<77 < (( 40 40 28 28 REMARKS Same as (ESC) (EM) “R”, above.
178 MEMO
APPENDIX D COMMANDSUMMARY IN NUMERICORDER Control code CHR$(7) Function Sounds the printer bell Moves the print head back one print CHR$(8) position (backspace) Moves the print head to the next CHR$(9) horizontal tab position Advances the paper one line (line CHR$(1O) feed) Advances paper to the next vertical CHR$(ll) tab position Advances the paper to the top of the CHR$(12) next page (form feed) Returns print head to the left margin CHR$(13) (carriage return) Sets the printer to expanded print for CHR$
180 (ESC) CHR$(25) CHR$(4) Selects auto feed mode Ejects paper (ESC) CHR$(25) “R” Adds n dot spaces between (ESC) CH,R$(32)n characters Sets the master print mode (ESC) “!” n Accepts the value of the eighth data (ESC) “#” bit as is Moves the print head to an absolute (ESC) “$” nl 922 horizontal position Cancels download character set (ESC) “~0” O Selects download character set (ESC> “~0” 1 (ESC) “&” CHR$(0) nl 2 mO ml ..... mll [m12 .....m46] Defines download characters into RAM (ESC) “*” nO nl n2 ml n2 ..
181 Sets the value of the eighth data bit to logical 1 Redefines the graphics mode “?” nO nl Resets the printer “@” Sets or defines line spacing to n/72 “A” n inch “B” nl n2 n3 ... CHR$(0) Sets vertical tab positions Sets page length to n inches “C” CHR$(0) n Sets page length to n lines “C” n “D” nl n2 n3 ...
— 182 (ESC) “Z” nl n2 ml m2 ... Prints quadruple-density graphics Moves the print head to a specified horizontal position (ESC) “ - “ nOnl n2 ml m2 ..... Selects 9-pin graphics Sets alignment or centering (ESC) “a” n (ESC) “b” nO nl n2 n3 ...
L APPENDIX E TECHNICAL SPECIFICATIONS Printing Printing method Printing speed Print buffer Paper feed Printing direction Character set Draft characters NLQ characters Other characters Character matrix Serial impact dot matrix 120 characters per second (in Draft pica) 30 characters per second (in NLQ mode) 4 KB 2.
184 Line spacing Column width Special.
I 185 Print head life Temperature: 5 to 40°C (40 to 104”F) Humidity: 10 to 809’0,non condensing Black cloth ribbon in special cartridge Ribbon life: 3 million draft characters 100 million draft characters Parallel interface Interface Synchronization Handshaking Logic level Connector Centronic-compatible, 7 or 8 bit By external supplied Strobe pulses By ACK or BUSY signals TTL 57-30360 Amphenol Environment Ribbon Serial interface (option) Asynchronous RS-232C/20 mA current Interface loop 150, 300, 600,
186 MEMO
APPENDIX F THE PARALLEL INTERFACE This printer has a parallel interface to communicate with the computer. The operating specifications of the parallel interface are as follows: Data transfer rate: Synchronization: Handshaking: Logic level: 1,000 to 6,000 characters per second Via externally supplied STROBE pulses ACK and BUSY signals Compatible with TTL level The parallel interface connects to the computer by a 36 pin connector on the back of the printer.
188 ACK [ ‘----------- —.- 1 —— ~ STROBE ~ —1 ‘-–r–-” r——————” L—..— ‘“s’ L— --l T: More than 0.5WWC Figure F-1. The interfacetiming diagram. Siwd N’ame STROBE (To Printer) BUSY,ACK (From Printer) Figure F-2. ! Circuit Ew3mDle ‘sat’’” ‘u:~a’ib’e Typicalinterfacecircuit. When the printer has successfully received the byte of data from the computer it sets pin 10 low for approximately 2.75 microseconds (15 microseconds when using the optional buffer board).
I_ 189 The printer will report that it has run out of paper by making the PAPER OUT signal on pin 12 high. This pin can be held low by turning DIP switch 1-5 off. When the printer is in the on-line state, pin 13 is held high. This signal (SELECTED) tells the computer that the printer is ready to receive data. Table F-1 Parallel interface pin functions ~i:;:l Pin No.
Pins 14, 15, 34 and 35 are not used, while pins 16, 17, 19-30 and 33 are grounded. Pin 18 is connected to the +5VDC supply in the printer. Pin 31 can be used to reset the printer. If this signal (RESET) goes low the printer will reinitialize. Pin 32 is used to report error conditions in the printer. This signal (ERROR) is high during normal operation and goes low to report that the printer cannot print due to an error condition.
APPENDIX G SERIAL INTERFACE SPECIFICATIONS This printer provides a very flexible RS232C serial interface as an option. It can communicate at rates from 150 to 19,200 baud (bits per second) and supports four different kinds of handshaking. This interface can also function as a 20mA current loop interface.
Table G-1 Serial interface pirf functions ~i::;l Pio No. 1 2 3 4 GND TXD RXD RTS – OUT IN OUT 5 CTS IN 6 DSR IN 7 8 GND DCD – IN 9 TTYTXI)R – 10 TTY TXD OUT 11 RCH OUT 12 13 14-16 17 N/C GND – N/C ‘lTYTXDR – I 18 I I TTY RXDR – 19 TTY RXD IN 20 DTR o’IUT 21-22 N/C 23 TTY RXDR – I 24 25 Function Direction I TTY TXD OUT , t TTY RXD IN Printer’s chassis ground. This pin carries data from the printer. This pin carries data to the printer.
193 Table G-2 DIP switch on serial board ON Switch 1 7 data bits 2 Parity checked No parity 9+ 5 IEvenparity 6 7 ~ 8 OFF 8 data bits , Handshaking protocols–see Table G-3 Odd parity I Data transfer rate–see Table G-4 Table G-3 Handshaking protocols Protocol Serial busy, 1 byte mode Serial busy, 1 block mode Switch3 Switch4 OFF ON OFF mode OFF ON XON/XOFF mode ON ON ACK OFF Table G-4 Data transfer rates Baudrate 150 300 600 1200 2400 4800 119200 I Switch6 I OFF GFb OFF ]OFF ION --
— 194 data. These two pins go ON when the printer is ready to accept data. In the 1 byte mode they go OFF after each character is received. In the 1 block mode they only go OFF when the printer’s buffer approaches capacity. In both cases they will stay OFF if the buffer is too full to accept more data. H XON/XOFFprotocol The XON/XOFFprotocoluses theASCII characters(DC1) and (DC3) (sometimes called XON and XOFF, respectively) to communicate with the computer.
195 Serial busy protocol (I byte) mode ~;q DB ~ DTR Fin 20 u~ RCH Pin I 1 u u u 1 u 1 fu 1 I au f f e r or Of f 1 I n. Serial busy protocol (1 block) mode RXD P,” 3 g:~o – $::, ~ Buffer 0, off full 11”. XON/XOFF prutacol RXD Pin 3 TXD XON IDCII xOFF (DC31 XOFF IDC31’ P,” 2 9.f f . . fu I 1 or of f I I n. ACK protocol RXD Pm 3 :::0 TXD P,” 2 8“ f f e r . . Of f u I 1 f I tn. 08- Defa Brie Figure G-2. Serial protocol timing charts.
INDEX 9-pingraphics,112, Chart, ASCII code, 125 Chart, character set #2, 85 Absolute tab, 69, 157 CHR$ function, 38 ACKprotocol,194 CHR$(7), 169 Adjustingpapergap, 16 CHR$(8), 168 Adjustingwidthof space,81 CHR$(9),67, 156 Advancepaper, 55, 145, 146, 147, 148, CHR$(1O),55, 145 149 CHR$(ll), 70, 152 Aligningtext, 74, 158 CHR$(12),61, 149 Alternategraphicscodes, 111 CHR$(13),55, 154 American Standard Codefor Information CHR$(14),47, 140 Interchange,39 CHR$(15),49, 138 ASCIIcodeconversionchart, 125 CHR$(17), 7
197 Defining characters, 98, 159 macro instruction, 93, 165
Expanded print, 27, 33, 47, 53, 140 Extra functions, 10, 33 Feeding paper, 10, 13
199 Paper separator, 7, 14 Paper thickness, adjustment, 16 Paper-out, 122 Paper-out detector, 78 Parallel interface, 187 Pica Ditch.26.33, 46.
Consumer Response Star Micronics Co., Ltd. invites your suggestions and comments on your printer and this manual. Please address your correspondence to: WorldwideHeadquutiers: STAR MICRONICS CO., LTD. 194 Nakayoshida Shizuoka, JAPAN 422-91 Attn: Product Manager American Market: STAR MICRONICS AMERICA INC. Pan Am Bldg., Suite 3510 200 Park Avenue New York, NY 10166 Attn: Product Manager EuropeanMarket: STAR MICRONICS DEUTSCHLAND GMBH Mergenthalerallee 1-3. D-6236 Eschborn/Ts.
PRINTED IN JAPAN