Mobile Printer SM-T400I SERIES Hardware Manual
Federal Communications Commission Radio Frequency Interference Statement This device complies with Part 15 of the FCC Rules. Operation is subject to the following two conditions: (1) This device may not cause harmful interference, and (2) this device must accept any interference received, including interference that may cause undesired operation.
Български: това Безжично устройство е в съответствие със задължителните изисквания и другите приложими разпоредби на Директива [Bulgarian] 1999/5/EC. Polski: [Polish] Niniejszym STAR MICRONICS CO.,LTD. oświadcza, że Wireless Device jest zgodny z zasadniczymi wymogami oraz pozostałymi stosownymi postanowieniami Dyrektywy 1999/5/EC. Malti: [Maltese] Hawnhekk, STAR MICRONICS CO.,LTD.
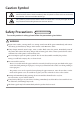
Caution Symbol This symbol is placed near the thermal head to indicate that it may be hot. Never touch the thermal head immediately after the printer has been used. Let the thermal head cool for a few minutes before touching it. This symbol is placed near the thermal head to indicate that it is easily damaged. Observe the precautions for handling electrostatic sensitive devices. Safety Precautions Please be sure to read To use this product in safety, please follow the precautions given below.
n Using the Printer P Some semiconductors can be damaged by static electricity. Be sure to turn off the printer when inserting or removing the battery pack. P Do not drop the printer or hit it against a hard object. P Do not open the printer cover while the printer is printing. P Before you open the printer cover, make sure that printing data is not being sent to the printer. P Do not unplug or plug in a communication cable while the printer is printing or during communication.
n Operating Environment for the Printer Before actually unpacking the printer, you should take a few minutes to think about where you plan to use it. Remember the following points when doing this. P Do not use the printer in an environment in which it will be subject to strong shaking while it is printing. P Be careful to ensure that the printer is not exposed to direct sunlight. The appropriate environment for using the printer is described below.
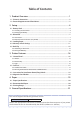
Table of Contents 1. Product Overview....................................................................................... 1 1.1 Printer & Accessories............................................................................................................. 2 1.2 External Appearance and Part Names................................................................................ 3 2. Setup............................................................................................................. 4 2.
1. Product Overview This printer is perfect for mobile banking systems, retail, POS (point of sale) terminals and other forms of mobile computing. The characteristics of this printer are listed below: • • • • • • • • • • • • • • • • • • • • • Compact size (150.9 ×136.6 × 63.3 mm) Extremely light and mobile (735 g) Up to 24 hours of battery-powered operation (12 receipts per hour / Auto Power Down Mode) International Splash/Dust Proof “IP54” Certified 1.
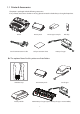
1.1 Printer & Accessories The printer is packaged with the following accessories. If any of these accessories is broken or missing, please contact the dealer that you bought the product. Printer Serial Communication Cable Battery Pack Printer paper sample Safety Instruction Sheet Belt Clip Battery Charger u The optional items for this printer are listed below.
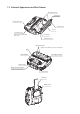
1.2 External Appearance and Part Names Black Mark Sensor Platen Gear Charge Connector Printer Cover Platen Serial Connector Don’t connect USB mini B cable here. Mechanism Paper End Sensor *Protection Film *Remove the films if you do not need them.
2. Setup 2.1 Battery Pack 2.1.1 Inserting into the Printer 1. Make sure that the printer has been turned off before you insert or remove the battery pack. 2. Insert the battery pack into the back of the printer as in the figure shown below, following the direction of the arrow. Hook Push the battery pack until the hock clicks into place. 3. To remove the battery back, pull back the hook, and use the opposite procedure from the one you used to insert the battery pack. 4.
2.1.2 Charging the Battery Insert the battery pack into the printer to charge it. Insert the battery charger cable into the printer’s power inlet for charging. Lamp(Red) Lamp(Green) Charging Fully charged Note: When the battery charger is connected to the printer without the battery pack, the printer turns on but cannot print. Notes about the Battery Pack u General Battery Characteristics • The battery is a consumable and its performance over time will gradually decrease.
u Battery Pack Life • The battery can be charged approximately 500 times in the normal temperature range without losing performance. If an extreme decline in the running time of the battery is noticed, the battery is reaching the end of its usable life. It is recommended to replace the old battery with a new one. u Notes about Using the Battery Pack • Only use a designated battery pack. • Only use the designated battery charging method.
2.2 Bluetooth Settings 2.2.1 connection 1. Press and hold POWER for approx. 3 seconds, and printer is turned on. Then, it is ready to pair with another Bluetooth device. 2. If necessary, enter the following information into the terminal that you are using. PIN: Device name: 1234 (default) Star Micronics (default) For security purposes, we recommend that you change the PIN. For details about changing the PIN, please contact with our dealer.
2.2.2 Auto Connection Function (only for iOS*1) When the Bluetooth connection with your iOS device (*2 is disconnected, it is required to establish a connection by tapping the printer you want to use on the Bluetooth setting screen. This Re-Connection Specification is exactly based on the iOS specifications, and this specification is different from other OS such as Android.
2.3 Loading Paper Refer to chapter 4, “Paper” (p. 19), to select roll paper that conforms to the specifications. 1. Turn on the printer. 2. Put your finger on the switch for opening the cover, and then open and raise the printer cover. Printer Cover Cover Open Switch 3. Load the roll paper in the orientation shown in the figure below, and then pull the end of the roll straight toward you. 4. Press down on both sides of the printer cover to close it firmly.
CAUTION When the paper is jammed, be sure to open the printer cover before removing the jammed paper. Do not under any circumstances try to pull out the jammed paper forcefully while the printer cover is closed. Doing so may damage parts of the printer. Caution Symbol This symbol is placed near the thermal head to indicate that it may be hot. Never touch the thermal head immediately after the printer has been used.
2.4 Memory Switch Settings Change the Memory switch by following operations. (Refer to page 13 “Memory Switch Setting Table”). 1. Press and hold POWER for approx. 3 seconds, and printer is turned on. 2. To put the printer into Memory Switch Setting mode, press and hold both the POWER & FEED buttons for 3 seconds. After the ERROR LED flashes five (5) times, you can configure the settings. Release the buttons after you surely confirm the LED flashes five (5) times, to get a printer into the setting mode. 3.
* Example: When you want to change the settings of the printer mode as shown below, Bluetooth / 9600 BPS / 8 DATA BIT / NO PARITY / 1 STOP BIT / DENSITY LOW / LOW QUALITY / MARK NO USE / SENSOR LOW / PWDN1min Sleep Bluetooth(iOS) / 9600 BPS / 7 DDATA BIT / EVEN PARITY / 1 STOP BIT / DENSITY LOW / HIGH QUALITY / MARK NO USE / SENSOR HIGH / PWDN1min Sleep 1 Press and hold the POWER & FEED buttons for 3 seconds. After the ERROR LED flashes five times, you can configure the settings.
Memory Switch Setting Table Printer Mode 1 2 3 4 5 6 7 8 9 10 11 Communication Port v1) Baud Rate Data Bit Parity Bit Stop Bit Print Density Print Quality Black Mark Sensor Black Mark Sensor Sensitivity Power Down Auto Connection Setting Display RS-232C UART Mode Bluetooth Bluetooth Mode Bluetooth(iOS) * Bluetooth(iAP) 9600 bps 9600 BPS 19200 bps 19200 BPS 38400 bps 38400 BPS 57600 bps * 57600 BPS 115200 bps 115200 BPS 7 Data bit 7 DATA BIT 8 Data bit * 8 DATA BIT
v1) Communication mode It is possible to change the communication mode setting between Bluetooth and serial. Please see below for details to select the proper communication mode for your application. Bluetooth (iOS): The display shows [Bluetooth(iAP)]. At the Bluetooth (iOS) mode, the printer can communicate with an iOS device over Bluetooth. Bluetooth: The display shows [Bluetooth Mode].
2.5 Belt Clip 2.5.1 Attaching to the Printer Follow the procedure below to attach the belt clip to the printer. 1. Make sure that you are attaching the belt clip in the right orientation, then screw the screw that comes with the belt clip into the designated screw hole to attach the belt clip to the printer. 2. Use a coin to firmly screw in the screw. Coin 2.5.2 Using the Belt Clip When the printer is attached to your belt, you can use it like the picture below.
3. Printer Features 3.1 Control Panel Mode Status LCD Remaining battery power ERROR Lamp POWER Lamp Bluetooth Mode FEED Button POWER Button Bluetooth Connection Status Data Communication Status 3.1.1 Button 1) POWER Button : 1 Pressing and holding the POWER button for 3 seconds or more will turn the power on or off. 2 Pressing both the POWER and FEED buttons simultaneously will cause the ERROR lamp to flash 5 times and put the printer into Memory Switch Setting mode.
3.2 Self Test You can use a self test to check the printer’s settings. Before you start the self test, make sure that roll paper has been properly loaded into the printer. 3.2.1 Self Test Procedure 1) Turn on the power while holding down FEED. 2) The printer will print the current printer status, including the firmware version, communication mode, and print settings. 3) The self test will finish automatically. The printer will be ready to receive data after the self test finishes. 3.2.
3.3 Instruction for Auto Power Down(Sleep) Mode The printer in the Power Down(Sleep) Mode will recover to the Print Ready Mode when receiving commands or button operations. However, print data received while shifting from the Sleep Mode to the print Ready Mode (for approx. 1 sec.) is discarded and cannot be printed. Therefore, if the printer is in the Sleep Mode, please be sure to recover it to the Print Ready Mode before sending print data.
4. Paper 4.1 Thermal Paper 4.1.1 Paper Specifications Paper width : Paper thickness : Outer diameter : Inner diameter : Recording side : 111.5±0.5mm 65±5 µm Ø50 mm or less Ø12 mm or more Outside of roll 4.1.2 Recommended Paper Manufacturer Mitsubishi Paper Mills Limited Oji Paper Co., Ltd. APPLETON KANZAKI (Oji Paper USA) Product Name P220AG PD450 Alpha 800-2.4 P-350 4.1.3 Printing Range 112.0 mm Paper Width 4.0 mm 104.0 mm Printing Area 4.
4.2 Thermal Label 4.2.1 Paper Specifications Paper width : Paper thickness : Outer diameter : Inner diameter : Recording side : 112.5±0.5mm 115±15 µm Ø50 mm or less Ø25 mm or more Outside of roll 4.2.2 Recommended Paper Manufacturer Product Name Black Mark RICOH 150PSMW Back reading 4.2.3 Printing Range 112.5 mm Paper Width 2.25 mm 108.0 mm Printing Area 2.25 mm Black Mark 25~295 mm 25~295+5 mm PCS (Print Contrast Signal) value shall be 0.9 or more. Surface (Label side) Back Liner 4.2.
5.
n Dimensions External Dimensions : 150.9 mm (W) × 136.6 mm (D) × 63.3 mm (H) Weight : Body Color : 150.9 mm (W) × 143.2 mm (D) × 63.3 mm (H) 735 g (Including Battery Pack) Gray and Black 150.9 136.6 63.3 63.3 143.2 150.
STAR MICRONICS CO.,LTD. Head Office 20-10 Nakayoshida, Suruga-ku, Shizuoka-shi, Shizuoka, 422-8654, Japan Tel. + 81-54-263-1111 Fax. + 81-54-263-1057 STAR Quality Technical Center 18-12 Nakayoshida, Suruga-ku, Shizuoka-shi, Shizuoka, 422-8001, Japan Tel. + 81-54-263-1303 Fax. + 81-54-263-6650 Declaration of Conformity Application of Council Directive(s) 1999/5/EC of 9 Mar. 1999 2011/65/EU of 8 Jun 2011 Standard(s) to which Conformity is Declared RADIO : EN 300 328 V1.7.1 EMC : EN 301 489-1 V1.9.
URL: http://www.starmicronics.com/support/ Rev. 1.