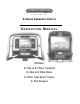
E SERIES EMBEDDED DISPLAY O P E R AT I O N M A N U A L Models: E-TRe & E-TRxe Treadmill E-UBe & E-RBe Bikes E-TBTe Total Body Trainer E-STe Stepper
CORPORATE HEADQUARTERS 14410 Myford Road Irvine, CA 92606 USA Phone +1 714 669 1660 Fax +1 714 669 0287 800 228 6635 (toll-free within the U.S.A., Canada) Star Trac Europe Unit 4, The Gateway Centre, Coronation Road Cressex Business Park, High Wycombe, Bucks HP12 3SU United Kingdom Phone +44 (0) 1494 688260 Fax +44 (0) 1494 688269 Star Trac Asia No. 39A Jalan Pemimpin, Halcyon Building #01-02 Singapore 577183 Phone +65 6255 6252 Fax +65 6255 1501 Copyright 2008. Star Trac by Unisen, Inc.
Before using this product, it is essential to read this ENTIRE operations manual and ALL installation Instructions. It describes equipment setup and instructs members on how to use it correctly and safely. Health related injuries may result from incorrect or excessive use of exercise equipment.
Table of Contents DESCRIPTION Regulatory Information PAGE 6 FCC 6 EUROPEAN DIRECTIVES 6 SAFETY STANDARDS 6 Getting Started 7 INTRODUCTION 7 EMBEDDED DISPLAY CONSOLE SPECIFICATIONS 7 Safety Instructions IMPORTANT SAFETY INSTRUCTIONS Display Console 8 8 9 EMBEDDED DISPLAY CONSOLE 9 HOME SCREEN 10 CENTER CONSOLE KEYPAD 11 HEART RATE BAR 11 TREADMILLS SAFETY STOP 12 Assembly and Product Model Setup 13 ASSEMBLY 13 SETUP 13 Operation Instructions QUICK START 15 15 PRESET PROGRAMS
Regulatory Information FCC When used in conjunction with the appropriate Star Trac cardio equipment, the STAR TRAC E SERIES EMBEDDED DISPLAY has been tested and found to comply with the limits for a Class A digital device pursuant to Part 15 of FCC rules. Under the FCC guidelines, operation is subject to the following two guidelines: (1) this device may not cause harmful interference, and (2) this device must accept any interference received, including interference that may cause undesired operation.
Getting Started INTRODUCTION Thank you for choosing STAR TRAC. Our products have been designed to provide the user the most rewarding experience based upon the carefully planned features it possesses. The design elements of these products will provide you with a comfortable, intuitive, safe and reliable experience, guiding you to a habit-forming lifestyle.
Safety Instructions Important Safety Instructions These safety notes are directed to you as the owner of the EMBEDDED DISPLAY PRODUCT ( E-TRe or ETRxe Treadmill; E-UBe or E-RBe Bike; E-TBTe Total Body Trainer; or E-STe Stepper) Note: Train all your users and fitness staff to follow these safety instructions DANGER – To reduce the risk of electric shock, always unplug this appliance from the electrical outlet immediately after using and before cleaning.
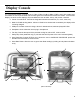
Display Console EMBEDDED DISPLAY CONSOLE: The computerized display console on the E-TRe, E-TRxe, E-UBe, E-RBe, E-TBTe, and E-STe cardio products allows the user to personalize his/her fitness goals and maximize and monitor the results. Touch Screen Display: the touch screen display (LCD) area allows the user to select, set up, and monitor a workout. a. Center Console Panel: Controls the integrated entertainment solution (TV, music, video, etc) b.
HOME SCREEN: The HOME SCREEN of your Embedded Display Product contains a series of icons that are outlined if the specific feature is present. The main screen icons are: 1. SELECT A WORKOUT - allow the user to select presets programs (see WORKOUT DEFINITIONS section for description of each program) 2. CREATE A WORKOUT - Allows the user to create custom programs (see CREATE A WORKOUT section for instruction on how to create a custom program) 3.
CENTER CONSOLE KEYPAD: QUICK START Key: Starts the QUICK START program using a default weight of 155 pounds or 70 kilograms for metric units and a default time of 20 minutes. Note: on treadmills, the running belt would start moving after a 3 seconds countdown. STOP / PAUSE Key (Treadmills only): Pauses the treadmill when pressed once. Ends the current program when pressed twice. CHANNEL SELECT: • VOL Key: Allows you to adjust the volume up by pressing the VOL + or down by pressing the VOL - .
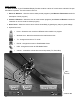
TREADMILLS SAFETY STOP SAFETY STOP SWITCH: The STAR TRAC E-SERIES TREADMILLS is equipped with a pull cord that cuts off power to the unit drive train if activated (pulled). To use the pull-cord, attach the clamp to your clothes. Warning: The Safety Stop pull cord must be utilized at all times while using the treadmill. Failure to do so may result in harm to the treadmill user.
Assembly & Product Model Setup ASSEMBLY To install the Embedded Display on an E-TRe or E-TRxe, refer to document 620-7854. To install the Embedded Display on an E-UBe, E-RBe, E-TBTe or E-STe, refer to document 620-7855. SETUP After powering the unit for the first time, the computer will boot up and the Maintenance Mode screen will appear in the display. If for any reason the Maintenance Mode Screen does not appear, press and hold “VOL +, CH/ TRK +, and 3” simultaneously.
4. Verify that the serial number matches the last 5 digits of the Display Serial number. If the numbers do not match, retype the number (the serial number is printed outside the package of your Embedded Display) . Click inside the Serial Number tab and the Numeric Keypad will popup. 5. Verify that the displayed model in the MODEL tab matches the previously selected product. Note: when setting up a treadmill, make sure that the model is properly selected.
Operation Instructions This section explains how to operate your Star Trac Embedded Display Cardio Products. From the Home Screen you can select from the following programs: QUICK START QUICK START lets you begin your workout by simply pressing one key. QUICK START uses a default weight of 155 pounds (70 kg) and a default time of 20 minutes. To operate the QUICK START program: Stand on the running belt and press the QUICK START area in the Home Screen or the QUICK START key on the Center Console Panel.
PRESET PROGRAMS The STAR TRAC E-SERIES CARDIO PRODUCTS offer up to 14 preset programs to add variety and challenge to your workout. Note: Some programs are not available on all products. Program applicability is noted where appropriate. To select a Workout, press Select A Workout while in the Home Screen. The Workouts screen will appear. You can select a program as defined in the following flowchart (see Program Definition for explanation of each program).
Preset Programs - Bikes: 17
Preset Programs - Total Body Trainer: 18
Preset Programs - Stepper: 19
To operate a PRESET PROGRAM: 1. Select desired program. The Selection View screen will appear (the title will vary to match the selected program). Modify the following parameters: • Weight: enter your weight using the Numeric Keypad. If you type a wrong value, press (back) in the numeric keypad to go back. • Gender: select gender (male / female) • Age: enter your age in years 2. Press OK to start the program. If you decided to go back to the previous screen, press the main screen. 3.
ADVANCED WORKOUT PROGRAMS Your STAR TRAC E-Series Product offers an option to create custom workouts. To select a Workout follow these steps: 1. Press Create A Workout at the Home Screen. The Create a Workouts screen will appear. 2. Select the desired program (Time or Distance) 3. Time: select the preset times (15, 30, 45 min) or enter the desired program time then press OK. 4. Distance: enter the desired distance then press OK. 5.
Burn Fat Stepper Warm Up TBT Quick Start Bikes PROGRAM Treadmills Workouts Definitions X X X X X X X - X X X X X X X X This program shall automatically control the speed and incline of the treadmill to alternate the user’s heart rate between user-defined upper and lower limits. Program will gradually elevate the user’s heart rate to the upper end of their selected training range and then gradually decreases their heart rate to the lower end of their selected X range.
NAVY Test USAF Test Marines Test Custom Time Auto Pilot 25K Time Trail Constant Watts Interval Watts X - - - - - - - - - - - - X - - - X X X X X X This is a workout of a preset 2 mile distance, as required by the US Army, the object of the test is to complete the run distance as quickly as possible. At the completion of the test, a time-based score defined by the Army is returned to the user.
Bikes TBT Stepper Firm & Tone DESCRIPTION Treadmills PROGRAM - - X - - - - X - - - X The Firm and Tone program allows the user to select a difficulty level and pre-program a time goal and user weight; the program automatically adjusts resistance during the workout. The SelectFitTM feature is automatically incorporated into the workout, unless the user disengages the upper body feature.
Workout Views Treadmill During any workout, you can select from the following views: PROGRESS VIEW This view displays a graphic representation of the speed and incline variation of your workout thus far. SIMPLE VIEW This view displays Time, Distance, and Calories. TRACK VIEW This view Shows your progress counter clockwise around 1/4mile (400-meter) course, starting from the bottom center. HEART VIEW This view displays a graphic representation of the heart rate of your workout thus far.
Workout Views TBT During any workout, you can select from the following views: PROGRESS VIEW This view displays a graphic representation of the upper body and level of your workout thus far. SIMPLE VIEW This view displays Time, Distance, and Calories. TRACK VIEW This view shows your progress counter clockwise around 1/4mile (400-meter) course, starting from the bottom center. HEART VIEW This view displays a graphic representation of the heart rate of your workout thus far.
Upper Body Positions While using you Total Body Trainer, you can modify the position of the upper body by selecting the icon that shows the desired position. The available choices are: • Pulling - concentrates the work on pulling by deceasing the range of movement of the handlebars. • Pushing - concentrates the work on pushing by increasing the range of movement of the handlebars. • Off - disengages the upper body arms.
Cooldown Cycle In most programs, once you have completed your workout, the treadmill enters a two-minute Cooldown cycle. All functions are available during the cooldown period. To end the cooldown cycle, press Done. The summary display will appear, at the end of the cooldown cycle.
TV Functions EMBEDDED TV Basic Functions (Touch Screen Display): To View the TV, press the TV icon in the Features Bar of the current screen. • To Change channel press the NUMERIC KEYPAD, a popup numeric keypad appears. Enter the desired channel and press OK. If you type a wrong value, press (back) in the numeric keypad to go back. • To cancel channel selection press • To change the volume, tap on the VOLUME icon in the display and slide the volume bar LEFT/RIGHT decrease/increase volume intensity.
iPod® Media Center IPOD® MEDIA CENTER: This future allows the user to control their iPod playlist from the display and watch iPod-delivered video. • To access the iPod Media Center: • Dock your iPod in the Made for iPod docking station. • Press the iPod icon in the Features Bar of the current screen.
USB Media Center USB PORT: This feature allows the user to charge a USB device, download workout data, and play MP3 files (on select models) • To access the USB Media Center: • Connect the USB device to the USB port. • Press the USB icon in the Features Bar of the current screen. USB Basic Functions: • Playlist - Sort the contents by playlist • Previous/Rewind - In the Now Playing screen, pressing the Previous/Rewind button skips to the previous song in the list.
Additional Features USING PERSONAL FANS Your STAR TRAC E-SERIES PRODUCT is equipped with built-in personal fans to increase your comfort during a workout. The fans will automatically start one minute after you begin your workout. You can control the fan speed during your workout. NOTE: The automatic fan function can be enabled/disabled through Manager/Maintenance mode. To operate the personal fans: • • • Press the key, as necessary, to cycle the personal fans from OFF to HIGH to LOW to OFF.
LOCK OUT Your STAR TRAC E-SERIES PRODUCT is equipped with a built-in, software controlled, Lock Out feature which locks out the unit to prevent access by unauthorized users. NOTE: The automatic fan function can be enabled/disabled through Maintenance mode. To operate the Lock Out: • • When the unit is in lock out mode, a Password screen will pop up before you start your workout. Enter the Lockout ID ( the default ID is 0). The unit in now unlocked.
Service Menu To access Maintenance Mode: 1. While in Home Screen, press and hold “VOL +, CH/TRK +, and 3” simultaneously. 2. A pop up window appears requesting a Password. 3. Enter the Managers Password 218 to gain access to the Service Menu. Once in Service Menu you can open the following menus: MAINTENANCE MODE - while in Maintenance Mode, the following information can be access and/or modified: • SW versions - The latest software version loaded in the system.
MANAGER MODE Allows the change of Units, Language, Max Time and Weight. DIAGNOSTICS MODE Allows the test of all hard keys, and the telemetry and contact heart rate. USAGE STATISTICS Displays the total number of times a program has been used.
CALIBRATION AND SETUP The Calibration and Setup screen allows you to calibrate your equipment, update software, and scan the TV channels. • Speed Calibration - calibrates the speed of the treadmill: 1. Select Speed Calibration on the Calibration and Setup screen. 2. Press START to begin the calibration. 3. After the Speed Calibration is completed, press EXIT; The Calibration And Setup screen appears. 4. Press Cancel to exit and go back to the Home Screen. 5. The Speed Calibration has been completed.
GUI SW Update - allows the manager to update the GUI software. If for any reason you need to update the GUI, follow these steps: 1. Connect the USB stick that contains the GUI file. 2. Wait until the USB source is recognized by the system. 3. Press VOL+, CH/TRK+ and 3 simultaneously on the Center Console keypad to access the Maintenance Mode Screen. 4. Select Calibration And Setup. 5. Press the GUI Update icon on the Calibration and Setup screen. 6. The GUI update will start automatically. 7.
Preventative Maintenance Star Trac strongly recommends performing regular preventive maintenance on your STAR TRAC E-Series Integrated Embedded Display product. Without regularly scheduled maintenance, normal wear and tear may cause cumulative effects or premature wear. This may result in downtime. For this reason, we highly recommend following the maintenance schedules.
Trouble Shooting All Embedded Display Products perform a self-test at the beginning of every workout. If a problem is detected, a message displays before or after the workout, depending on the nature of the problem. Star Trac recommends that you refer your questions about your STAR TRAC PRODUCTS operation and suspected malfunctions to Star Trac’s Service Hotline at (800) 503-1221, or USA 1-714-669-1660.
ERROR CODE 39 40 NAME DESCRIPTION Speed calibration value out of range Fit CPU reports MCB error status: Speed calibration value out of range Speed lost (RPM Sensor) Fit CPU reports MCB error status: Speed lost (RPM Sensor) DIAGNOSIS 1. Re-boot the unit and see if the problem goes away. 2. If the problem persists, check the Product Model in Maintenance Mode and ensure it is correct. 3. Re-calibrate the Speed. 1. Re-boot the unit and see if the problem goes away. 2.
expect different. Star Trac 14410 Myford Road Irvine, CA 92606 USA Email: support@startrac.