Star Trac Fitness™ S-UBx Upright Bike S-UB Upright Bike S-RBx Recumbent Bike S-RB Recumbent Bike OWNER’S MANUAL
TABLE OF CONTENTS 2 Introduction........................................................................................................................................................... 5 ABOUT THIS MANUAL ...................................................................................................................................... 5 Safety Instructions .............................................................................................................................................
Copyright 2007. Star Trac by Unisen, Inc. All rights reserved, including those to reproduce this book or parts thereof in any form without first obtaining written permission from Star Trac. Every effort has been made to keep this information current; however, periodically, changes are made to the information herein, and these changes will be incorporated into new editions of this publication. All product names and logos are trademarks of their respective owners. Printed in the USA.
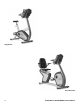
Upright Bike Recumbent Bike 4 STAR TRAC S SERIES BIKES OWNER’S MANUAL
INTRODUCTION Thank you for choosing the STAR TRAC S SERIES BIKE. The Upright and Recumbent Bikes have been designed to provide the user the most rewarding experience based upon the carefully planned features it possesses. The design elements of these Bikes will provide you with a comfortable, intuitive, safe and reliable experience, guiding you to a habit-forming lifestyle.
SAFETY INSTRUCTIONS This chapter includes fitness safeguards and precautions for the installation and use of the Star Trac S Series Bikes. Please read this chapter carefully before installing or using your equipment.
VEILIGHEIDSINSTRUCTIES Deze veiligheidsinstructies zijn aan u gericht als de eigenaar van de Star Trac S Series Bikes. Train uw leden en fitnesspersoneel om dezelfde veiligheidsinstructies te volgen. Doe Dit Neit Doe Dit Wel n n Moedig uw leden aan om hun gezondheids- of fitnessprogramma met een geneeskundige te bespreken. n Laat kinderen niet zonder toezicht de fiets bedienen. n Plaats uw voeten niet onder uw fiets. Stop met de fiets als u zich duizelig voelt of het gevoel heeft dat u flauwvalt.
SICHERHEITSVORSCHRIFTEN Diese Sicherheitshinweise sind an Sie, den Besitzer des Fitness-Bikes von Star Trac gerichtet. Bitte weisen Sie Ihre Mitglieder und Mitarbeiter an, sich an die folgenden Sicherheitsvorschriften zu halten. Sie Sollten Niemals Sie Sollten n Ihren Mitgliedern nahelegen, ihr Gesundheitsprogramm oder Fitneß-Trainning mit einem Arzt zu besprechen. n Die Benutzung des Fitneß-Bikes beenden, wenn Benommenheit oder Schwindel aufritt. n Das Gerät regelmäßig warten.
INSTRUÇÕES DE SEGURANÇA Estas observações de segurança destinam-se à você, proprietário da bicicleta Star Trac. Treine todos os membros e funcionários que utilizarão o equipamento para que sigam estas instruções de segurança. Não Faça Faça n Não permita que crianças operem a bicicleta sem supervisão de um adulto. n Não coloque seus pés embaixo da bicicleta. n Não utilize a bicicleta sem calçar tênis. Faça manutenção preventiva regularmente.
Advarsler Råd n Medlemmer bør opfordres til at tale om deres helseprogram eller kondiregime med en læge. n Tillad ikke børn uden opsyn at bruge cyklen. n Sæt ikke fødderne under cyklen. n Stig af cyklen, hvis du bliver mat i kroppen eller svimmel. n Brug ikke cyklen uden kondisko. n Foretag forebyggende regelmæssige mellemrum. med n Brug ikke cyklen udendørs i regnvejr eller i et indelukket område med svømmebasin. n Gør øvelserne langsomt, indtil du når et behageligt og sikkert niveau.
(JAPANESE SAFETY INSTRUCTIONS HERE STAR TRAC S SERIES BIKES OWNER’S MANUAL 11
ASSEMBLY AND SETUP S SERIES UPRIGHT BIKE ASSEMBLY AND SETUP Use the following procedures to unpack and assemble your STAR TRAC S-UB / S-UBx UPRIGHT BIKE.
2. Install the Rear Foot Lift up the rear of the bike frame and place the rear foot assembly in position under the frame, aligning the holes in the foot with the holes in the frame. Using four M10 X 30 button head screws, secure the rear foot assembly to the frame. Tighten all four screws securely. Step 2 3. Install the Display Console NOTE: It is necessary to have one person support and position the display console while a second person makes the cable connections.
CAUTION: Be sure not to pinch the display cables between the console neck and the bike frame. While gently pushing the display cables up into the display console neck, carefully slide the console neck onto the neck brackets until it is fully seated. Secure the display console to the bike frame with four M6 X 16 button head screws (two screws in front side and two screws in back side). Tighten all four screws securely. 4.
S SERIES RECUMBENT BIKE ASSEMBLY AND SETUP Use the following procedures to unpack and assemble your STAR TRAC SRB / S-RBx RECUMBENT BIKE. UNPACKING NOTE: Complete unpacking instructions are printed on the side of the shipping carton. Turn the shipping carton upside-down, and fully open all four flaps on the bottom of the carton. Turn the shipping carton right-side up, then lift the carton off of the foam inserts.
Stand the bike frame upright and place the front foot assembly under the frame, aligning the holes in the foot with the holes in the frame. NOTE: It may be necessary to raise the frame slightly to align the holes in the frame with the mating holes in the front foot. Using four M10 X 30 button head screws, secure the front foot assembly to the frame. Tighten all four screws securely. Step 1 2.
While holding the power cable connectors together, make a small “bundle” of the cable, and wrap with electrical tape to prevent the connectors from separating. Step 3c CAUTION: Be careful not to pinch your fingers between the console neck and the bike frame when sliding the console into place. CAUTION: Be sure not to pinch the display cables between the console neck and the bike frame.
OPERATING INSTRUCTIONS Operating the STAR TRAC S SERIES BIKE is very easy. Simply mount the bike, begin pedaling, and press QUICK START. Learning the features and incorporating the STAR TRAC S SERIES BIKE into your members' fitness programs is just as easy. In this chapter, you will learn the display function and how to get the most out of every STAR TRAC S SERIES BIKE workout.
Note your height adjustment (shown on the top of the seat rail either in front of or behind the seat) for future reference. PEDAL STRAP OPERATION The pedal straps should be adjusted to hold each foot comfortably but firmly on the pedal. Place your foot on the pedal, then adjust the pedal strap as necessary. Pull the free end of the strap down to tighten. Press the release button to loosen.
TIME Window: Shows the duration of your workout thus far in minutes and seconds. RPM Window: Shows the current speed at which you are pedaling in revolutions-per-minute. DISTANCE Window: Shows the total number of miles or kilometers you have ridden thus far. CALORIES / METS WINDOW: Alternates, display of your aggregate caloric expenditure (displays for six seconds) and aggregate METS expenditure (displays for three seconds) thus far in your workout.
n Press the key, as necessary, to cycle the personal fan from OFF to LOW to HIGH to OFF. An LED indicator lights to show the currently selected fan speed. n The fan remains set at the set speed if you pause your program. n The fan turns off automatically if you exit your workout, or when you complete your workout program. HEART RATE MONITORING Heart rate monitoring allows you to determine if your workout is too challenging or not challenging enough.
QUICK START Quick Start lets you begin your workout by simply pressing one key, or by pedaling for approximately 10 seconds without pressing any key. Quick Start uses a default weight of 155 pounds (70 kg), a resistance LEVEL of 1, and a time limit of 99 minutes. YOU control resistance Level during the entire program. NOTE: The default time and weight are adjustable through Manager / Maintenance Mode. To operate the Quick Start program: 1.
4. n Use the keys to enter your current weight; or press the the displayed weight in 1 pound (or 1 kg) increments. n When your correct weight has been entered, press the or key, as necessary, to increase or decrease key to accept the displayed value. You are prompted to enter a time goal. The default time is 99 minutes. You may enter any time from 1 to 99 minutes. 5. n keys to enter your desired time goal; or press the Use the decrease the displayed value in 1 minute increments.
n Use the keys to enter a resistance level (from 1 to 20) or press the decrease the resistance LEVEL in 1 unit increments. n When the desired resistance LEVEL has been entered, press the or key, as desired, to increase or key to accept the displayed LEVEL. 6. If desired, you can use the personal fan during your workout (see “Using the Personal Fan” for details). 7.
9. If desired, you can jump to another preset program if your remaining workout time is greater than 5 minutes. n To jump to another preset program, press the or key, as desired. 10. When you have reached your workout goal, the bike enters the Cooldown cycle (see “Cooldown Cycle” for details). If you wish to exit the program before you have reached your workout goal, stop pedaling and allow the Pause timer to expire.
10. When you have reached your workout goal, the bike enters the Cooldown cycle (see “Cooldown Cycle” for details). If you wish to exit the program before you have reached your workout goal, stop pedaling and allow the Pause timer to expire.
n 9. When the desired lower heart rate limit has been entered, press the key to accept the displayed value. If desired, you can use the personal fan during your workout (see “Using the Personal Fan” for details). 10. If you wish to pause the program, stop pedaling. The bike enters pause mode and a “P” flashes in the TIME Window. Resume pedaling within 25 seconds to continue your workout. 11. When you have reached your workout goal, the bike enters the Cooldown cycle (see “Cooldown Cycle” for details).
You are required to raise your heart rate between 120 and 170 BPM for minutes 5, 6 and 7 (optional minute determined by the program). If, during the test, your heart rate reading levels out increase the resistance LEVEL, but DO NOT change the speed at which you are pedaling. The Fitness Test utilizes age, gender, weight, workload output and HR to calculate two values: n Max VO2 (in m/O2/Kg/min) - measurement of oxygen consumption, which is used to define aerobic fitness.
5. n Use the keys to enter your current weight; or press the the displayed weight in 1 pound (or 1 kg) increments. n When your correct weight has been entered, press the or key, as necessary, to increase or decrease key to accept the displayed value. You are prompted to enter your goal for calories expended. You may enter any calorie goal from 1 to 999 calories. n keys to enter your calorie goal; or press the Use the displayed calories in 1 calorie increments.
5. You can increase the resistance LEVEL during the program by increasing your pedaling speed. Decreasing your pedaling speed will lower the resistance LEVEL. 6. If you wish to pause the program, stop pedaling. The bike enters pause mode and a “P” flashes in the TIME Window. Resume pedaling within 25 seconds to continue your workout. 7. When you have reached your workout goal, the bike enters the Cooldown cycle (see “Cooldown Cycle” for details).
n Vacuum the floor under and around the bike. Move the bike to another spot, if necessary, to vacuum thoroughly. n Inspect the display panel mounting screws for security, and retighten if necessary. n Inspect the display panel keypads for wear. MONTHLY MAINTENANCE Perform the following services each month, or as needed: n Check that the seat, pedals and shrouds are secure. n Tighten the pedals onto their respective pedal cranks using a 5/8-inch open end wrench.
and cooldown. WGT 1 (lb) 1 (kg) 500 (lb) 226 (kg) 155 (lb) 70 (kg) Default Weight (to user). Typical weight in lb (UNx = UNE) or kg (UNx = UNM). Lxx N/A N/A LEN Language. Display language; either LEN (English), LGE (German), LSP (Spanish), LDU (Dutch), LPO (Portuguese), LFR (French), LIT (Italian), LSW (Swedish) or LKA (Katakana). LOE OFF ON OFF Lockout Enable. Enables/disables lockout function. LOI 001 999 001 Lockout ID. Lockout override identification number.
Item Lowest Value Highest Value Default Value Lxx N/A N/A LEN Language. Display language; either LEN (English), LGE (German), LSP (Spanish), LDU (Dutch), LPO (Portuguese), LFR (French), LIT (Italian), LSW (Swedish) or LKA (Katakana). LOE OFF ON OFF Lockout Enable. Enables/disables lockout function. LOI 001 999 001 Lockout ID. Lockout override identification number. MDL 1 2 N/A Model. 1-- QKS 0 9999 0 Quick Start. Number of times the Quick Start program was run since last reset.
TROUBLESHOOTING STAR TRAC S SERIES BIKES perform a self-test at the beginning of every workout. If a problem is detected, a message displays before or after the workout, depending on the nature of the problem. Star Trac recommends that you refer your questions about your STAR TRAC S SERIES BIKE operation and suspected malfunctions to Star Trac’s Service Hotline at (800) 503-1221, or USA 1-714-669-1660.
STAR TRAC 14410 Myford Road Irvine, California 92606 Telephone: (800) 228-6635, (714) 669-1660 Fax: (714) 508-3303 http://www.startrac.com email: support@startrac.