
User Manual


6
© Copyright 2012 Star Water Systems. All rights reserved.
5.1) Testing of Pump (Main Switch)
1) With the discharge line in place, plug in the pump.
2) Pour water into the pump reservoir, through one of the inlets, until the pump activates to verify that the unit
works.
Note: If both inlets are plumbed, then it will be necessary to temporarily remove one of the pipes in order to pour water
into the reservoir. Replace pipe once testing is complete.
5.2) Testing of Safety Switch (If applicable)
Note: Unplug the pump for this test.
1) Energize the appliance so that it runs.
2) Pour water into the reservoir as described in Section 5.1 item 2.
3) Aswaterrisesinthereservoir,theoverowSwitchshouldactivate,breakingthethermostatcircuittotheappli-
ance and/or triggering the alarm.
4) Plug the pump in and allow the pump to empty the tank. As the water level decreases, the appliance will reset.
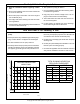
Trouble Shooting Guide
A. UNIT DOESN’T RUN.
B. PUMP MAKES LOUD NOISES WHEN
RUNNING.
C. PUMP RUNS BUT DOES NOT PUMP
LIQUID OUT.
D. LIQUID DRAINS BACK INTO PUMP
FROM DISCHARGE LINE.
E LIQUID LEAKS FROM AROUND
CHECK VALVE.
Pump not plugged in.
Low voltage; blown fuse, open circuit.
No condensate in reservoir.
Motor or wiring shorted.
Drain/Discharge line(s) blocked.
Debris in reservoir.
Float bound.
Maximum discharge height exceeded.
Discharge tube blocked.
Check Valve obstruction.
Check Valve damaged.
Check Valve damaged.
Check Valve obstruction.
Highest point of discharge line is less
than 5’.
Check Valve is too tight or too loose.
O-ring damaged.
Plug in.
Haveaqualiedelectriciancheckfusecircuit.
Be certain the appliance is generating con-
densate. Check drain line(s) and/or discharge
line for blockage.
Contact Factory.
Check drain line(s) and/or discharge line for
blockage.
Refer to “Maintenance Guidelines” section for
cleaning instructions.
Refer to “Maintenance” section for cleaning
instructions.
Measure from bottom of pump to highest point.
Rework discharge if height is greater that 18’.
Refer to STEP 3 for guidelines.
Check discharge line for blockage, remove
debris.
Refer to “Maintenance” section for cleaning
instructions.
Contact Factory.
Contact Factory.
Refer to “Maintenance” section for cleaning
instructions.
Check valve may allow some condensate to
drain out of line into reservoir. This is normal.
Check valve should be hand tight, then tighten
an additional 1/2 turn with a 9/16” wrench.
Replace with a 1/2 ID X 11/16” OD X 3/32” thick
O-ring or contact Star Service Station.
Condition Possible Cause Remedy
Before servicing a pump, always shut off the main power
breaker and then unplug the pump - making sure you are not standing in
water and are wearing insulated, protective-sole shoes. Under ooded condi-
tions, contact your local electric company or a qualied licensed electrician
for disconnecting electrical service prior to pump removal.
If the above checklist does not solve the problem, consult Star Water Systems
Technical Service Department 1-800-345-9422 - Do not attempt to service or
otherwise disassemble pump.
STEP 5 Testing of Pump Operation