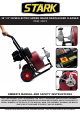
50’ 1/2” 250W ELECTRIC SEWER SNAKE DRAIN AUGER CLEANER ITEM: 45074 OWNER’S MANUAL AND SAFETY INSTRUCTIONS SAVE THIS MANUAL: KEEP THIS MANUAL FOR SAFETY WARNINGS, PRECAUTIONS, ASSEMBLY, OPERATING, INSPECTION, MAINTENANCE AND CLEANING PROCEDURES.
IMPORTANT SAFETY INFORMATION GENERAL SAFETY WARNINGS Read all safety warnings and instructions. Failure to follow the warnings and instructions may result in electric shock, fire and/or serious injury. Save all warnings and instructions for future reference. SAFETY The warnings, precautions, and instructions discussed in this instruction manual cannot cover all possible conditions and situations that may occur.
IMPORTANT SAFETY INFORMATION Stay alert, watch what you are doing and use common sense when operating this tool. DO NOT use a power tool while you are tired or under the influence of drugs, alcohol or medication. A moment of inattention while operating power tools may result in serious personal injury. Use personal protective equipment. Always wear eye protection.
ELECTRICAL SAFETY INFORMATION Be aware of possible damage to the drain lines that may result from the discovery of roots and obstacles. To prevent electric shock and death from incorrect grounding wire connection. Check with a qualified electrician if you are in doubt as to whether an outlet is properly grounded. 3-Prong Plug and Outlet 1. Tools marked with “Grounding Required” have a three wire cord and three prong grounding plug. The plug must be connected to a properly grounded outlet.
PRODUCT INFORMATION SEALED AIR FOOT SWITCH FRAME BELT GAURD KNOB HANDLE LOCKING KNOBS ROTATION SWITCH TOOL TRAY BELT GAURD TENSION KNOB DRUM POWER FEED LEVER CABLE WHEEL Assembled Product Dimensions (L x W x H): 23.00 x 17.50 x 36.00 Inches FEATURES This Portable Drain Cleaning Machines clears lines from 1” to 4”. Easily drive and retract the 1/2” cable using the automatic power feed system.
ASSEMBLY NOTICE: If the cause of the obstruction is unknown, use the bulb cutter to explore the obstruction. If possible, retreive a piece to inspect. Once you can see the cause of the obstruction, select the appropriate tool for the job. Run the smallest available tool through the blockage to allow the backed up water to flow and carry away the debris as the drain is cleaned. Once the drain is flowing, more appropriate tools can be used on the rest of the blockage.
SET UP WARNING: Before each use, inspect the drain cleaner and correct any problems to reduce risk of serious injury from electric shock, twisted or broken cables, chemical burns, infections and other causes and prevent drain cleaner damage. WARNING: Read and adhere to the following guidelines to prevent serious personal injury and property damage. ALWAYS wear ANSI approved goggles, hork gloves and appropriate equipment when setting up your drain cleaner.
SET UP 18. Press the foot switch and note the direction of rotation of the drum. if the foot switch does not control the cleaner’s operation, DO NOT use the machine until the foot switch has been repaired. 19. The drum should rotate clockwise when seen from the front of the drum. It wil match the drum direction shown on the warning label and the arrows molded onto the drum. 20. release the foot switch and let the drum come to a complete stop.
SET UP 14. Verify the electrical outlet is properly grounded. A three oring or GFCI outlet may not be properly grounded. If in doubt, have the outlet inspected by a licensed technician. Install the tool to the end of the cable. Slide the base of the cutter tool into the slot at the end of the cable. Fasten together using a screwdriver. 15. Postion the foot switch for easy accessibility. You must be able to hold and control the cable, control the foot switch and reach the power switch. 16.
OPERATION RETREIVING DRAIN CLEANER CABLE 1. Once the drain is clear, turn on the faucet or use a hose to flush the debris out. NOTE: Pay attention to the water level. There could be blockages further down the drain. 2. Set the power switch to the OFF position and unplug the machine. 3. Pull the cable from the drain by hand and feed into the drain cleaner. The flow of water down the line will helo ti clean the cable as it is retreived. if necessary, change the cutting tool and cintinue cleaning.
MAINTENANCE Turn the power switch OFF and unplug the drain cleaner before performing any maintenance. ALWAYS wear safety goggles and gloves while performing any maintenance. CLEANING DRAIN CLEANER CABLES 1. Thoroughly flush the drain cleaner cables with clean water after every use. 2. Once cables have been flushed, carefully tip the drain cleaner forward to empty out any remaining debris. 3. Once the cable is clean and dry, pull the cable from the drum. 4.
TROUBLESOOTING 11
PARTS 12
WARRANTY PLEASE READ THE FOLLOWING CAREFULLY THE MANUFACTURER AND/OR DISTRIBUTOR HAS PROVIDED THE PARTS LIST AND ASSEMBLY DIAGRAM IN THIS MANUAL AS A REFERENCE TOOL ONLY. NEITHER THE MANUFACTURER OR DISTRIBUTOR MAKES ANY REPRESENTATION OR WARRANTY OF ANY KIND TO THE BUYER THAT HE OR SHE IS QUALIFIED TO MAKE ANY REPAIRS TO THE PRODUCT, OR THAT HE OR SHE IS QUALIFIED TO REPLACE ANY PARTS OF THE PRODUCT.