
Use and Care Manual


OPERATION and MAINTENANCE
11
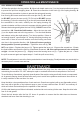
COIL SPRING ADJUSTMENT
1. Raise the spindle to the top position. 2. Move both depth scale nuts (1) to the lowest position and tighten
to prevent the quill from dropping down. 3. Place the screwdriver in the notch (2) of the spring housing. 4.
Firmly hold the screwdriver in place to prevent the spring and housing
from moving. 5. Loosen and remove the outer jam nut (3). 6. Loosen
but DO NOT remove the inner nut (4). 7. Pull out but DO NOT remove
the housing (5) from the raised lug (6) on the drill press head. 8. With
the screwdriver in the notch, carefully turn the spring housing 95)
counter-clockwise until the next notch engages with the raised lug. 9.
Release the housing and tighten the inner nut (4). DO NOT remove the
screwdriver. 10. Check the Quill tension • Move the two stop nuts
(1) on the depth scale rod to the top position. • Turn the feed handles
and release, raising the depth pointer (7) to the top position. If there is
not enough tension, repeat steps 6-9, moving the spring housing one
more notch. If there is too much tension, move the housing one notch
at a time in the opposite direction. 11. If the quill returns gently to
the top position (correct operation): • Tighten the inner nut (4), DO
NOT over tighten. • Replace the jam nut (3). Tighten against the inner nut. • Remove the screwdriver. • Rotate
the feed handles and check the quill for unrestricted movement. 12. If the quill movement is too restricted
or tight: • Loosen the jame nut (3). • Slightly loosen the housing inner nut (4). • Tighten the jam nut. • Check
the quill movement again and repeat steps 1-3 until the quill moves freely.
NOTE: This adjustment is set at the factory and should not need changing. Readjustments may eventually be
necessary due to normal wear and tear.
WARNING: Turn the power switch OFF and disconnect the plug from the outlet prior to adjusting or
maintaining the machine. DO NOT attempt to repair or maintain the electrical components of the motor.
To avoid build up of wood dust, regularly clean all parts of the machine using a soft cloth, brush or compressed
air. A general cleaning should be done after every use to avoid future problems and ensure the machine is
in ready condition for the next time it is used.
Keep the table, column and base free of resin and rust. Clean them regularly with a non-ammable solvent,
then coat with a light lm of dry lubricant spray or wax, to keep surfaces clean. DO NOT use ordinary oil
which will collect dust and hamper the operation of the machine.
All of the ball bearings are lifetime lubricated, sealed and do not need any further care. Keep the drive belts
free of oil and grease.
Check the belt tension after the rst 3-5 hours of operation to ensure that the belts have not become
stretched and loose from their breaking in use.