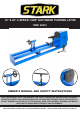
4” X 40” 4-SPEED 1/2HP 120V WOOD TURNING LATHE ITEM: 66012 OWNER’S MANUAL AND SAFETY INSTRUCTIONS SAVE THIS MANUAL: KEEP THIS MANUAL FOR SAFETY WARNINGS, PRECAUTIONS, ASSEMBLY, OPERATING, INSPECTION, MAINTENANCE AND CLEANING PROCEDURES. WRITE THE PRODUCT’S SERIAL NUMBER ON THE BACK OF THE MANUAL NEAR THE ASSEMBLY DIAGRAM (OR MONTH AND YEAR OF PURCHASE IF PRODUCT HAS NO NUMBER).
IMPORTANT SAFETY INFORMATION GENERAL SAFETY WARNINGS Read all safety warnings and instructions. Failure to follow the warnings and instructions may result in electric shock, fire and/or serious injury. Save all warnings and instructions for future reference. SAFETY The warnings, precautions, and instructions discussed in this instruction manual cannot cover all possible conditions and situations that may occur.
IMPORTANT SAFETY INFORMATION Dress properly. DO NOT wear loose clothing, dangling objects, or jewellery. Keep your hair, clothing and gloves away from moving parts. Loose clothes, jewellery, or long hair can be caught in moving parts. Air vents on the tool often cover moving parts and should be avoided. Wear the proper personal protective equipment when necessary. Use ANSI Z87.1 compliant safety goggles (not safety glasses) with side shields, or when needed, a face shield.
DIAGRAM AND SPECIFICATIONS MOTOR SPECIFICATIONS The Wood Lathe is designed to use a 3400 RPM motor only. Do not use a motor that runs faster than 3400 RPM. This Wood Lathe is wired for operation on 110-120 volts, 60Hz alternating current. To avoid injury from unexpected start-up, do not use blower or washing machine motors or any motor with an automatic reset overload protector. CONNECTING TO A POWER SOURCE This machine must be grounded while in use to protect the operator from electric shock.
DIAGRAM AND SPECIFICATIONS The use of any extension cord will cause some loss of power. To keep this to a minimum and to prevent overheating and motor burn out, use the table to determine the minimum wire size (A.W.G.) for an extension cord. Use one a 3-wire extension cord which have 3-prong grounding type plugs and 3-pole receptacles which accept the tool’s plug. PARTS IDENTIFICATION ON/OFF SWITCH: Device to turn the Wood Lathe power ON or OFF. BELT AND PULLEY COVER: Cover for the Belt and Pulley.
OPERATION AND ADJUSTMENTS Separating and checking contents: Separate all loose parts from packing materials and make sure all parts are accounted for before discarding packing material. If any parts are missing, do not attempt to assemble the Wood Lathe or plug into a power source. If pieces are missing, contact your distributor or XtremePowerUS directly. To avoid fire or toxic reaction, never use gasoline, naphtha or any highly volatile solvents.
OPERATION AND ADJUSTMENTS MOVING TAIL STOCK ASSEMBLY AND TOOL REST The tail stock assembly and tool rest are held to the bed with the lock handle right underneath the bed rails. To move them to a new position: 1. Disconnect the lathe from power source. 2. Loosen the lock handle with the knob. 3. Slide the tail stock assembly or tool rest along the bed and re-tighten the lock handle. MOUNTING THE LATHE The lathe must be mounted to a firm supporting surface such as a stand or workbench when operating.
OPERATION AND ADJUSTMENTS INSTALLING THE FACEPLATE The faceplate is supplied with your lathe. To install the faceplate: 1. Disconnect the lathe from power source. 2. Remove the drive center from the driving spindle. 3. Align the center hole of faceplate to the thread of the spindle. 4. Screw the faceplate into the spindle. ALIGNING CENTERS If the centers are not in the lines, make the following adjustments: 1. Move the tail stock assembly close to the drive center assembly. 2. Lock the tail stock assembly.
OPERATION AND ADJUSTMENTS USING A SKEW The tool is nearly always used to make finished cute, to cut vees and beads and to square shoulders. It produces the best finish that can be obtained without a chisel. To avoid dulling, it should be used very little for scraping. For finish cutting, the skew is held with the cutting edge considerably in advance of the handle, bevel side down.
OPERATION AND ADJUSTMENTS CUTTING VEES Vee grooves can be cut with the toe or heel of the skew. When the toe is used, the cutting action is exactly the same as the same as in trimming a shoulder, except the skew is tilted to cut at the required bevel. Light cuts should be taken down on one side first, then the other, gradually enlarging the vee to the required depth and width. When the heel is used, the skew is rotated down into the work using the tool rest as a pivot.
TROUBLESHOOTING 10
PARTS LIST MAINTAINING YOUR WOOD LATHE For your own safety, turn the power off and remove the plug from the power source outlet before maintaining or lubricating your wood lathe. Blow out any dust that may accumulate inside the motor. A coat of automobile-type wax applied to the rail and center driver will help to keep the surfaces clean. If the power cord is cut, worn or damaged, do not plug it in and have it repaired or replaced to avoid shock, a fire hazard or serious injuries.
PARTS DIAGRAM 12
WARRANTY PLEASE READ THE FOLLOWING CAREFULLY THE MANUFACTURER AND/OR DISTRIBUTOR HAS PROVIDED THE PARTS LIST AND ASSEMBLY DIAGRAM IN THIS MANUAL AS A REFERENCE TOOL ONLY. NEITHER THE MANUFACTURER OR DISTRIBUTOR MAKES ANY REPRESENTATION OR WARRANTY OF ANY KIND TO THE BUYER THAT HE OR SHE IS QUALIFIED TO MAKE ANY REPAIRS TO THE PRODUCT, OR THAT HE OR SHE IS QUALIFIED TO REPLACE ANY PARTS OF THE PRODUCT.