Custom Hearing Aids O p e r atio n s M a n u a l In-The-Ear, In-The-Canal, Completely-In-Canal
Table of Contents Overview Features, Controls and Identification. . . . . . . . . . . . . . 1 Preparation Batteries. . . . . . . . . . . . . . . . . . . . . . . . . . . . . . . . . . . . 4 Battery Indicators. . . . . . . . . . . . . . . . . . . . . . . . . . . . . 6 Insertion and Removal. . . . . . . . . . . . . . . . . . . . . . . . . 7 Operation On & Off . . . . . . . . . . . . . . . . . . .
ITE Overview Features, Controls and Identification Your hearing system controls include: 1. Microphone opening(s) 2. Battery compartment (on/off control) 3. Vent (optional) 4. Sound outlet (receiver) and wax protection system Your hearing system can be identified by: 5.
ITC Overview Features, Controls and Identification Your hearing system controls include: 1. Microphone opening(s) 2. Battery compartment (on/off control) 3. Vent (optional) 4. Sound outlet (receiver) and wax protection system Your hearing system can be identified by: 5.
CIC Overview Features, Controls and Identification Your hearing system controls include: 1. Multimemory button (optional) 2. Microphone opening 3. Sound outlet (receiver) and wax protection system 4. Battery compartment (on/off control) 5. Removal handle 6. Vent (optional) Your hearing system can be identified by the color of the instrument case (red is for the right ear and blue is for the left ear) and the serial number: 7.
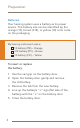
Preparation Batteries Your hearing system uses a battery as its power source. This battery size can be identified by the orange (13), brown (312), or yellow (10) color code on the packaging. My hearing instrument uses a: 1 3 battery (ITE) – Orange 3 12 battery (ITC) – Brown 1 0 battery (CIC) – Yellow To insert or replace the battery: 1. Use the nail grip on the battery door. 2. Open the battery door gently and remove the old battery. 3. Remove the tab from the new battery. 4.
Preparation 1 2 3 4 5 5
Preparation Battery Indicators An indicator will sound when the battery voltage is low. You have approximately 20 minutes* to replace the battery. A different indicator will sound just before the battery stops working. * Actual time between low battery indicator and shut down will vary depending on environmental noise levels and brand of battery used.
Preparation Insertion and Removal To insert the hearing instrument: 1. Hold the instrument with your thumb and forefinger on the outer edges of the case. 2. Tilt your hand slightly forward and gently insert the canal tip of the instrument into your ear canal and rotate the instrument backward. Softly press the instrument into place with your fingertip. 1 2 To remove the hearing instrument: Grasp the instrument with your thumb and forefinger; gently rotate it as you pull outward.
Preparation Helpful Hints • Minor irritation and inflammation may occur as your ear becomes accustomed to having an object in it; if so, please contact your hearing care professional • If an actual allergic reaction occurs, alternative materials are available; contact your hearing care professional • Severe swelling, discharge from the ear, excessive wax, or other unusual conditions warrant immediate consultation with a physician Warnings Batteries are dangerous if swallowed.
Operation On & Off To turn ON: Insert a battery and completely close the battery door. My volume control is also an on/off switch. Devices with volume control: Rotate forward to turn device on. To turn OFF: Open the battery door until the battery is no longer touching the battery contacts. Some hearing instruments are programmed to have a Power-On delay. Your hearing professional will place a check in the box below if your hearing instruments have this feature. My hearing instrument has a Power-On delay.
Operation Volume Control My hearing instrument has a volume control. Please read the section below. My hearing instrument volume is set automatically. See page 11. To turn the instrument “on,” use your fingertip to rotate the volume control forward, toward your face. You should feel it “click” on if the instrument was correctly turned off. 1. To make sounds louder, continue to rotate the control forward, toward your face. On or Volume Increase 2.
Operation My hearing system has: Optimal volume control indicator Minimum volume control indicator Maximum volume control indicator Your hearing system has been set to a specific volume level by your hearing care professional. If sounds are generally too loud or too soft, please contact your hearing care professional for advice and adjustment. Multimemory Settings My hearing instrument has Multimemory. Please read the section below. My hearing instrument does not have Multimemory. See page 13.
Operation When you press the Multimemory button, you may hear an indicator or a tone series indicating the device has changed to the next program. Your hearing instrument has been set up with the following environments.
Operation Directional Settings My hearing system uses directional microphones. Please read the information below. My hearing system uses omnidirectional microphones. See Telephone Use section on page 14. Directional microphones help improve speech understanding in noisy situations.
Operation When the directional microphones are activated automatically (automatic), the hearing instrument will continually monitor the environment and gradually adjust to the appropriate mode to optimize speech intelligibility. When the directional microphones are activated by pushing the Multimemory button (manual), the hearing instrument optimizes speech when you select the directional memory. Ask your hearing care professional about your particular directional settings.
Operation Automatic Telephone Response and Automatic Telecoil These options activate the telephone response automatically when used with a hearing aid compatible telephone. To use, place the telephone receiver on your ear as you normally would and the hearing instrument will select the telephone setting. It might be necessary to move the telephone receiver slightly to find the best reception. Once the telephone is removed from the ear, the hearing instrument will switch back to the normal listening mode.
Operation Telecoil and Manual Switching Hearing instruments with a manual telecoil allow you to switch the devices to telephone mode when needed. Manually switched telecoils are activated by choosing the telecoil setting using the Multimemory button. General Telephone Use Some hearing instruments work best by holding the phone close to, but not fully covering your ear. In some instances, if you encounter whistling (feedback), tilt the receiver at an angle until the whistling stops.
Operation Some hearing aid users have reported a buzzing sound in their hearing aids when they are using cell phones, indicating that the cell phone and hearing aid may not be compatible. According to the ANSI C63.19 standard (ANSI C63.
Operation T2 (touch-tone) Function My hearing instrument has T2 capability. Please read the section below. My hearing instrument does not have T2 capability. See page 20. You may use a cell phone, cordless telephone, or corded telephone to adjust your hearing system. The telephone MUST “beep” when the keys are pressed for this function to work. If your telephone does not “beep” when the keys are pressed, consult your telephone operator’s manual or contact your telephone service provider.
Operation Use the following keypad buttons to remotely adjust your hearing aid settings.
Operation Self Check Some hearing systems can run a diagnostic test of their own performance. This feature is called Self Check. Your hearing care professional will check the box below if this feature is activated. My Self Check feature is activated. My Self Check indicator is a: S peech Indicator (“Good”/ “Make Appointment”) T one Indicator To perform the Self Check: 1. Open and close the battery door three times. 2. Place the hearing system in your ear. 3. Listen for the status indicator. 4.
Operation Reminder Some hearing systems have been programmed with a Reminder indicating that it is time to schedule an appointment. Your hearing care professional will check the box below if this feature is activated. My Reminder feature is activated. My Reminder indicator is a: Speech Indicator (“Make Appointment”) Tone Indicator The Reminder will occur automatically. When you hear the Reminder indicator, please contact your hearing care professional.
Operation Summary of Settings Program 1 Environment Directional Setting Normal Off Automatic Program 2 Off Automatic Manual Program 3 Off Automatic Manual Program 4 Off Automatic Manual Low Battery — — Battery End of Life — — Standby — — Push and Hold — — Self Check — — Reminder — — Volume Control — — 22
Operation Indicator Tone On Yes No Indicator Tone Type Yes No Speech 1 Tone Yes No Speech 2 Tones Tone Series Yes No Speech 3 Tones Tone Series Yes No Speech 4 Tones Tone Series Yes No Speech Tone Series Yes No Speech Sustained Tone Yes No Tone Series Yes No Speech Tone Series Yes No Speech Tone Series Yes No Speech Tone Series Optimal VC Minimum VC Maximum VC Tone Series 23
Hearing System Care Instrument Care Do your best to keep your hearing instrument clean at all times. Heat, moisture and foreign substances can result in poor performance.
Hearing System Care Service and Repair If, for any reason, your hearing system does not operate properly, do NOT attempt to fix it yourself. Not only are you likely to violate any applicable warranties or insurance, you could easily cause further damage. Should your hearing system fail or perform poorly, check the guide below for possible solutions. If problems continue, contact your hearing care professional for advice and assistance.
Tips for Better Communication Your hearing care professional will recommend an appropriate schedule to help you adapt to your new hearing system. It will take practice, time and patience for your brain to adapt to the new sounds that your hearing system provides. Hearing is only part of how we share thoughts, ideas and feelings. Reading lips, facial expressions and gestures can help the learning process and add to what amplification alone may miss.
Tips for Better Communication • Let others know what you need; keep in mind that people cannot “see” your hearing loss • Develop realistic expectations of what your hearing instruments can and cannot do • Better hearing with hearing instruments is a learned skill combining desire, practice and patience For Your Family and Friends Your family and friends are also affected by your hearing loss.
FDA Information Required Information The following additional information is provided in compliance with U.S. Food and Drug Administration (FDA) regulations: WARNING TO HEARING INSTRUMENT DISPENSERS.
FDA Information Following the medical evaluation, the physician will give you a written statement that states that your hearing loss has been medically evaluated and that you may be considered a candidate for a hearing instrument. The physician will refer you to an audiologist or hearing instrument dispenser, as appropriate, for a hearing instrument evaluation.
A global hearing technology company headquartered in Eden Prairie, Minnesota, U.S.A. Starkey Laboratories, Inc. 6700 Washington Avenue South Eden Prairie, MN 55344-3476 800.328.8602 www.starkey.com © 2009 Starkey Laboratories, Inc. All Rights Reserved. 84112-000 5/09 BKLT0116-01-EE-ST Rev.