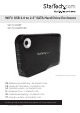
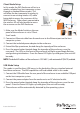
WiFi/ USB 2.0 to 2.5” SATA Hard Drive Enclosure S2510U2WF S2510U2WUKEU *actual product may vary from photos DE: Bedienungsanleitung - de.startech.com FR: Guide de l'utilisateur - fr.startech.com ES: Guía del usuario - es.startech.com IT: Guida per l'uso - it.startech.com NL: Gebruiksaanwijzing - nl.startech.com PT: Guia do usuário - pt.startech.com For the most up-to-date information, please visit: www.startech.
FCC Compliance Statement This equipment has been tested and found to comply with the limits for a Class B digital device, pursuant to part 15 of the FCC Rules. These limits are designed to provide reasonable protection against harmful interference in a residential installation. This equipment generates, uses and can radiate radio frequency energy and, if not installed and used in accordance with the instructions, may cause harmful interference to radio communications.
Table of Contents Introduction.............................................................................................1 Packaging Contents.................................................................................................................................. 1 System Requirements............................................................................................................................... 1 Front View.............................................................................
Introduction The S2510U2WF/S2510U2WUKEU WiFi/USB 2.0 to SATA Hard Drive Enclosure is a unique combination of wireless external storage device and wireless access point (AP) in one, enabling you to access data over a WiFi connection or a USB 2.0 connection (as a normal 2.5-inch SATA HDD enclosure), or create a local wireless hot spot with a shared hard drive (NAS).
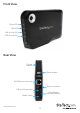
Front View Power LED WiFi LED LAN Activity LED HDD Activity LED Rear View Flip-up Antenna Power button RJ45 Ethernet connector Power connector USB mini-B connector Reset button (Restore Defaults) Mode Switch Instruction Manual 2
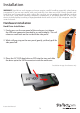
Installation WARNING! Hard drives and storage enclosures require careful handling, especially when being transported. If you are not careful with your hard disk, lost data may result. Always handle your hard drive and storage device with caution. Be sure that you are properly grounded by wearing an anti-static strap when handling computer components or discharge yourself of any static electricity build-up by touching a large grounded metal surface (such as the computer case) for several seconds.
4. Place the side panel back onto the enclosure, making sure to properly line up the latches before snapping the cover into place. AP Mode Setup In this mode, the WiFi Enclosure will act as a wireless access point (AP), enabling computers with wireless adapters to connect to it. All connected clients will then be able to access the resources of the WiFi Enclosure.
Client Mode Setup Computer In this mode, the WiFi Enclosure will act as a wireless adapter for a host computer system through a standard Ethernet port. This will allow the host computer to wirelessly connect to an existing wireless AP, while being able to access the resources of the WiFi Enclosure. Other clients connected to the wireless AP will also be able to access the resources on the WiFi Enclosure. Modem/Router 1.
Driver Installation No drivers are required to be installed to access the date on the WiFi Enclosure through USB mode. An optional client software for Windows operating systems is available to make locating and configuring the enclosure simple (AP and Client Scan settings only), for those whom do not wish to use the web interface. 1. To install the client software, insert the included Software CD into the computers CD/DVD drive. 2.
How to Use Once the hardware has been setup, changes to the network configuration may be necessary. These changes can be made either through the built-in web interface, or the Client software (Windows only). Web Interface A built-in web server offers a convenient interface for accessing the hard drive contents, as well as network configuration and the built-in Bit Torrent client and general maintenance and setup options of the WiFi Enclosure.
Setting The network settings for the WiFi Enclosure can be configured from this section. Settings specific for each mode can be accessed by clicking on the appropriate link/image. For AP mode, the wireless network name (SSID), security settings and IP addresses and WAN Port can be configured. For Client Scan mode, the list of available wireless networks and preferred networks (saved settings) will be listed.
Maintenance Updates to the firmware and software on the WiFi Enclosure can be performed from this section, as well as rebooting and shutting down the enclosure. The latest firmware can be downloaded from the StarTech.com website (www.startech.com). The Disk Format utility is found here and can be used to format the SATA drive and create one or two partitions. NOTE: The web interface will only recognize up to 2 partitions on the hard drive.
While logged in as the Admin account, you can set access rights/permissions for files and folders by clicking on the round icon under the “Action” heading on the far right side of each folder. The icon next to this is for the rename action, which allows for renaming files and folders. Access Rights Rename BitTorrent A built-in BitTorrent client (Transmission BT) allows for computer-less (standalone) downloading of files through the BitTorrent peer-to-peer (P2P)protocol.
Configuration options for the BT client are accessible from the Preferences settings button in the bottom left corner. Settings such as download/upload speeds, schedules and port configuration are available. Client Software (Windows only) The client software can be used as an alternative to the web interface to configure the WiFi Enclosure and access some of it’s features. While connected to the same network as the enclosure (either AP or Client Scan modes), click on the “Search” button.
Samba (SMB)/ FTP Access Once the WiFi Enclosure has been properly configured, the files and folders on the WiFi Enclosure can be accessed directly through SMB or FTP with the appropriate client software. SMB and FTP access are enabled by default, but can be disabled (or re-enabled) from the web interface’s System Settings -> Status page. Many FTP clients are available for any operating system, so please consult the software’s documentation for exact setup details.
Using the Storage Device (USB Mode) Windows 2000/ XP/ Vista/ 7/ 8 If you are using a brand new hard drive that does not contain any data, then you will first need to prepare the hard drive for use. From the main desktop, right-click on “My Computer” (“Computer” in Vista/ 7), then select Manage. In the new Computer Management window, select Disk Management from the left window panel.
The New Partition Wizard will appear. Follow the instructions in the wizard to complete setting up the drive. Once complete, the Disk should show up as “Healthy” with a drive letter assigned (i.e. E:). This drive letter should now appear within My Computer. If you are installing a hard drive that already has data on it, then after plugging it in, the drive should automatically show up with a drive letter assigned within My Computer.
Specifications Number of Drive Bays 1 Host Interface USB 2.0 Chipset ID Ralink RT3052 1 x USB 2.0 mini-B female External Connectors 1 x RJ45 Ethernet female 1 x DC Power 1 x Power 1 x WiFi Status LEDs 1 x LAN Status 1 x HDD Activity 2.5” SATA hard drive or solid state drive, 9.5mm height Compatible Hard Drives Supported File System Type FAT32, NTFS IEEE 802.3, IEEE 802.3u Networking Standards IEEE 802.11b/g/n Wireless Frequency 2.
Specifications (Cont’d) Operating Temperature 0°C ~ 40°C (32°F ~ 104°F) Storage Temperature -30°C ~ 70°C (-22°F ~ 158°F) Humidity 8% ~ 90% RH Dimensions 147.0mm x 93.0mm x 31.
Technical Support StarTech.com’s lifetime technical support is an integral part of our commitment to provide industry-leading solutions. If you ever need help with your product, visit www.startech.com/support and access our comprehensive selection of online tools, documentation, and downloads. For the latest drivers/software, please visit www.startech.com/downloads Warranty Information This product is backed by a two year warranty. In addition, StarTech.
Hard-to-find made easy. At StarTech.com, that isn’t a slogan. It’s a promise. StarTech.com is your one-stop source for every connectivity part you need. From the latest technology to legacy products — and all the parts that bridge the old and new — we can help you find the parts that connect your solutions. We make it easy to locate the parts, and we quickly deliver them wherever they need to go. Just talk to one of our tech advisors or visit our website.