
User Manual

Instruction Manual
DE: Bedienungsanleitung - de.startech.com
FR: Guide de l'utilisateur - fr.startech.com
ES: Guía del usuario - es.startech.com
IT: Guida per l'uso - it.startech.com
NL: Gebruiksaanwijzing - nl.startech.com
PT: Guia do usuário - pt.startech.com
Manual Revision: 04/24/2013
For the most up-to-date information, please visit: www.startech.com
Packaging Contents
• 2xFront/RearFrame
• 4xHorizontalFramePosts
• 2xAdjustableVerticalPost
• 52xHexboltandWasher
• 16xKEPnut
• 16xM6CageNutandCabinetScrew
• 4xSwivelCaster
Tools Required
• Adjustablewrench
4POSTRACK12A
12U 4 Post Server Equipment Open Rack Cabinet /w Casters
Installation
Verify packaging contents before proceeding with assembly.
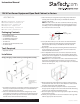
1. StandtheFrontFramepieceuprightsothatthesquareholesrun
fromtoptobottom(theFrontFramepieceislabeledwiththe
StarTech.comlogointhetopcorner).
2. PlaceoneoftheHorizontalFramePostsalongthetopinside
corneroftheFrontFramepiecewiththeCastermountingholes
facingupwards,andlineupthescrewholesoftheFrontFrame
withtheholesoftheHorizontalFramePost.
3. Fastenthetwopiecestogetherbythreadingtheprovidedhex
bolts(4),withwashers(4)intothepre-weldednutsfromthe
outsideoftheframe.
NOTE:Inordertoensureallofthescrewholeswilllineupeasily,
itisrecommendedtohand-tightenthenutsthroughtheentire
assemblyprocess,andthentightenusinganadjustablewrench
onceallboltshavebeeninserted.
4. SetuptheRearFramepieceattheotherendoftheHorizontal
FramePostandfastenbythreadingtheprovidedhexbolts(4)
withwashers(4)intothepre-weldednutsfromtheoutside
oftheframe.
5. Repeatstep2-4toattachtheremainingHorizontalFramePosts
totheremaining3corners,turningtherackovertoattachthe
bottomHorizontalFramePosts.
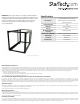
6. The2AdjustableVerticalPostscannowbeattachedtothetop
andbottomHorizontalFramePosts.Themountingdepthofthe
verticalpostscanbeadjustedin1”increments.Ensurebothposts
areinstalledatthesamepositions.
NOTE:Thereisa15”sectioninthecenteroftheHorizontalFrame
PostswheretheAdjustableVerticalPostscannotbeattached
(markedinthediagram).Theycanbemountedupto11”fromthe
frontorrearoftherack.
7. Onthebottomtwohorizontalframepoststherewillbe4holes
locatedatbothends.Thecasterscanbettedhereandfastened
usingthesuppliedHexboltsandKEPnuts.
8. Tomountrack-mountableequipmentintotherack,determine
theappropriateheightontherackandmatchwiththemounting
pointsonyourequipmentmountingbrackets.
9. Placethesquarecagenutsintotheappropriatesquaremounting
holes(fromtheinside).
10.Mountyourequipmentintotherackandfastentothecagenuts
withtheappropriatecabinetscrews.
1.HorizontalFramePost
2.Front/RearFrame
3.AdjustableVerticalPost
4.Casters
Caster
MountingHoles