
User guide

Instruction Manual
DE: Bedienungsanleitung - de.startech.com
FR: Guide de l'utilisateur - fr.startech.com
ES: Guía del usuario - es.startech.com
IT: Guida per l'uso - it.startech.com
NL: Gebruiksaanwijzing - nl.startech.com
PT: Guia do usuário - pt.startech.com
Manual Revision: 05/25/2012
For the most up-to-date information, please visit: www.startech.com
Packaging Contents
• 2xFront/RearFrame
• 2xFloorPlates
• 6xAdjustableHorizontalArm
• 2xFloorMountingBrackets
• 1xM8Hex(Allen)Key
• 8xM8x25HexSockeyScrews
• 42xM5x15TrussHeadScrews
• 16xBushingCaps
• 50xCabinetScrews
• 50xCageNuts
WARNING! Topreventbodilyinjury,pleaseensurethattherack
isinstalledinastructurallysoundenvironmentwithaleveloor
andthatallhardwarehasbeenassembledsecurely,andcheckedfor
stabilitybeforeloadingequipment.Wheninstallingequipmentinto
therack,startfromthebottomoftherackrstandmoveupwards,
keepingtheheaviestequipmentatthebottomtoavoidasituation
wheretherackbecomestop-heavy.
Tools Required
• Philips(crosshead)Screwdriver
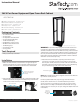
4POSTRACK36
36U 4 Post Server Equipment Open Frame Rack Cabinet
*actual product may vary from photos
Installation
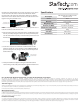
1. Makesurethatthefrontandrearframesarerightsideup.The
bottomoftheframehasholesfortheoormountingbrackets
andcasters.Makesurethatthepicturedendisatthebottom.
2. Attachtheoormountingbrackets(theL-shapedbrackets)tothe
bottomoftheframes.Usingtheincludedhexkey,installthehex
socketscrews.Install4screwsperbracket.
OptionalCastermounting
point,onthebottomof
rackframe.
HexSocketScrews
3. Attachthearmstotheframes.Separateyourarmsintopairs
(consistingofonewideandonenarrowarmperpair).Youwill
havesixpairsofarms,threeforeachsideoftherack.Thenarrow
armsthatconnectthebottomoftheframescanbeidentiedby
thepre-mountedcagenutsontheinsideofthearms.
NOTE:Wheninstallingthearms,itmightbeeasiesttostartwiththe
toparmsforstabilityreasons.
Forthetopandmiddlearms,snapthecagenutsintotheback
(inside)ofthenarrowarms.Itisrecommendedthatyouinstall
severalcagenutsoneacharm.Thecagenutsareeasiertoinstall
whentherackisnotfullyassembled.Youshouldinstallmorecage
nutsthanmaybenecessaryincaseyouchangethedepthoftherack
inthefuture.
Pre-installedcagenuts
Insideofa
narrowarm
withcagenuts
installed