
Instruction manual


Management Option II: Management Software
The management software allows you to power devices attached to your switch(es) on
and off and program advanced timer features to automate power events. Please see
Appendix A, “Configuring Your Computers for Remote Restarts” for important additional
information.
NOTE: It is recommended that you disable or uninstall any existing monitoring software
installed on the host computer that uses the serial port, such as UPS automation
software, as it may interfere with the communication between the switch and the
computer.
1. Choose a computer to be the host for the management software. Note that this
should be a computer that will not be plugged into the switch if you will be using the
provided software to remotely manage devices, and it should be in
close proximity to the switch unit.
2. Connect the male end of a RS-232 straight through serial cable (provided) to the port
marked RS-232 on the rear panel of the power switch.
3. Connect the opposite end to the serial port on your computer. The labelling and
location varies from model to model; consult your documentation or System
Administrator for assistance. Insert the CD that came with the switch into the host
computer’s CD-ROM drive.
4. Create a folder on a local drive of the host computer. This is the folder that will hold
the files for the software on the host computer. Use a folder location and name of
your choosing.
5. Open My Computer and double click the icon that represents the CD-ROM drive.
Highlight the files PowerSW1.exe and define.ini and choose Copy from the Edit
menu.
6. Open the folder you created in step 4 using My Computer or Windows Explorer.
Choose Paste from the Edit menu. You may wish to place a shortcut to
PowerSW1.exe in an easily accessible place such as the Windows desktop.
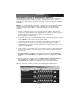
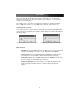
When you launch the software, you will be presented with the following menu:
Instruction Manual
6
Main Menu
Clickable Power button