
Quick Start Guide

Instruction Manual
DE: Bedienungsanleitung - de.startech.com
FR: Guide de l'utilisateur - fr.startech.com
ES: Guía del usuario - es.startech.com
I T: Guida per l'uso - it.startech.com
NL: Gebruiksaanwijzing - nl.startech.com
P T: Guia do usuário - pt.startech.com
Manual Revision: 09/18/2015
For the most up-to-date information, please visit: www.startech.com
Packaging Contents
• 1 x Shelf Body
• 2 x Front Mounting Bracket
• 2 x Rear Mounting Bracket
• 8 x M5x12 Hex Screw
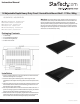
ADJSHELFHD / ADJSHELFHDV
1U Adjustable Depth Heavy Duty Fixed / Vented Rack Mount Shelf - 175lbs / 80kg
Installation
1. Locate a suitable location in the rack/cabinet to mount the shelf -
the shelf itself requires 1U of space.
2. If the rack uses square mounting holes, install cage nuts (not
included) into the square mounting holes on the front posts of the
rack.
3. Place the shelf into the rack and align the mounting points on the
front brackets of the shelf with the mounting points on the rack
(for example, cage nuts, if used).
4. Use the provided cabinet screws to secure the shelf to the rack. If
you’re not using cage nuts or M6 threaded rack posts, you should
use the appropriate mounting hardware for the rack.
5. Make sure the screws are properly tightened and the shelf has no
movement before attempting to place anything on the shelf. Be
sure to observe the maximum weight capacity of the shelf.
*ADJSHELFHD Shown
*ADJSHELFHDV Shown
Warning: To prevent bodily injury, please ensure that the rack is
installed in a structurally sound environment with a level oor and
that all hardware has been assembled securely, and checked for
stability before loading equipment. When installing equipment into
the rack, start from the bottom of the rack rst and move upwards,
keeping the heaviest equipment at the bottom to avoid a situation
where the rack becomes top-heavy.