U 8-Port KVM Module for 1UCABCONS 1U 16-Port KVM Module for 1UCABCONS CAB831HDU CAB1631HDU *actual product may vary from photos DE: Bedienungsanleitung - de.startech.com FR: Guide de l'utilisateur - fr.startech.com ES: Guía del usuario - es.startech.com IT: Guida per l'uso - it.startech.com NL: Gebruiksaanwijzing - nl.startech.com PT: Guia do usuário - pt.startech.com For the most up-to-date information, please visit: www.startech.
FCC Compliance Statement This equipment has been tested and found to comply with the limits for a Class B digital device, pursuant to part 15 of the FCC Rules. These limits are designed to provide reasonable protection against harmful interference in a residential installation. This equipment generates, uses and can radiate radio frequency energy and, if not installed and used in accordance with the instructions, may cause harmful interference to radio communications.
Table of Contents Introduction.............................................................................................1 Packaging Contents.................................................................................................................................. 1 System Requirements............................................................................................................................... 1 Installation..........................................................................
Introduction The CAB831HDU 8 Port USB KVM Switch Module is designed for use with StarTech.com’s 1UCABCONS series (1UCABCONS, 1UCABCONS17, 1UCABCONS19) 1U LCD Rack Console, allowing control of up to 8 USB based PCs or servers from a single console. Featuring a rugged and durable design, the USB KVM Module fits neatly behind your rack console to provide upgraded functionality while saving space in the rack.
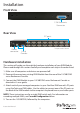
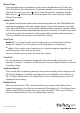
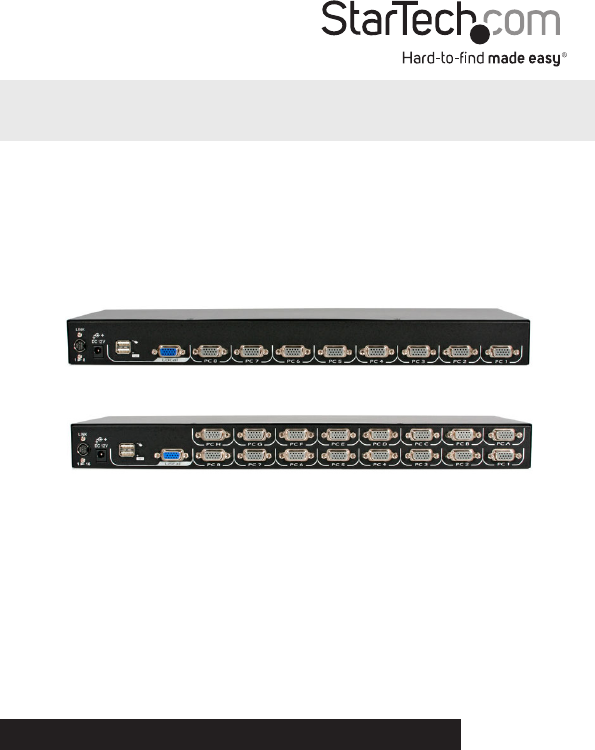
Installation Front View C-36 Centronics Connector Rear View PC ports Power connector *16-port model shown Local Console Hardware Installation This section will guide you through the hardware installation of your KVM Module. Please read through this section carefully and complete each step in the order listed. 1. Make sure all computers and devices are powered off. 2. Remove/disconnect any existing KVM Module from the rear of the 1UCABCONS series Rackmount Console. 3.
NOTE: After the initial power up, you can hot-plug additional computers or slave KVM switches without having to power down your KVM. NOTE: For any “CABxxxx” series KVM Module, the connectors (keyboard and mouse) for the Local Console port on the rear of the KVM module are not active while the module is connected to the LCD Console by the C-36 connector.
Operating Your KVM Switch To toggle between computers, you can use the hot-key commands, OSD (On-Screen Display) menu or by using the push buttons built into the 1UCABCONS series LCD Rack Console. Push Buttons A solid red indicator reflects the port selected. The indicator flashes red when in Auto or Manual Scan mode. You can press any of the corresponding push buttons to select the active computer. On the 16 port models, Port 1 and Port A share the same push button, as do Port 2 and Port B, etc.
Use the up < > and down < > arrow keys to highlight a computer and the key to select it. Or, you may press to exit the OSD and remove the OSD menu from the display; the status window returns to the display and indicates the currently selected computer or operating status. A triangle mark ( ►) to the right of a name indicates the port is cascaded to a Slave; the number at the left of the triangle mark shows the number of ports the Slave has (i.e. 8 for an 8-port switch).
Non-volatile memory stores all name entries until you change, even if the unit is powered down. Selecting Computers for Autoscan Function key - Use this key to switch the eye mark (N ) of a computer on or off. First, use the < > and < > arrow keys to highlight it, then press to switch its eye mark on or off. If Scan Type reads ‘Ready PC + N ‘, only the power-on and eye mark selected computers will be displayed sequentially in Scan mode.
Manual Scan Scan through power-on computers one by one by keyboard control. Scan Type (:More\Scan Type) determines if scanned computers must also be eye mark selected. Press the up arrow < > key to select the previous computer and the down arrow < > key to select the next computer. Press any other key to abort Manual Scan mode. Audio Stick An optional multimedia module can be linked to the back of each KVM Module for selecting microphone and stereo speaker signals.
CH Display Auto Off: After you select a computer, the port number and name of the computer will appear on the screen for 3 seconds then disappear automatically. Always On: The port number and name of a selected computer and/or OSD status are displayed on the screen all the time. The non-volatile memory stores the CH Display setting. Position The position of the selected computer name and/or OSD status displayed on screen during operation.
NOTE: It is unnecessary to switch the Sun mark ON or OFF if an authentic Sun keyboard is being used on the console. In other words, you must ensure that the Sunmarked port has not been selected if you are already using a Sun keyboard.
Left + left + <6> + Selects a computer connected to port C of a Slave connected to port 6 of the Master. Auto Scan, automatically scans power-on computers one by one at a fixed interval: Left + left + When Auto Scan detects any keyboard or mouse activity, it suspends the scanning till activity stops; it then resumes with the next computer in sequence. The length of the Auto Scan interval (Scan Rate) is adjustable, see below.
To change the leading hotkey sequence to Right : Left , Left , hold , press Right All hotkey commands that previously required pressing the Left will be switched to requiring the right instead. To change the leading hotkey sequence back to Left : Right , Right , hold , press Left Sun/Mac Keyboard Mapping The KVM Switch emulates a Sun Keyboard when a computer is marked with a Sun, in the OSD menu by Function Key .
Press right and release Press right and release Press right and release Press right and release Press right and release Press right and release Press right and release Press right and release Press right and release right < > left < < > right < > rig
Specifications CAB831HDU Number of Ports Connectors 16 8 x DE-15 PC connectors 16 x DE-15 PC connectors 1 x VGA female output 1 x VGA female output 1 x DC Power 1 x DC Power Inactive: 2 x USB female input (keyboard/mouse) Inactive: 2 x USB female input (keyboard/mouse) Maximum Resolution 1920x1440 On Screen Display Port Switching Control Yes Hot-keys, OSD, Push Button Auto Scan Yes Auto Scan Interval Power Adapter Included 3, 8, 15, 30 No (included with 1UCABCONS) Operating Temperature 5
Technical Support StarTech.com’s lifetime technical support is an integral part of our commitment to provide industry-leading solutions. If you ever need help with your product, visit www.startech.com/support and access our comprehensive selection of online tools, documentation, and downloads. For the latest drivers/software, please visit www.startech.com/downloads Warranty Information This product is backed by a three year warranty. In addition, StarTech.
Hard-to-find made easy. At StarTech.com, that isn’t a slogan. It’s a promise. StarTech.com is your one-stop source for every connectivity part you need. From the latest technology to legacy products — and all the parts that bridge the old and new — we can help you find the parts that connect your solutions. We make it easy to locate the parts, and we quickly deliver them wherever they need to go. Just talk to one of our tech advisors or visit our website.